Pricing
Go to app
User Name
Upgrade Help Center

HubSpot: manage your Contacts in LiveChat

Wojciech Pollok
6 min read
updated: Dec 11, 2024

HubSpot is your all-in-one CRM that makes business growth a joyful experience. It’s packed with AI-powered tools to attract leads, close deals, and nurture customers. It streamlines everything from marketing through sales to support.

HubSpot helps you focus on what matters the most: growing your business and delighting your customers.
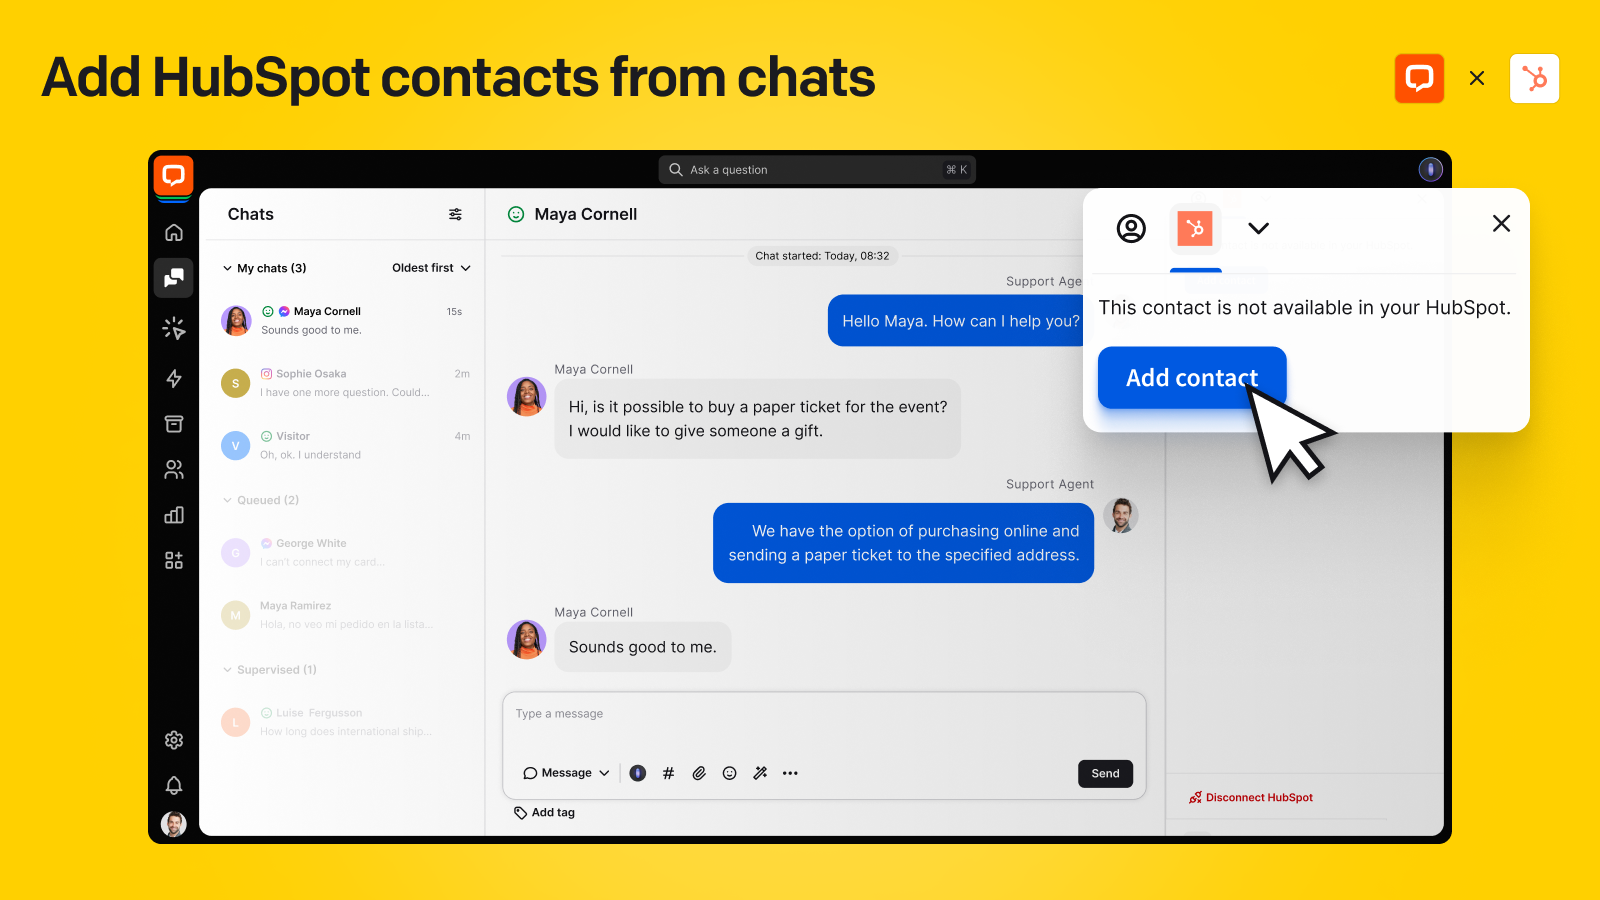
Integrate HubSpot with LiveChat to:

- Easily turn your website visitors into HubSpot contacts.

- Review your contacts information and manage it in the LiveChat app.

- Assign chat transcripts and notes to keep valuable data in sight.

- Next: Integrate and automate.

Keep your customer interactions and key details in one place. Give your team a complete view to deliver personalized service.

Integrate HubSpot with LiveChatLink icon

  1. Navigate to the HubSpot app on the LiveChat Marketplace.
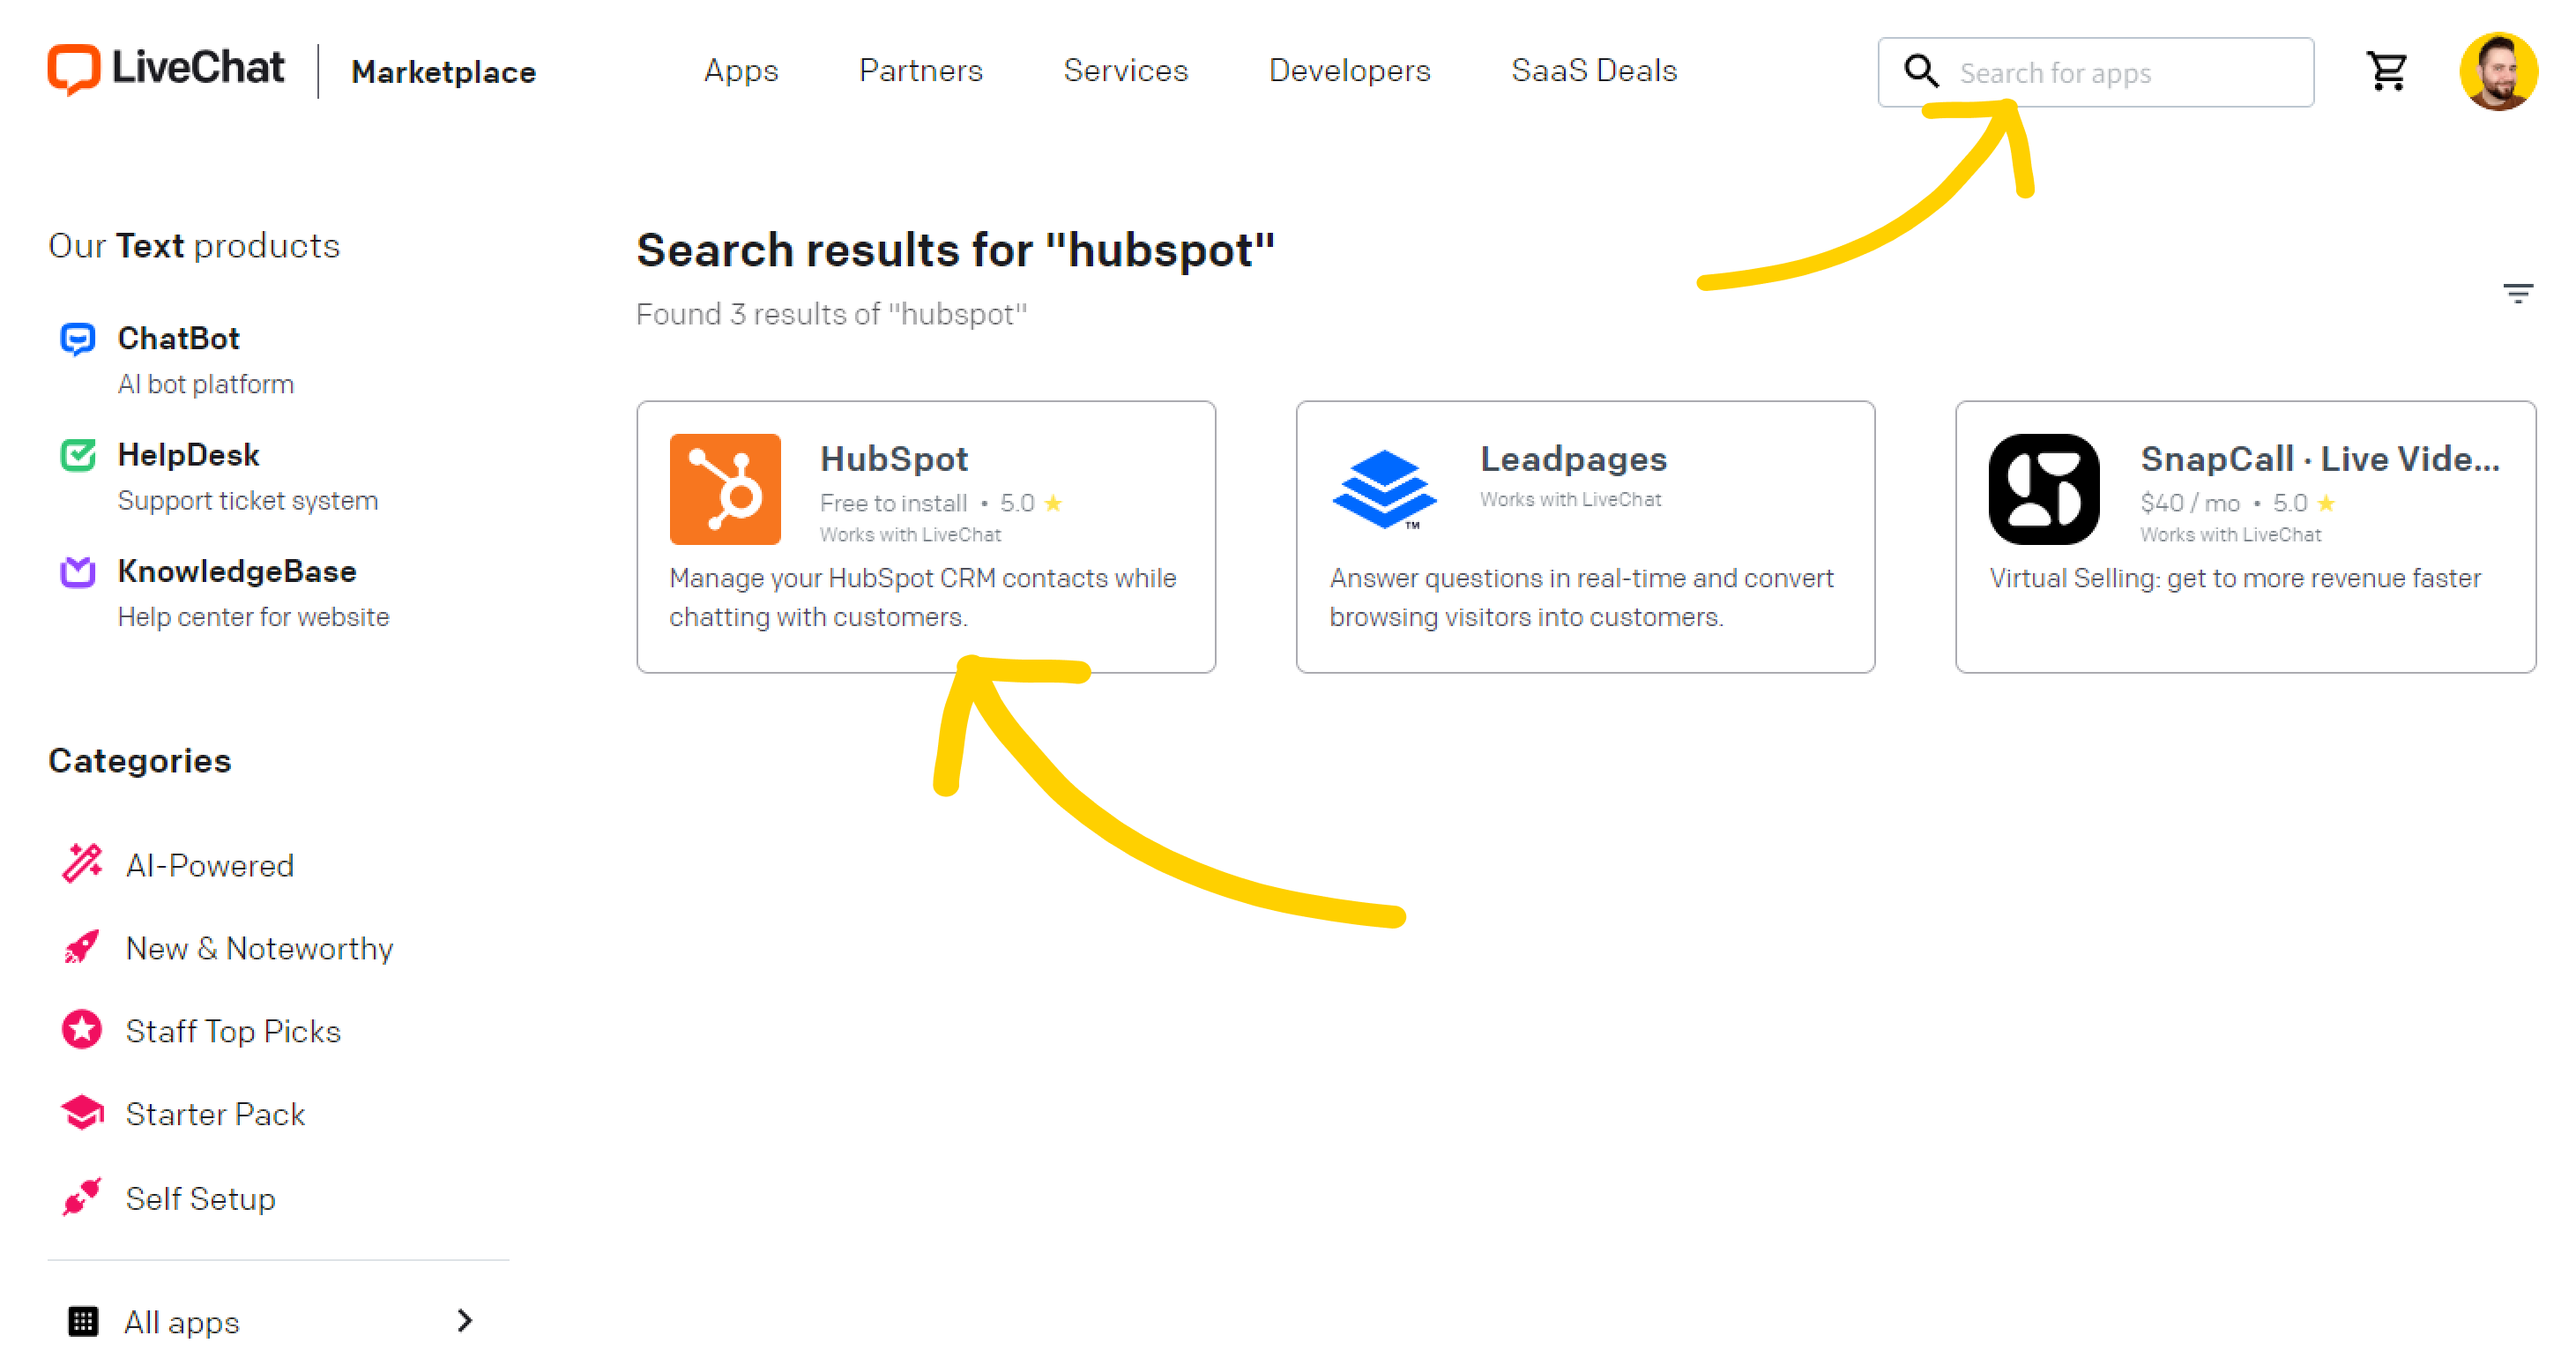
  1. Select Get. You should see a green toast confirming the successful installation.

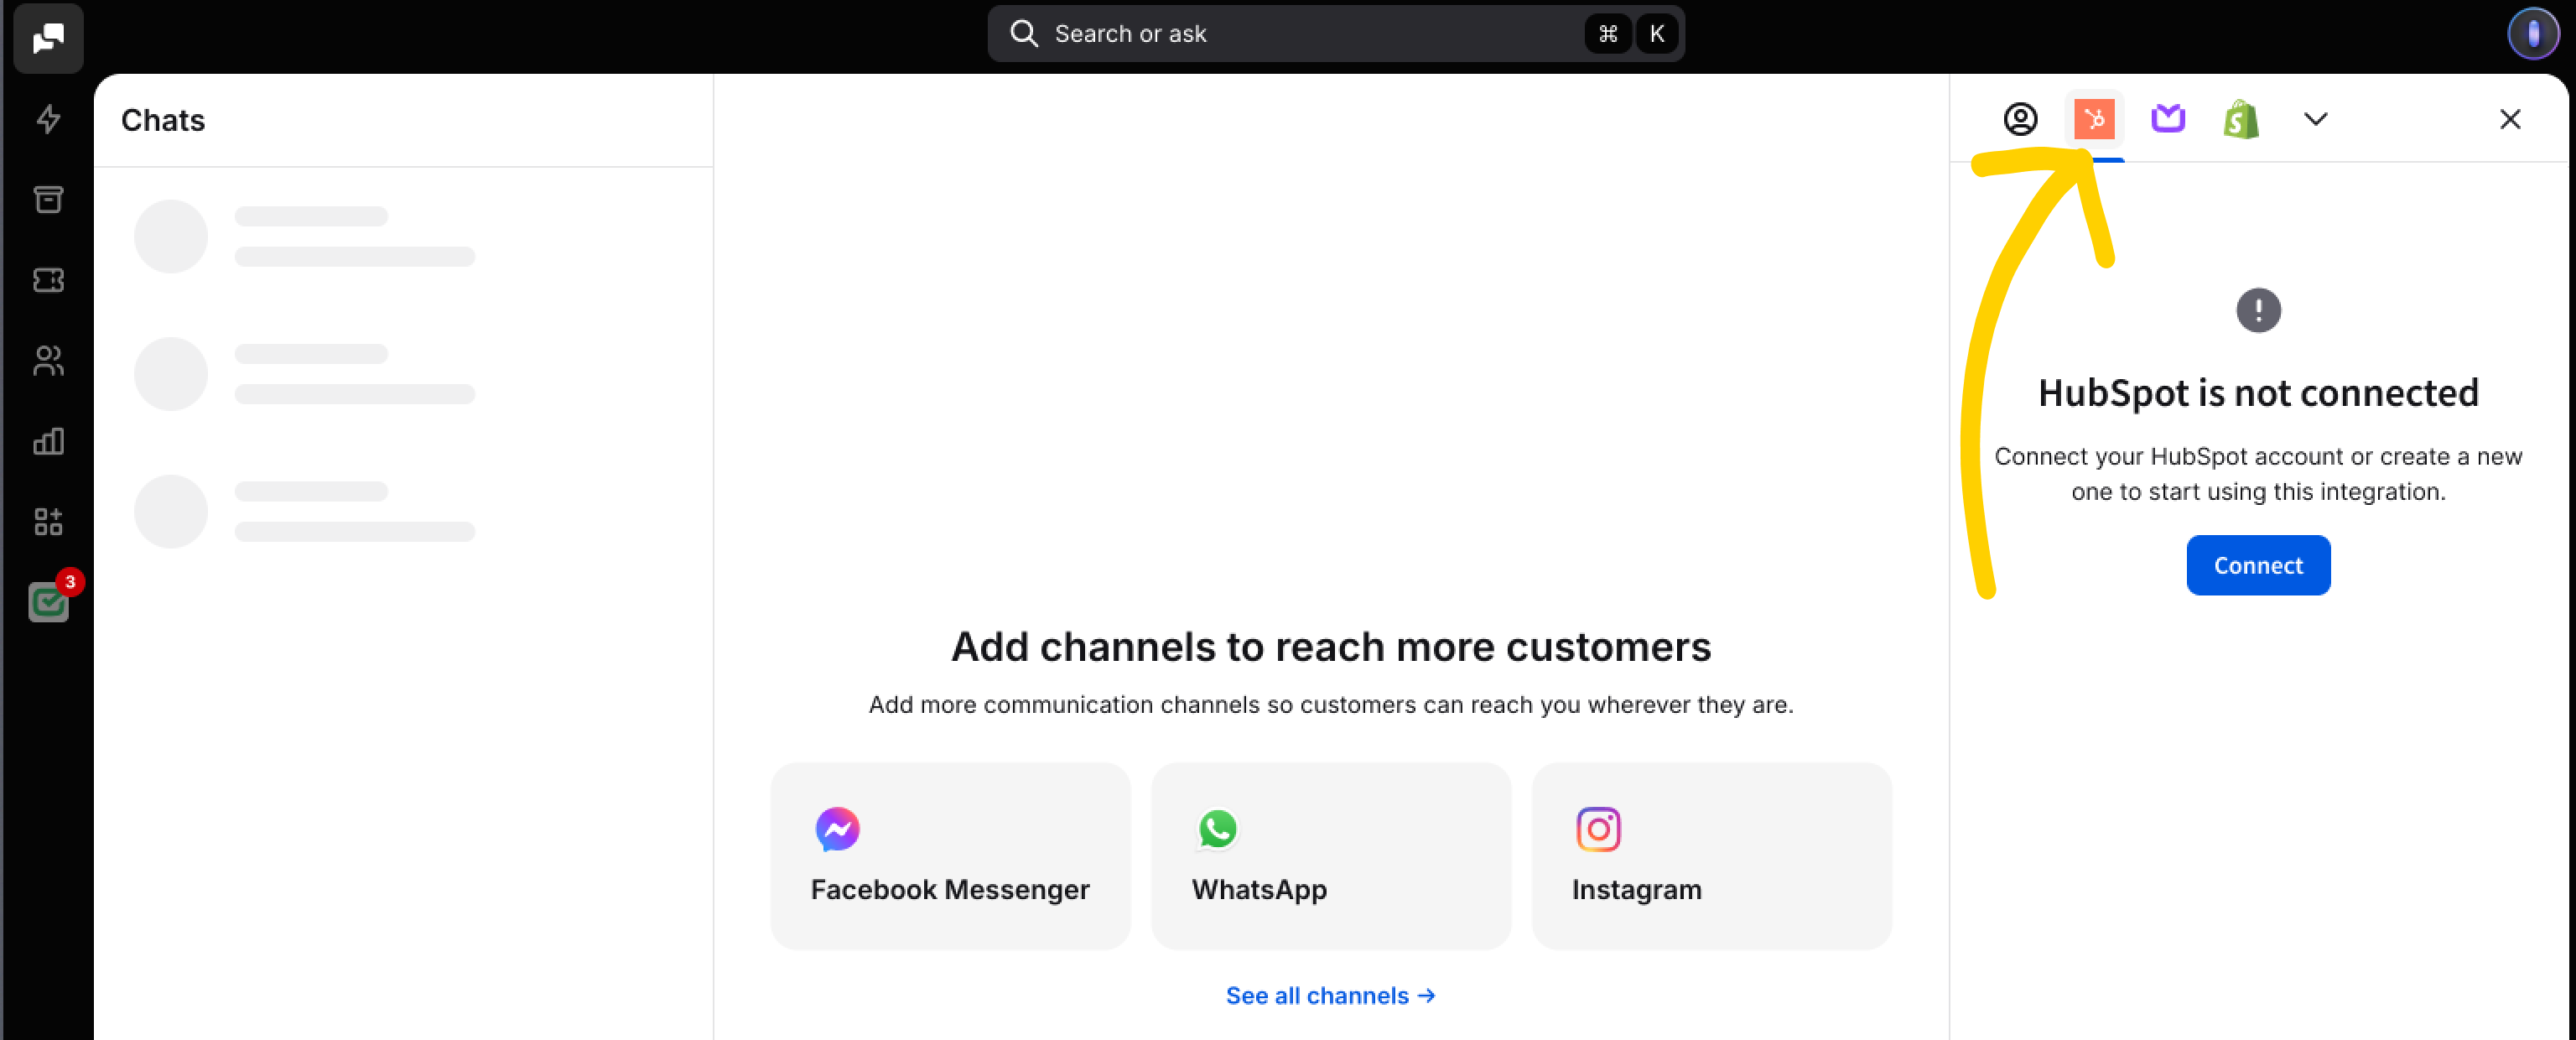
  2. Navigate to the Chats section. Select the HubSpot icon on the Details column.
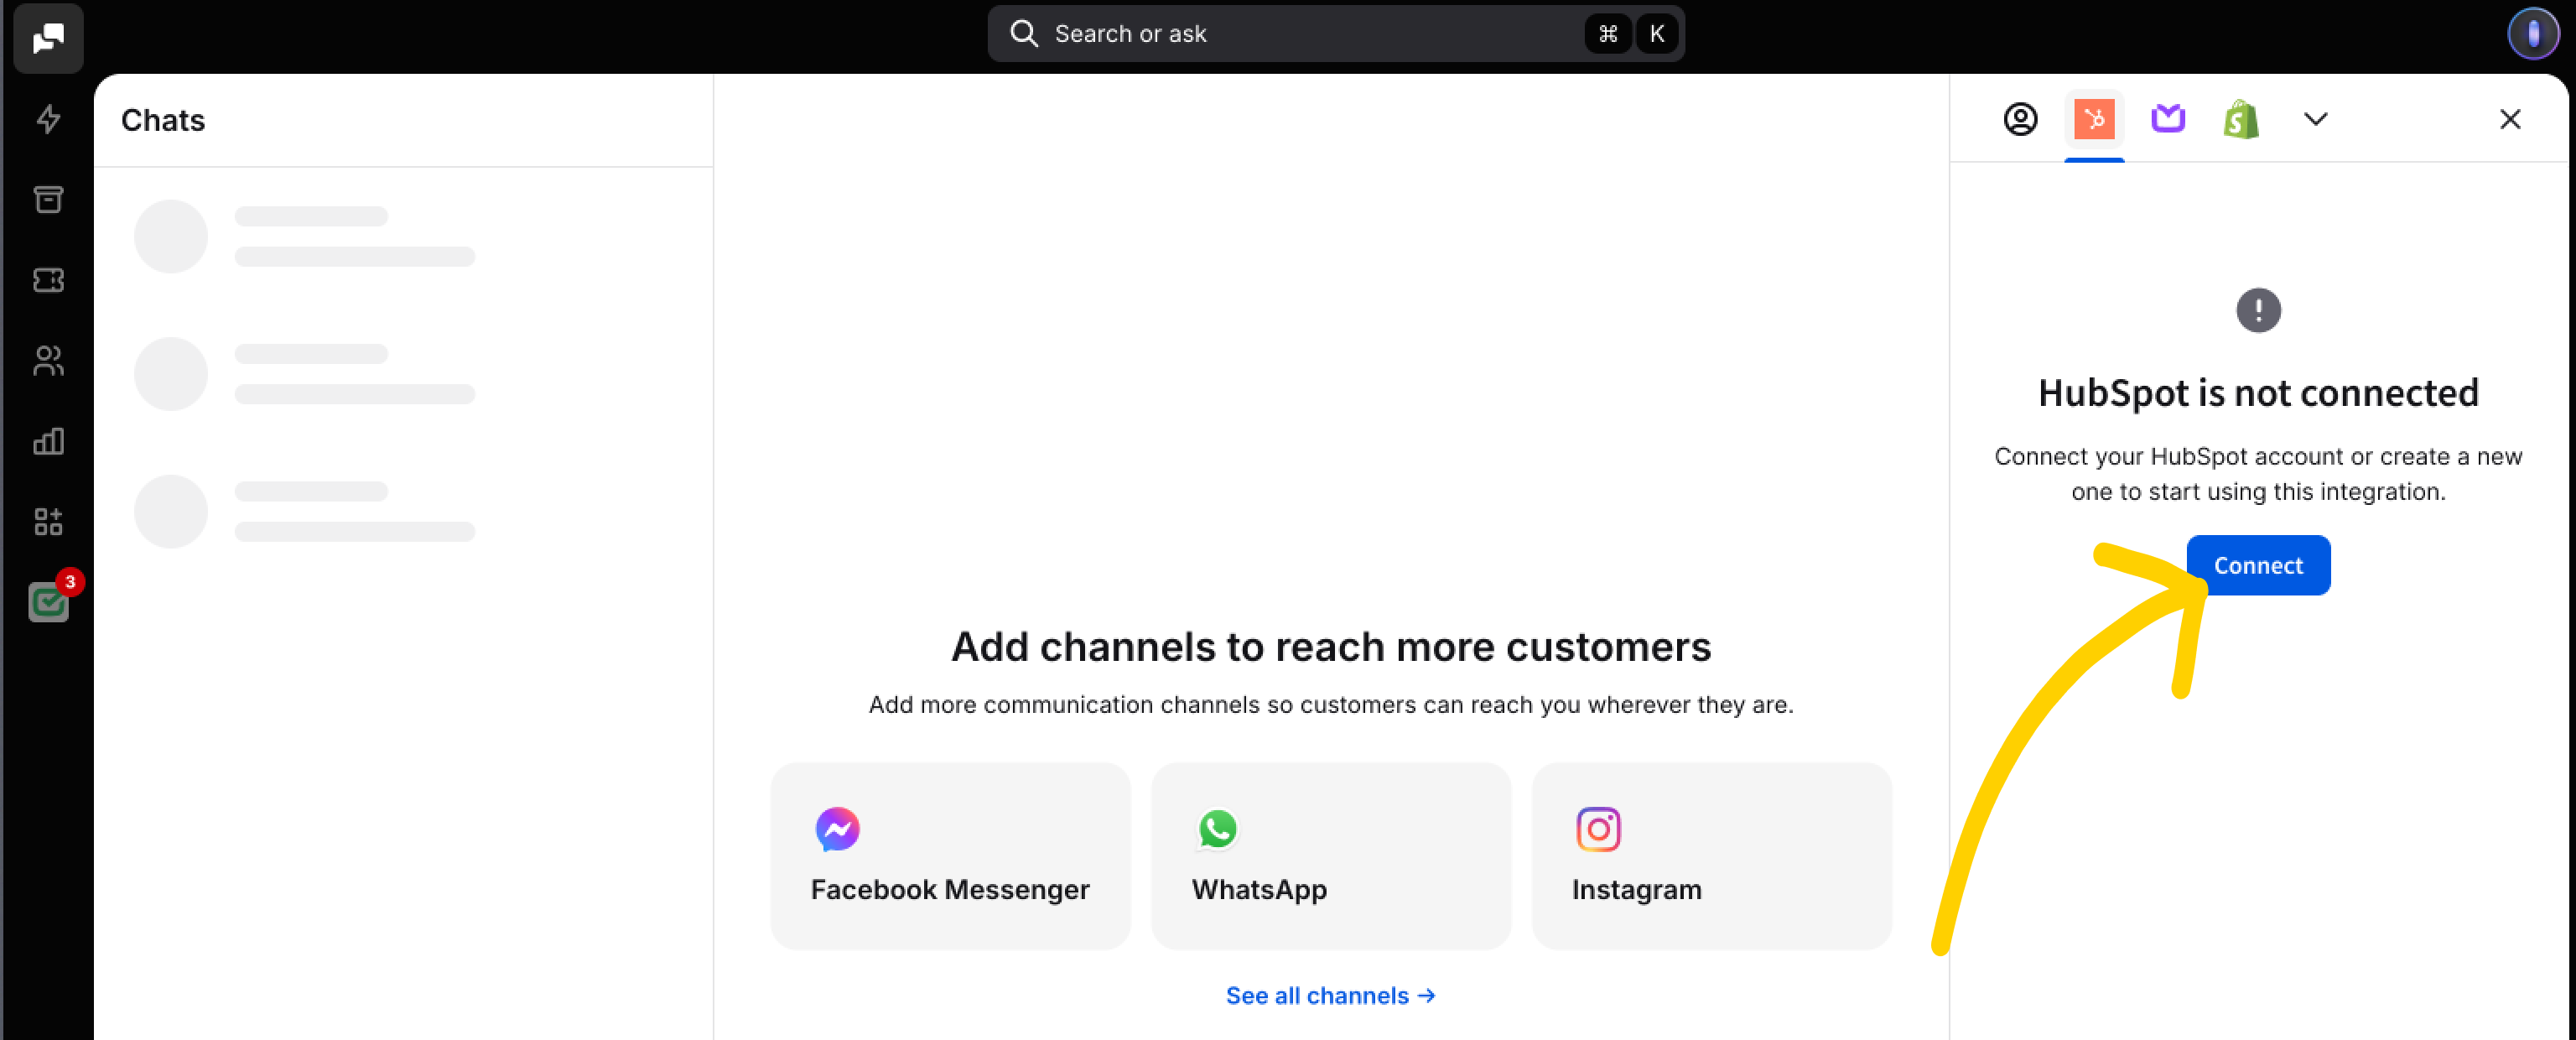
  1. Select Connect to link your Hubspot account with LiveChat.
  1. You will be prompted with the Hubspot authorization screen. There, provide your Hubspot credentials and select Log in. Choose the HubSpot account you want to integrate with your LiveChat. Select Choose Account.
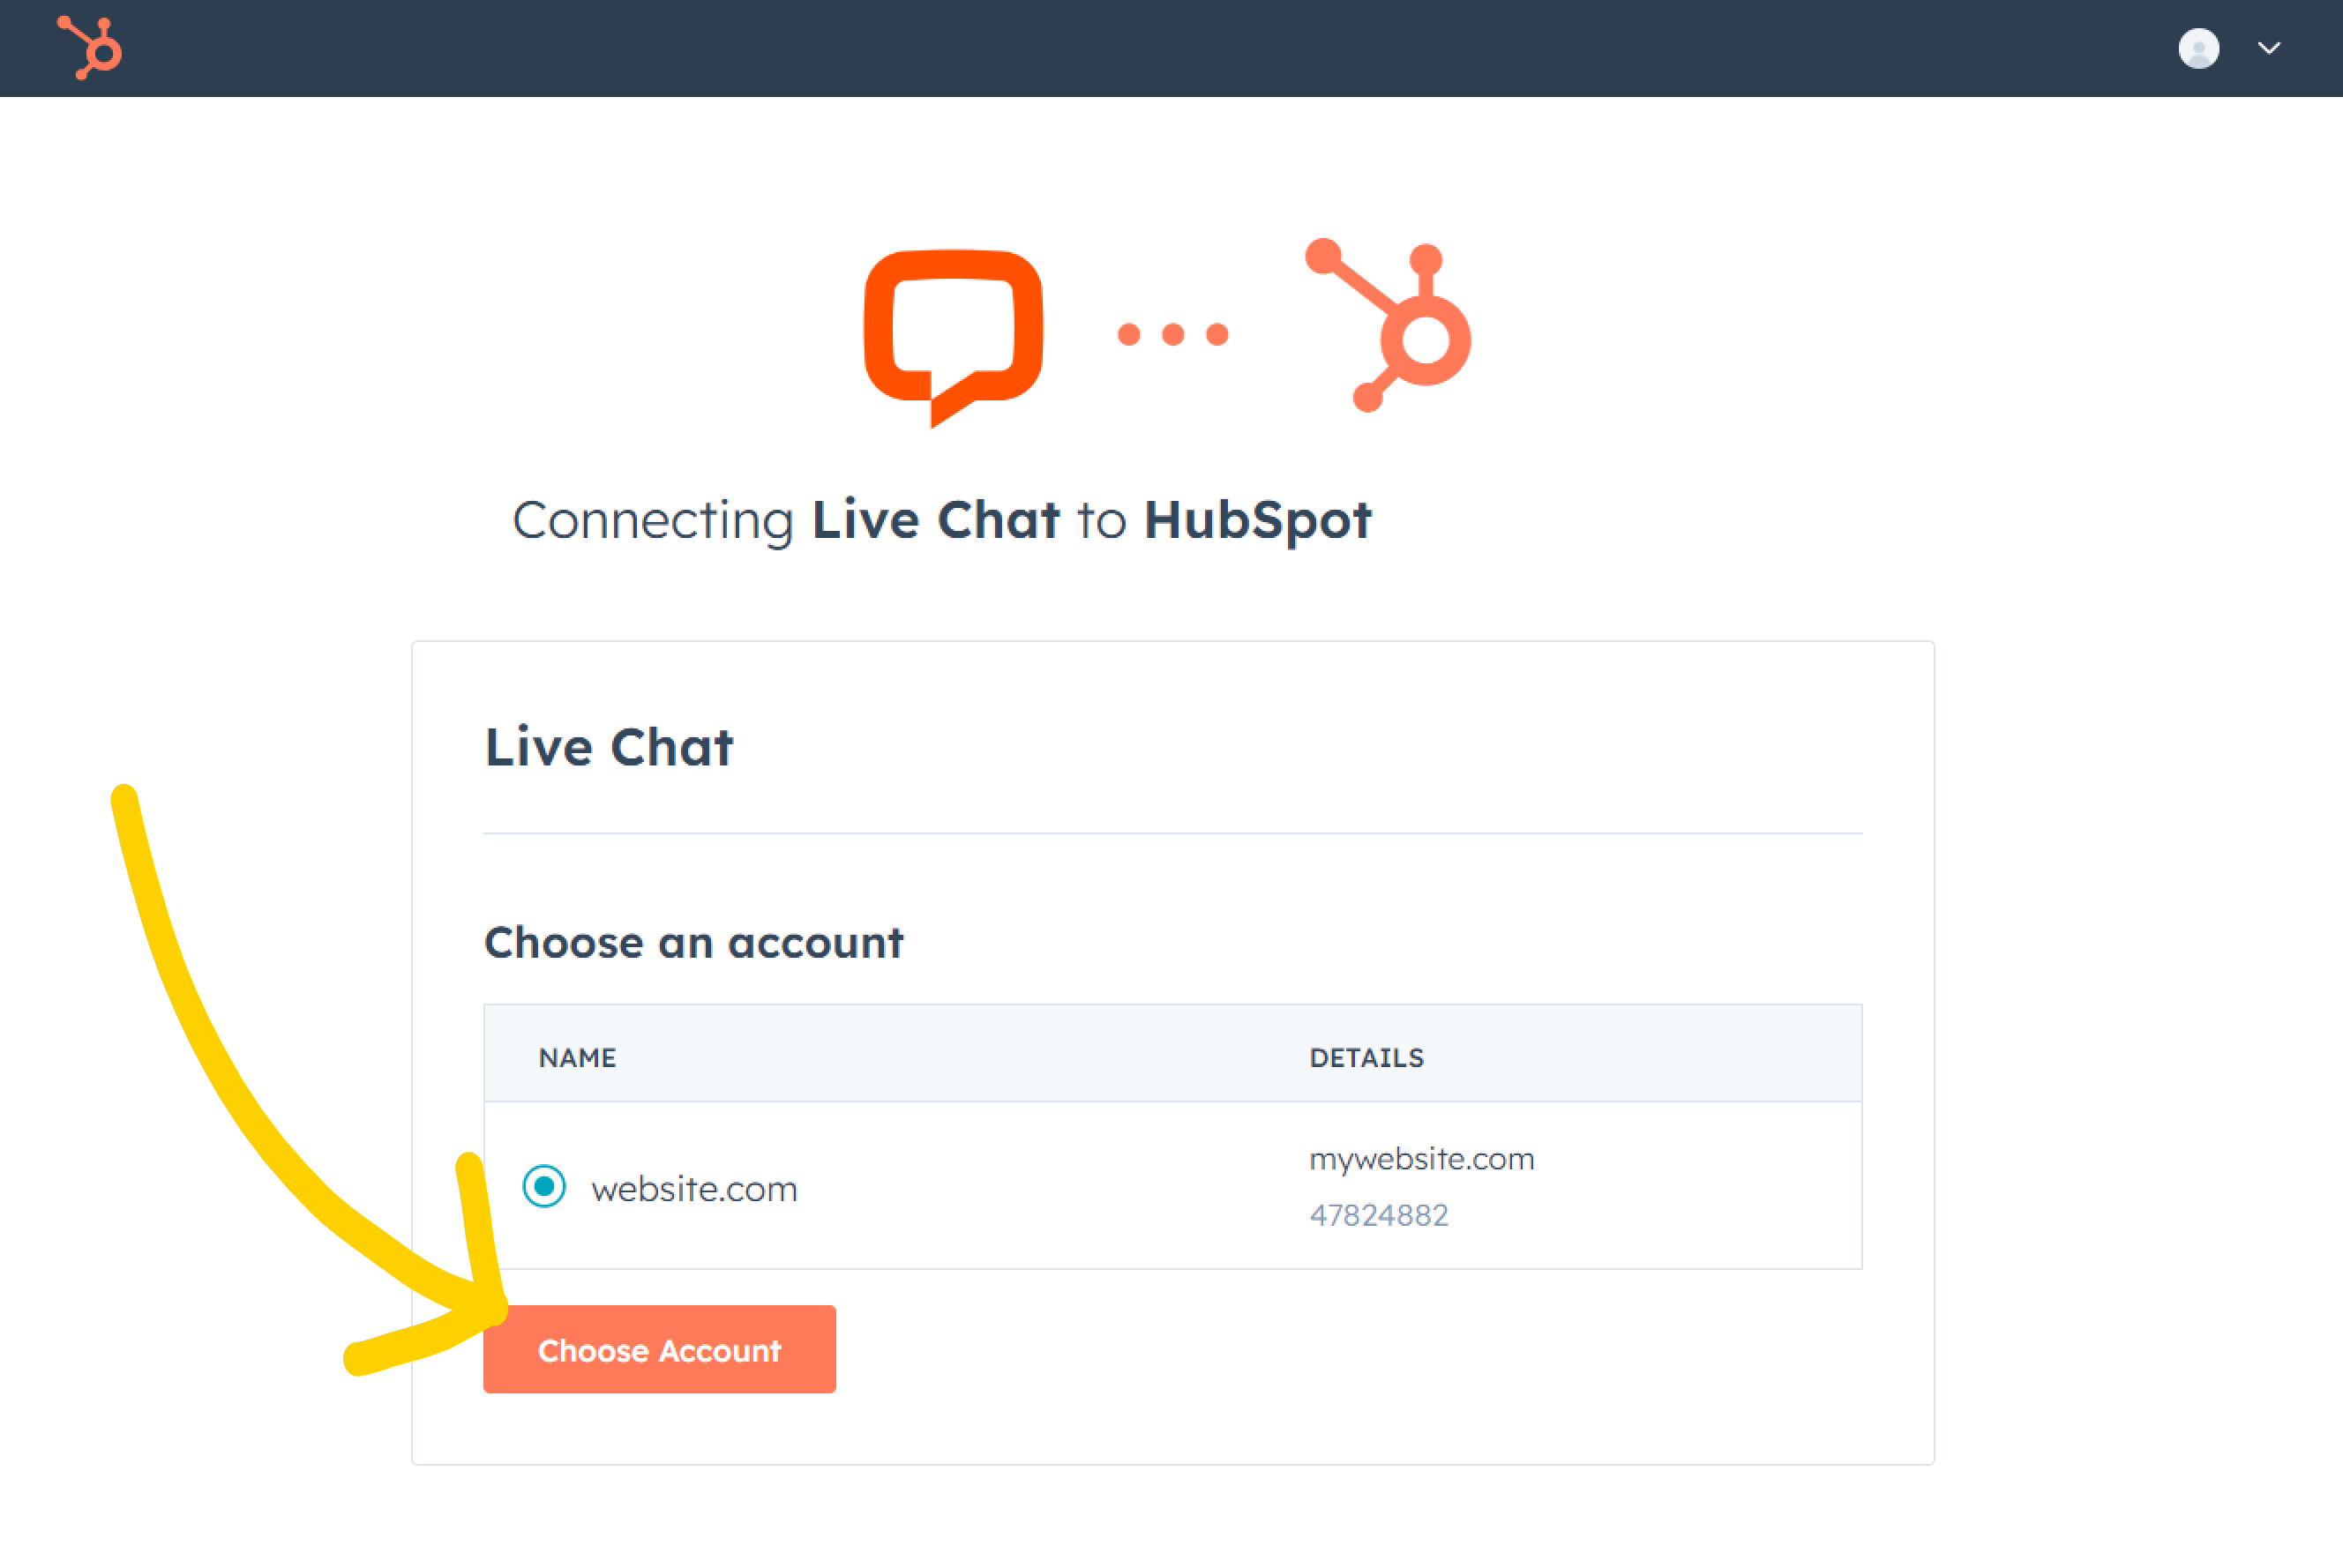
  1. All that is left is to grant access to your HubSpot account…
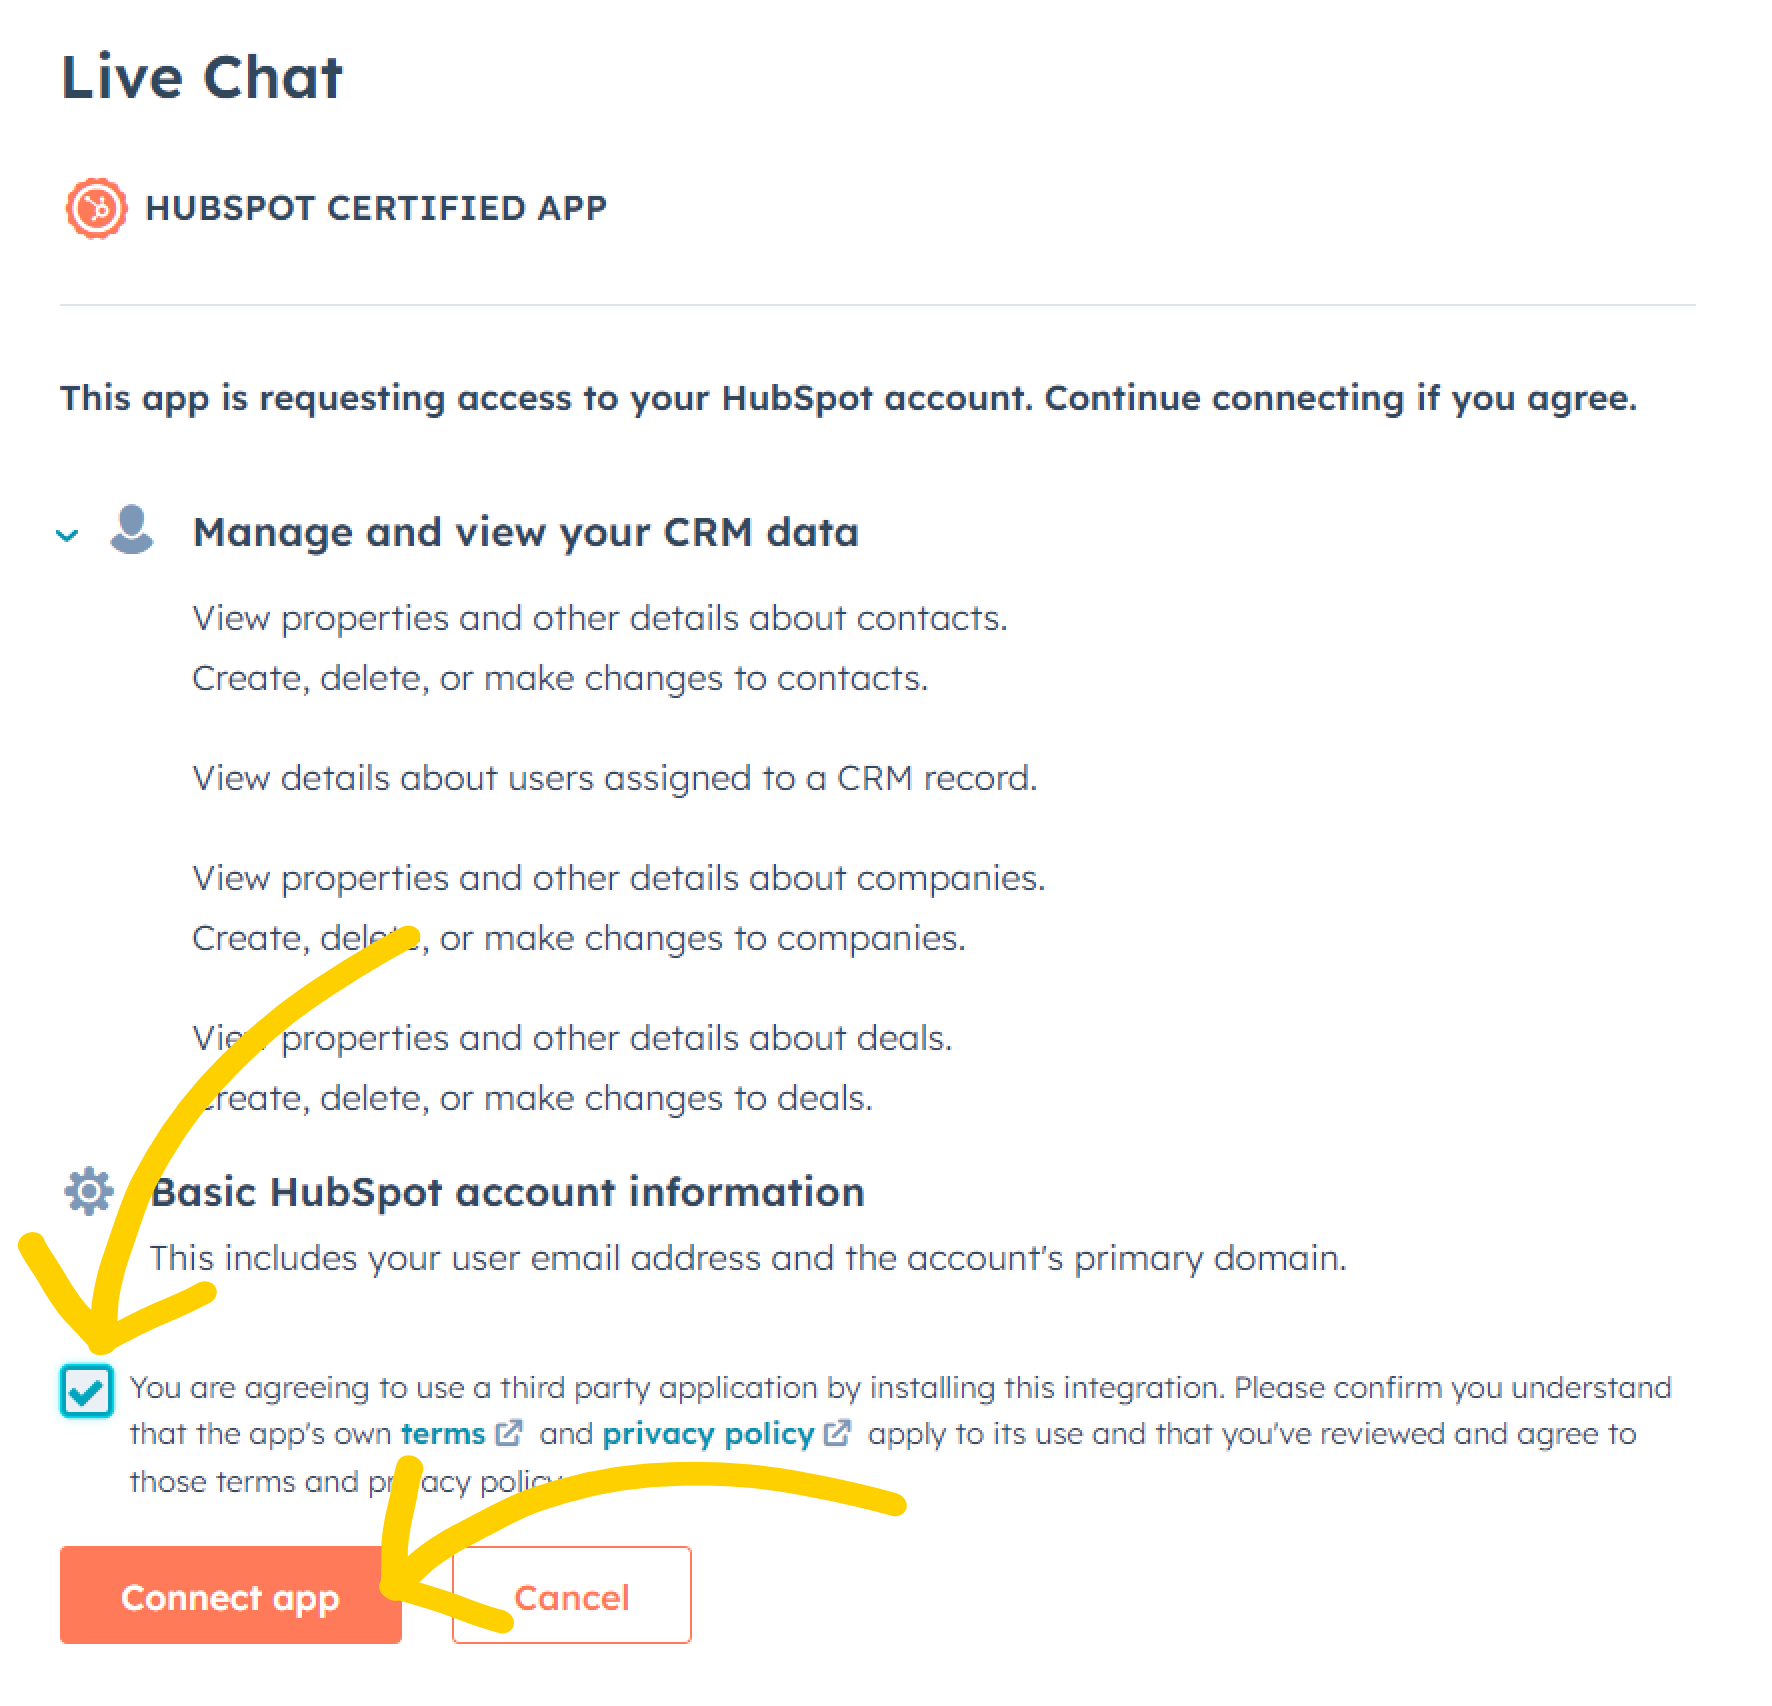
…and done! Your HubSpot is now connected with LiveChat. You can start making new HubSpot contacts directly from LiveChat, make notes and log full chat history! 

Read on to learn how ▶️

Create HubSpot contacts with LiveChatLink icon

  • Stop copying and pasting customer data to your CRM. Create HubSpot contacts from LiveChat chats in a jiffy.
  • Keep your customer database up-to-date in real time. 
If you want to add and see your HubSpot contacts data inside LiveChat, enable a pre-chat form with a mandatory email address field. LiveChat will be able to match your contacts with chatting customers based on the email addresses they provide in the form.
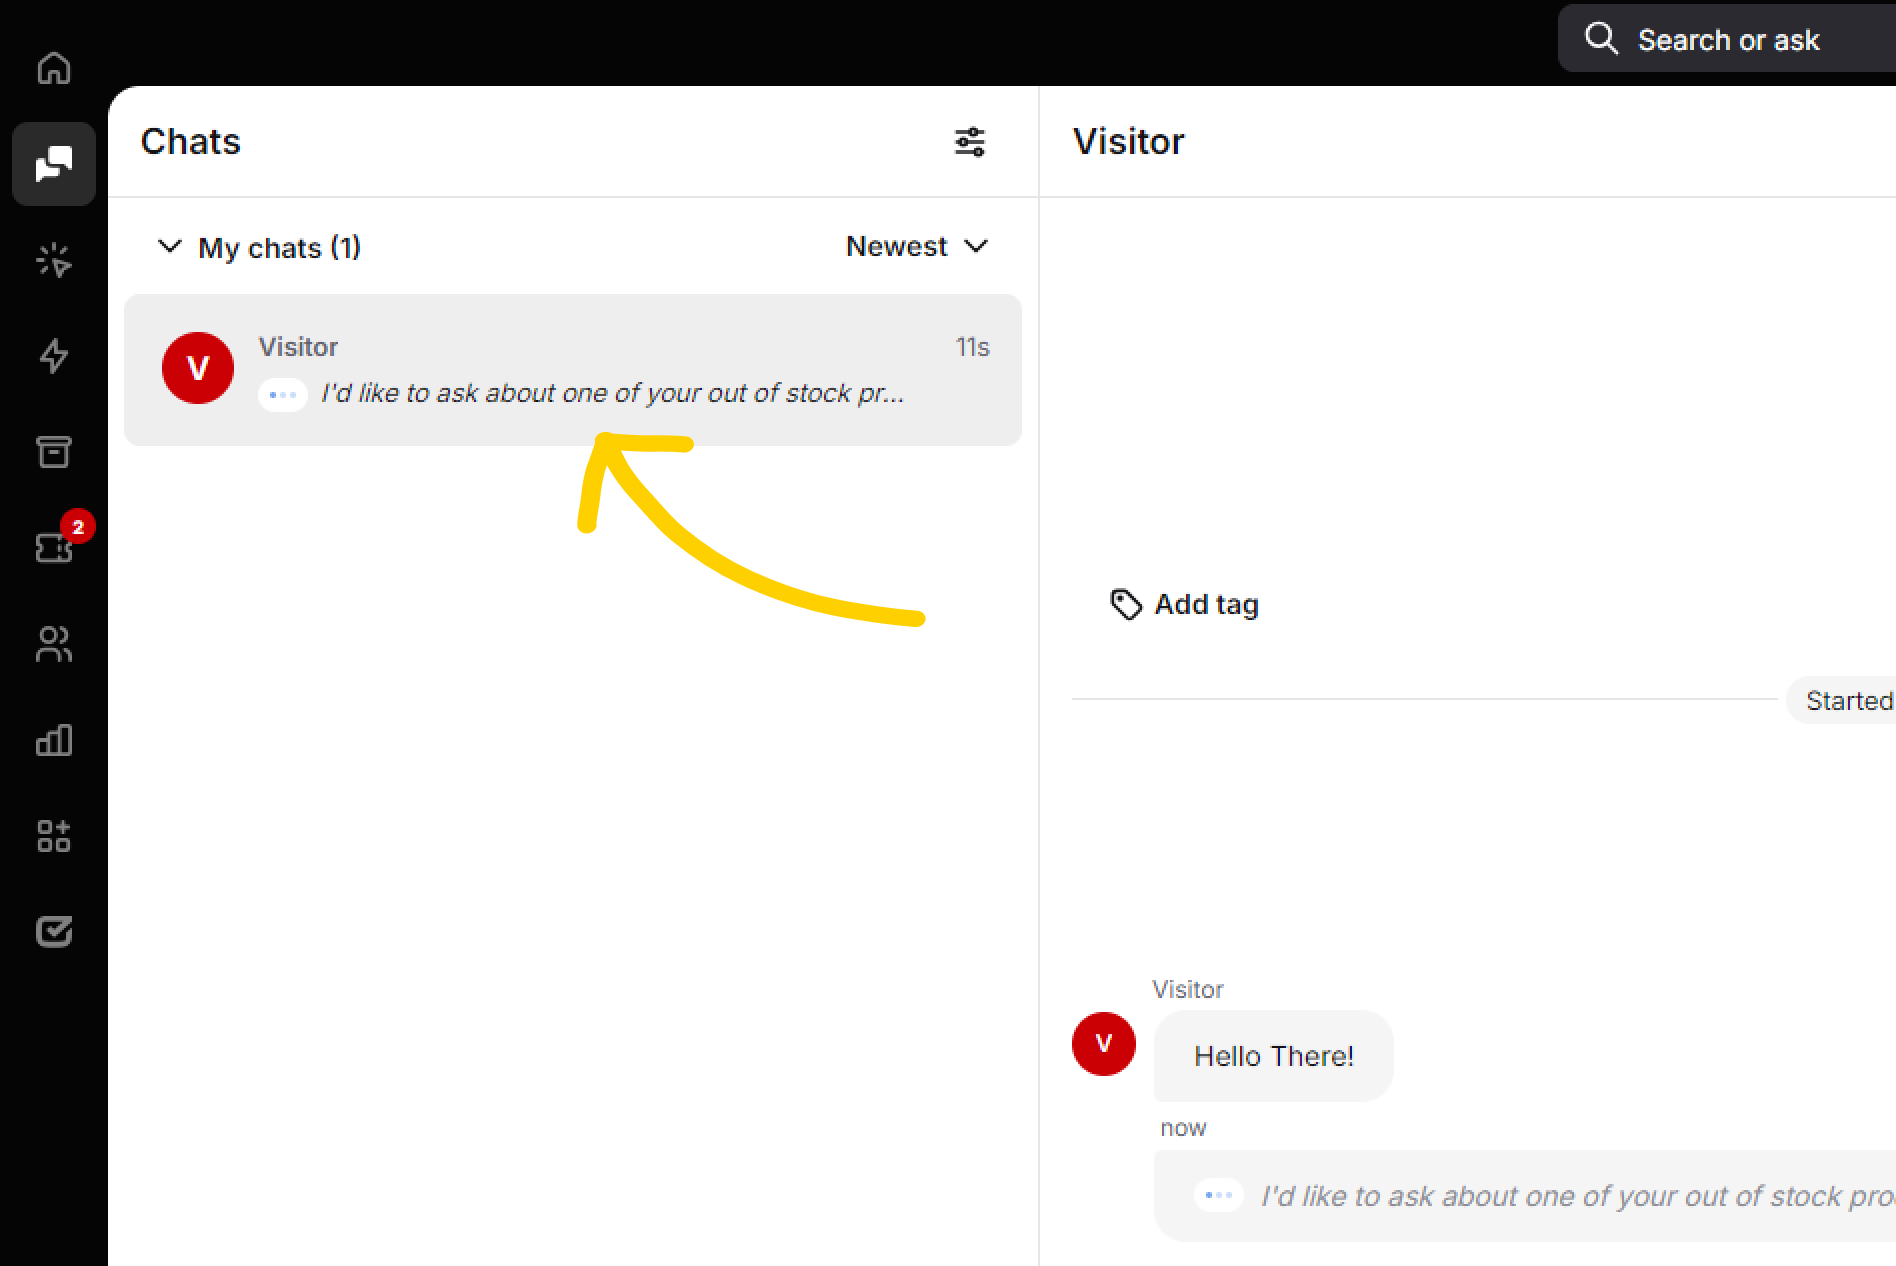
  1. Start in the Chats section. Select one of your ongoing conversations to proceed.
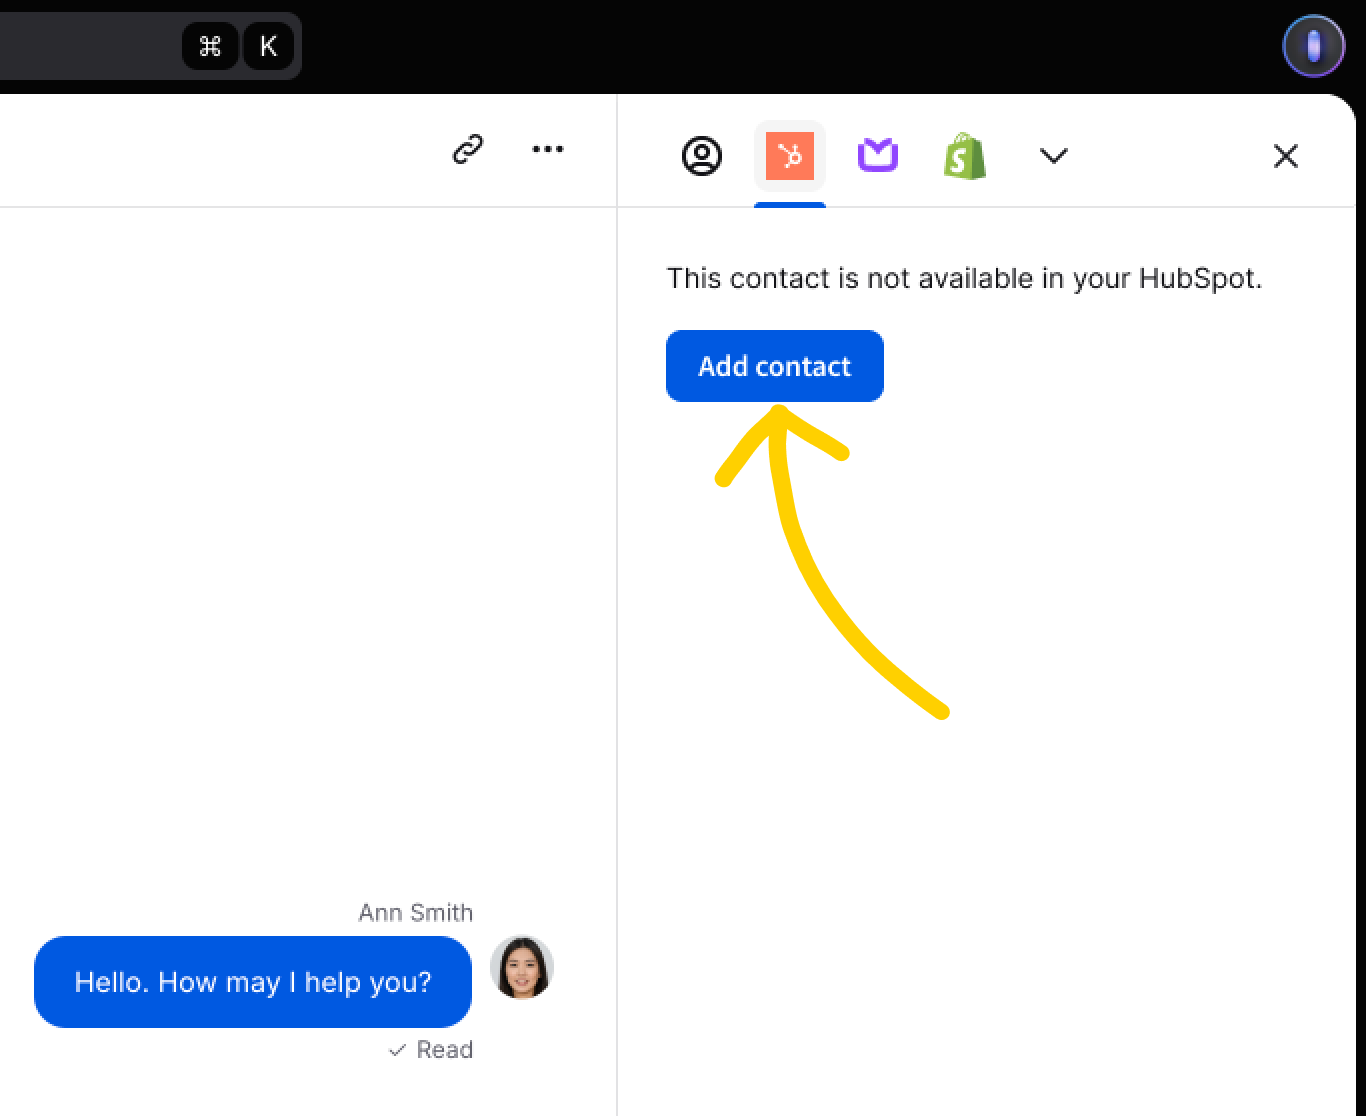
  1. Open the HubSpot tab, by selecting the HubSpot icon available at the top of the Details column.
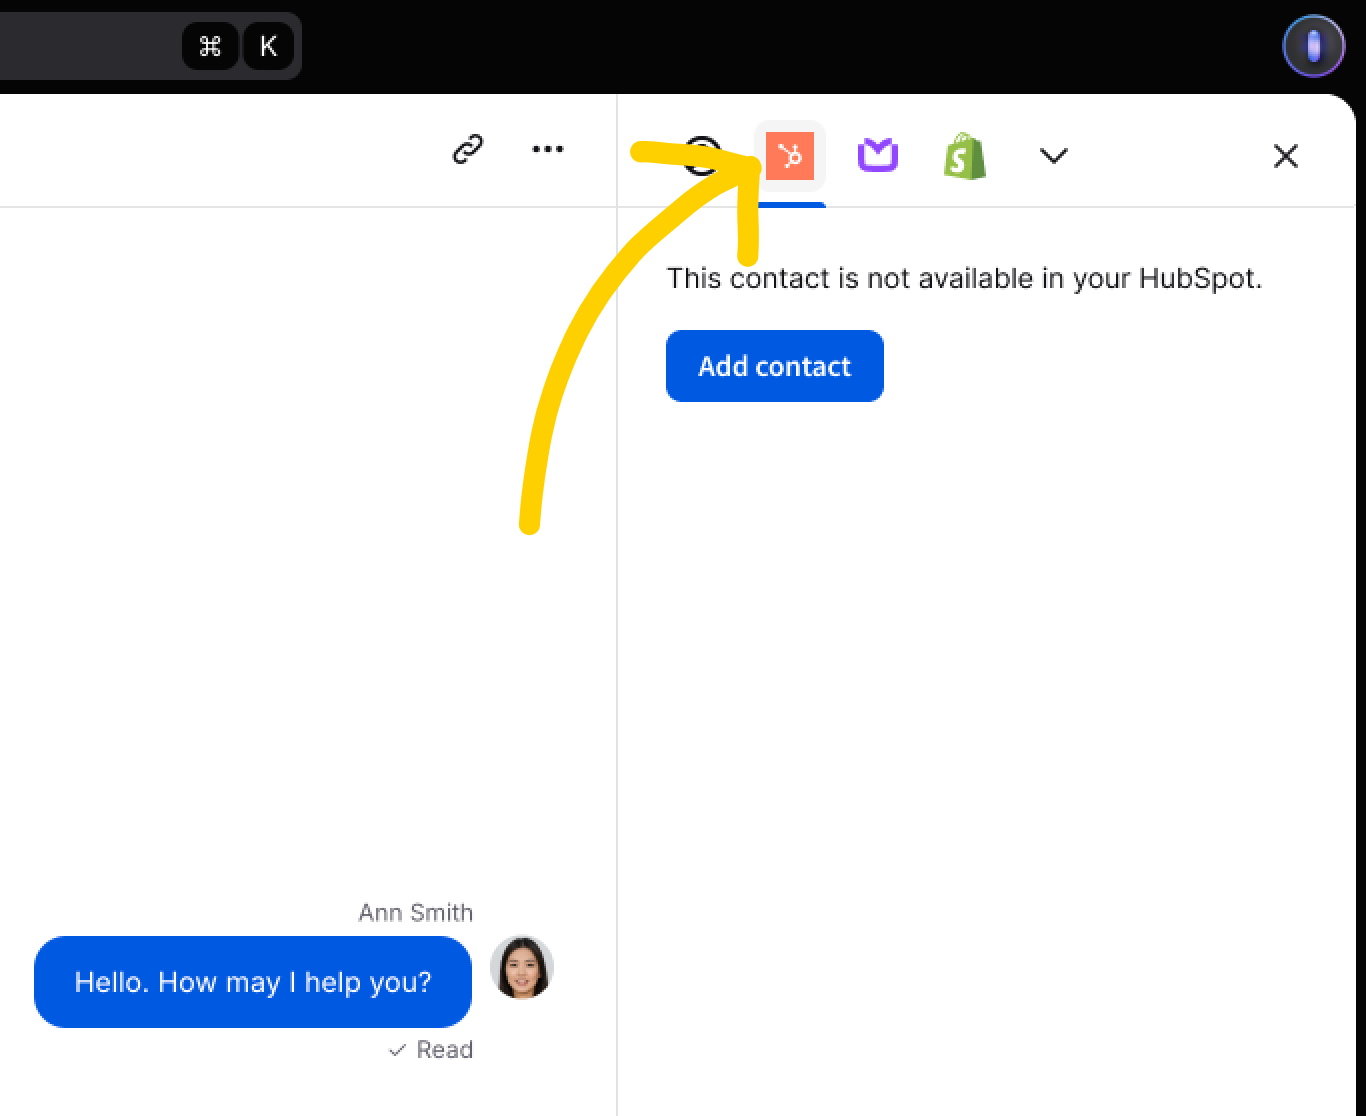
  1. Select the Add contact button.

  1. That’s it! Your customer is now listed as a contact, and their data will be visible in LiveChat and in your HubSpot dashboard.
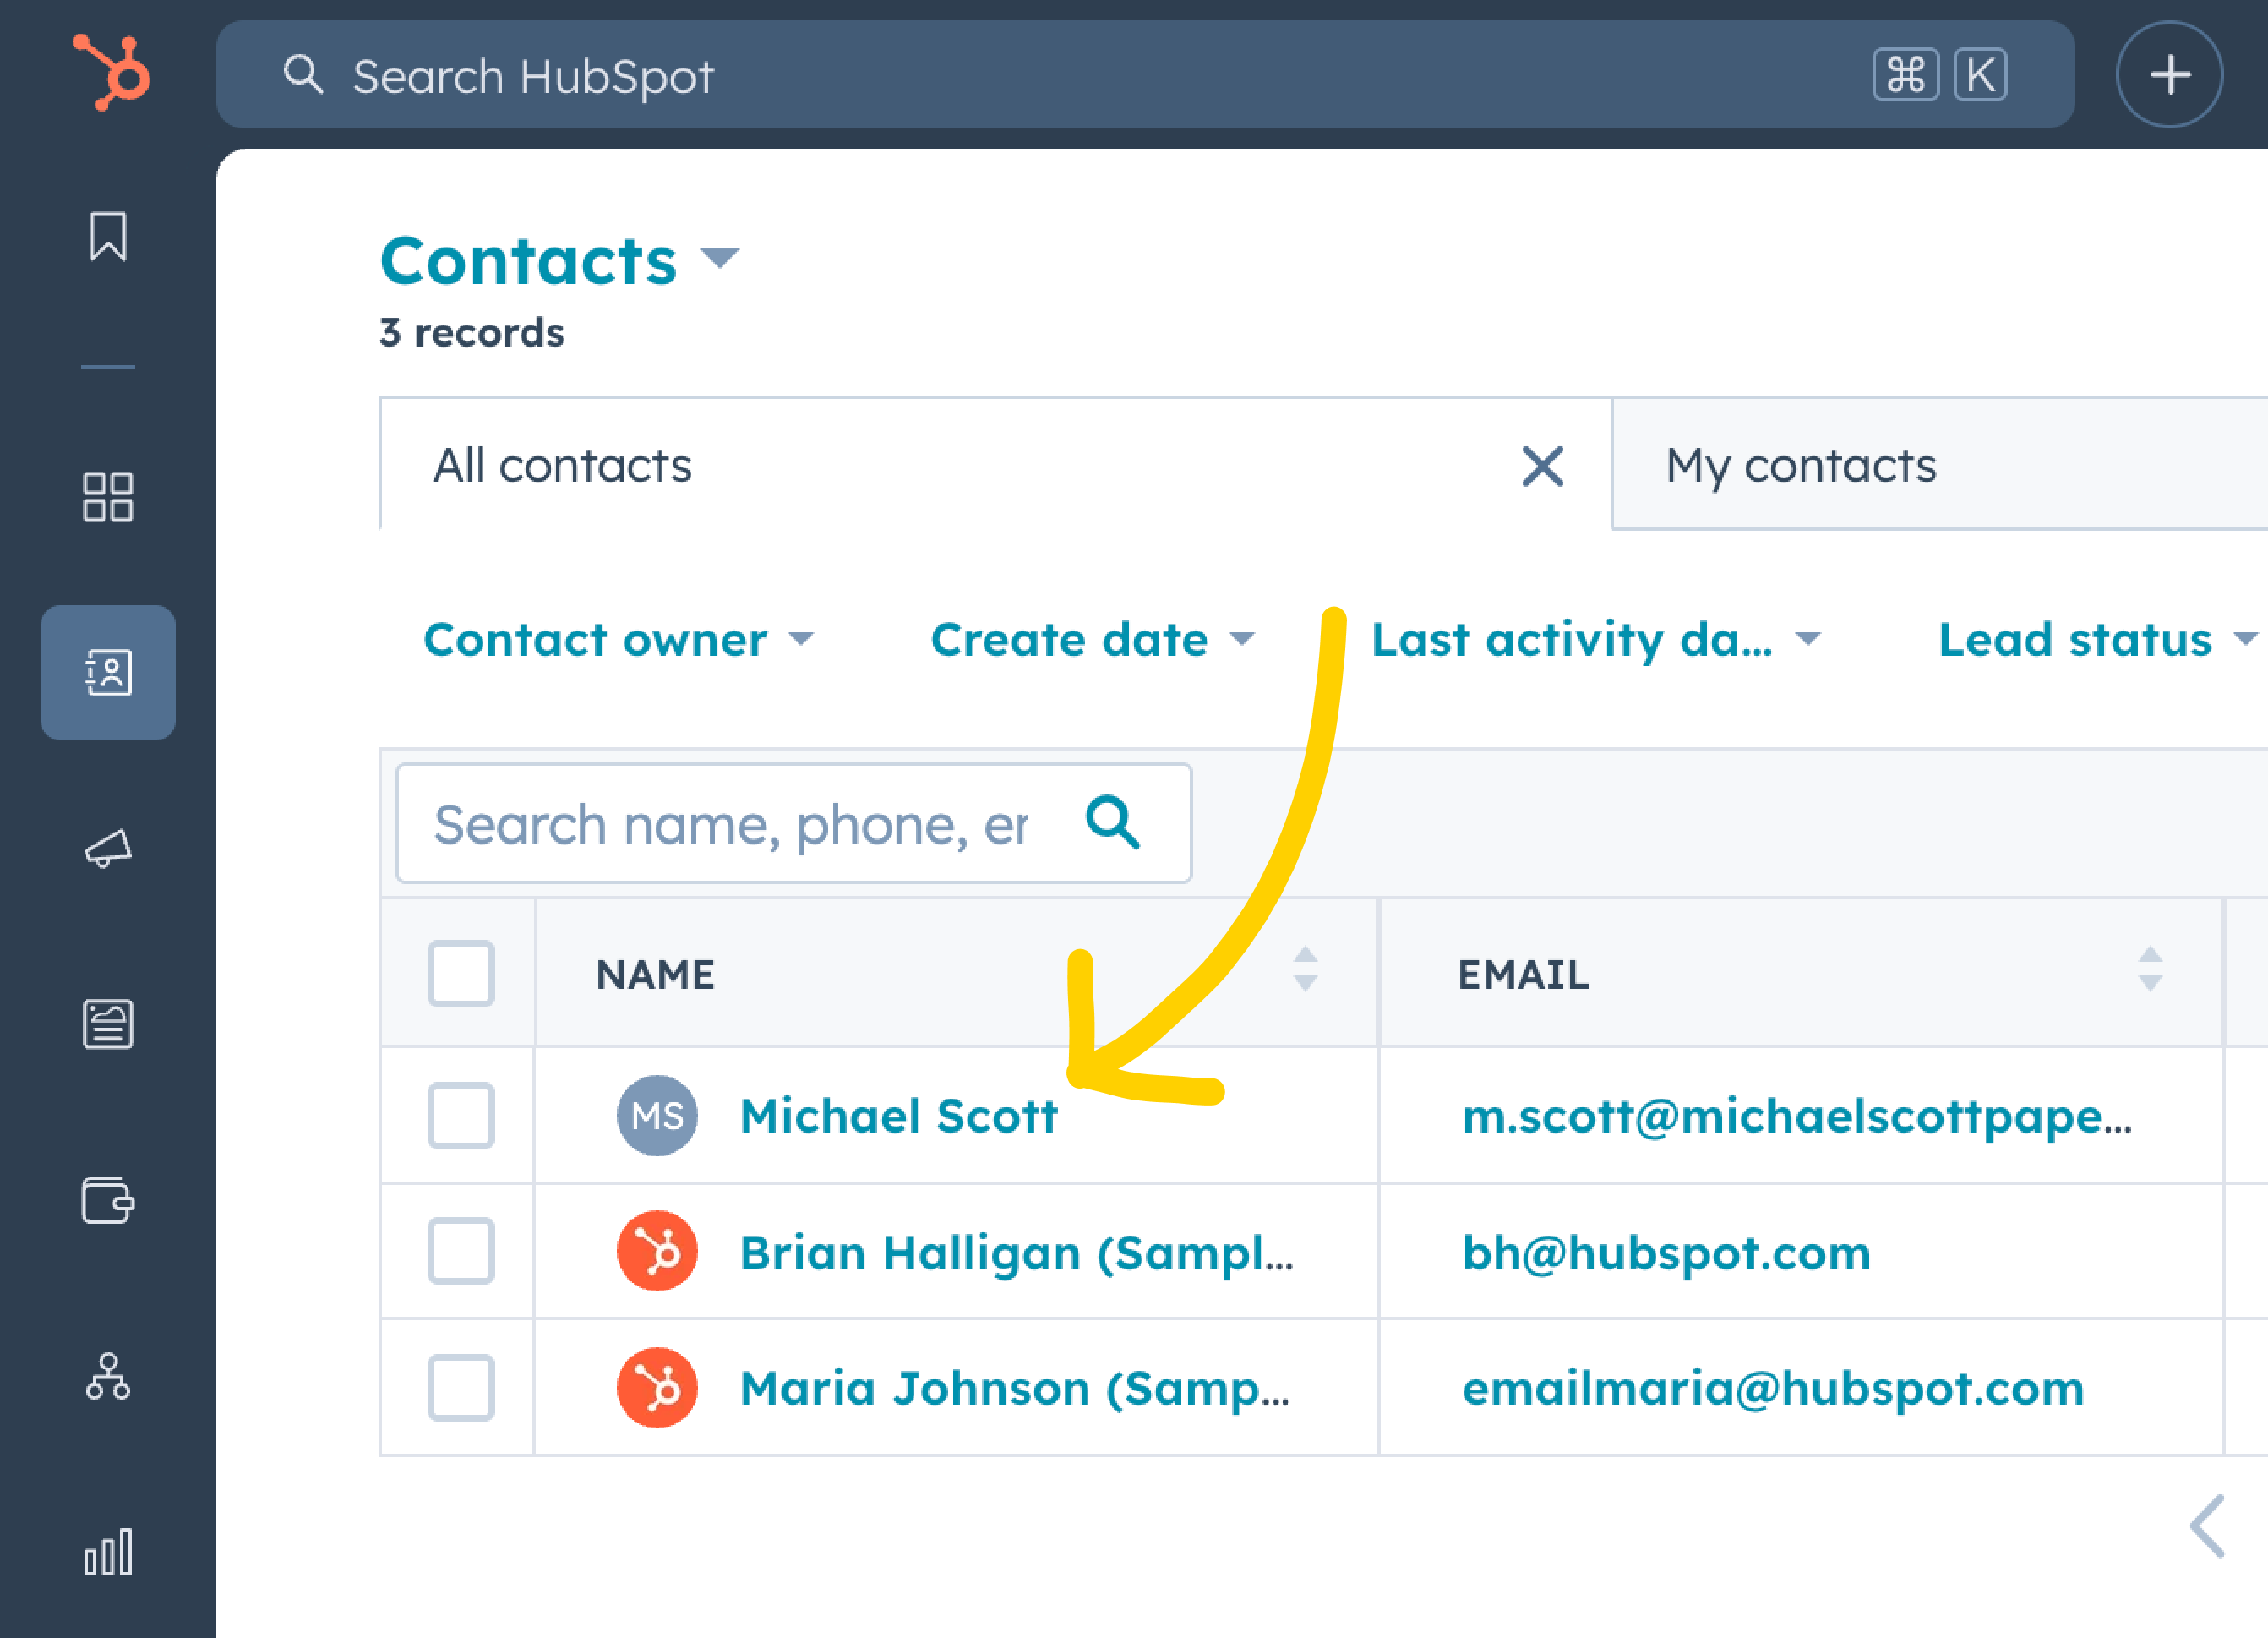
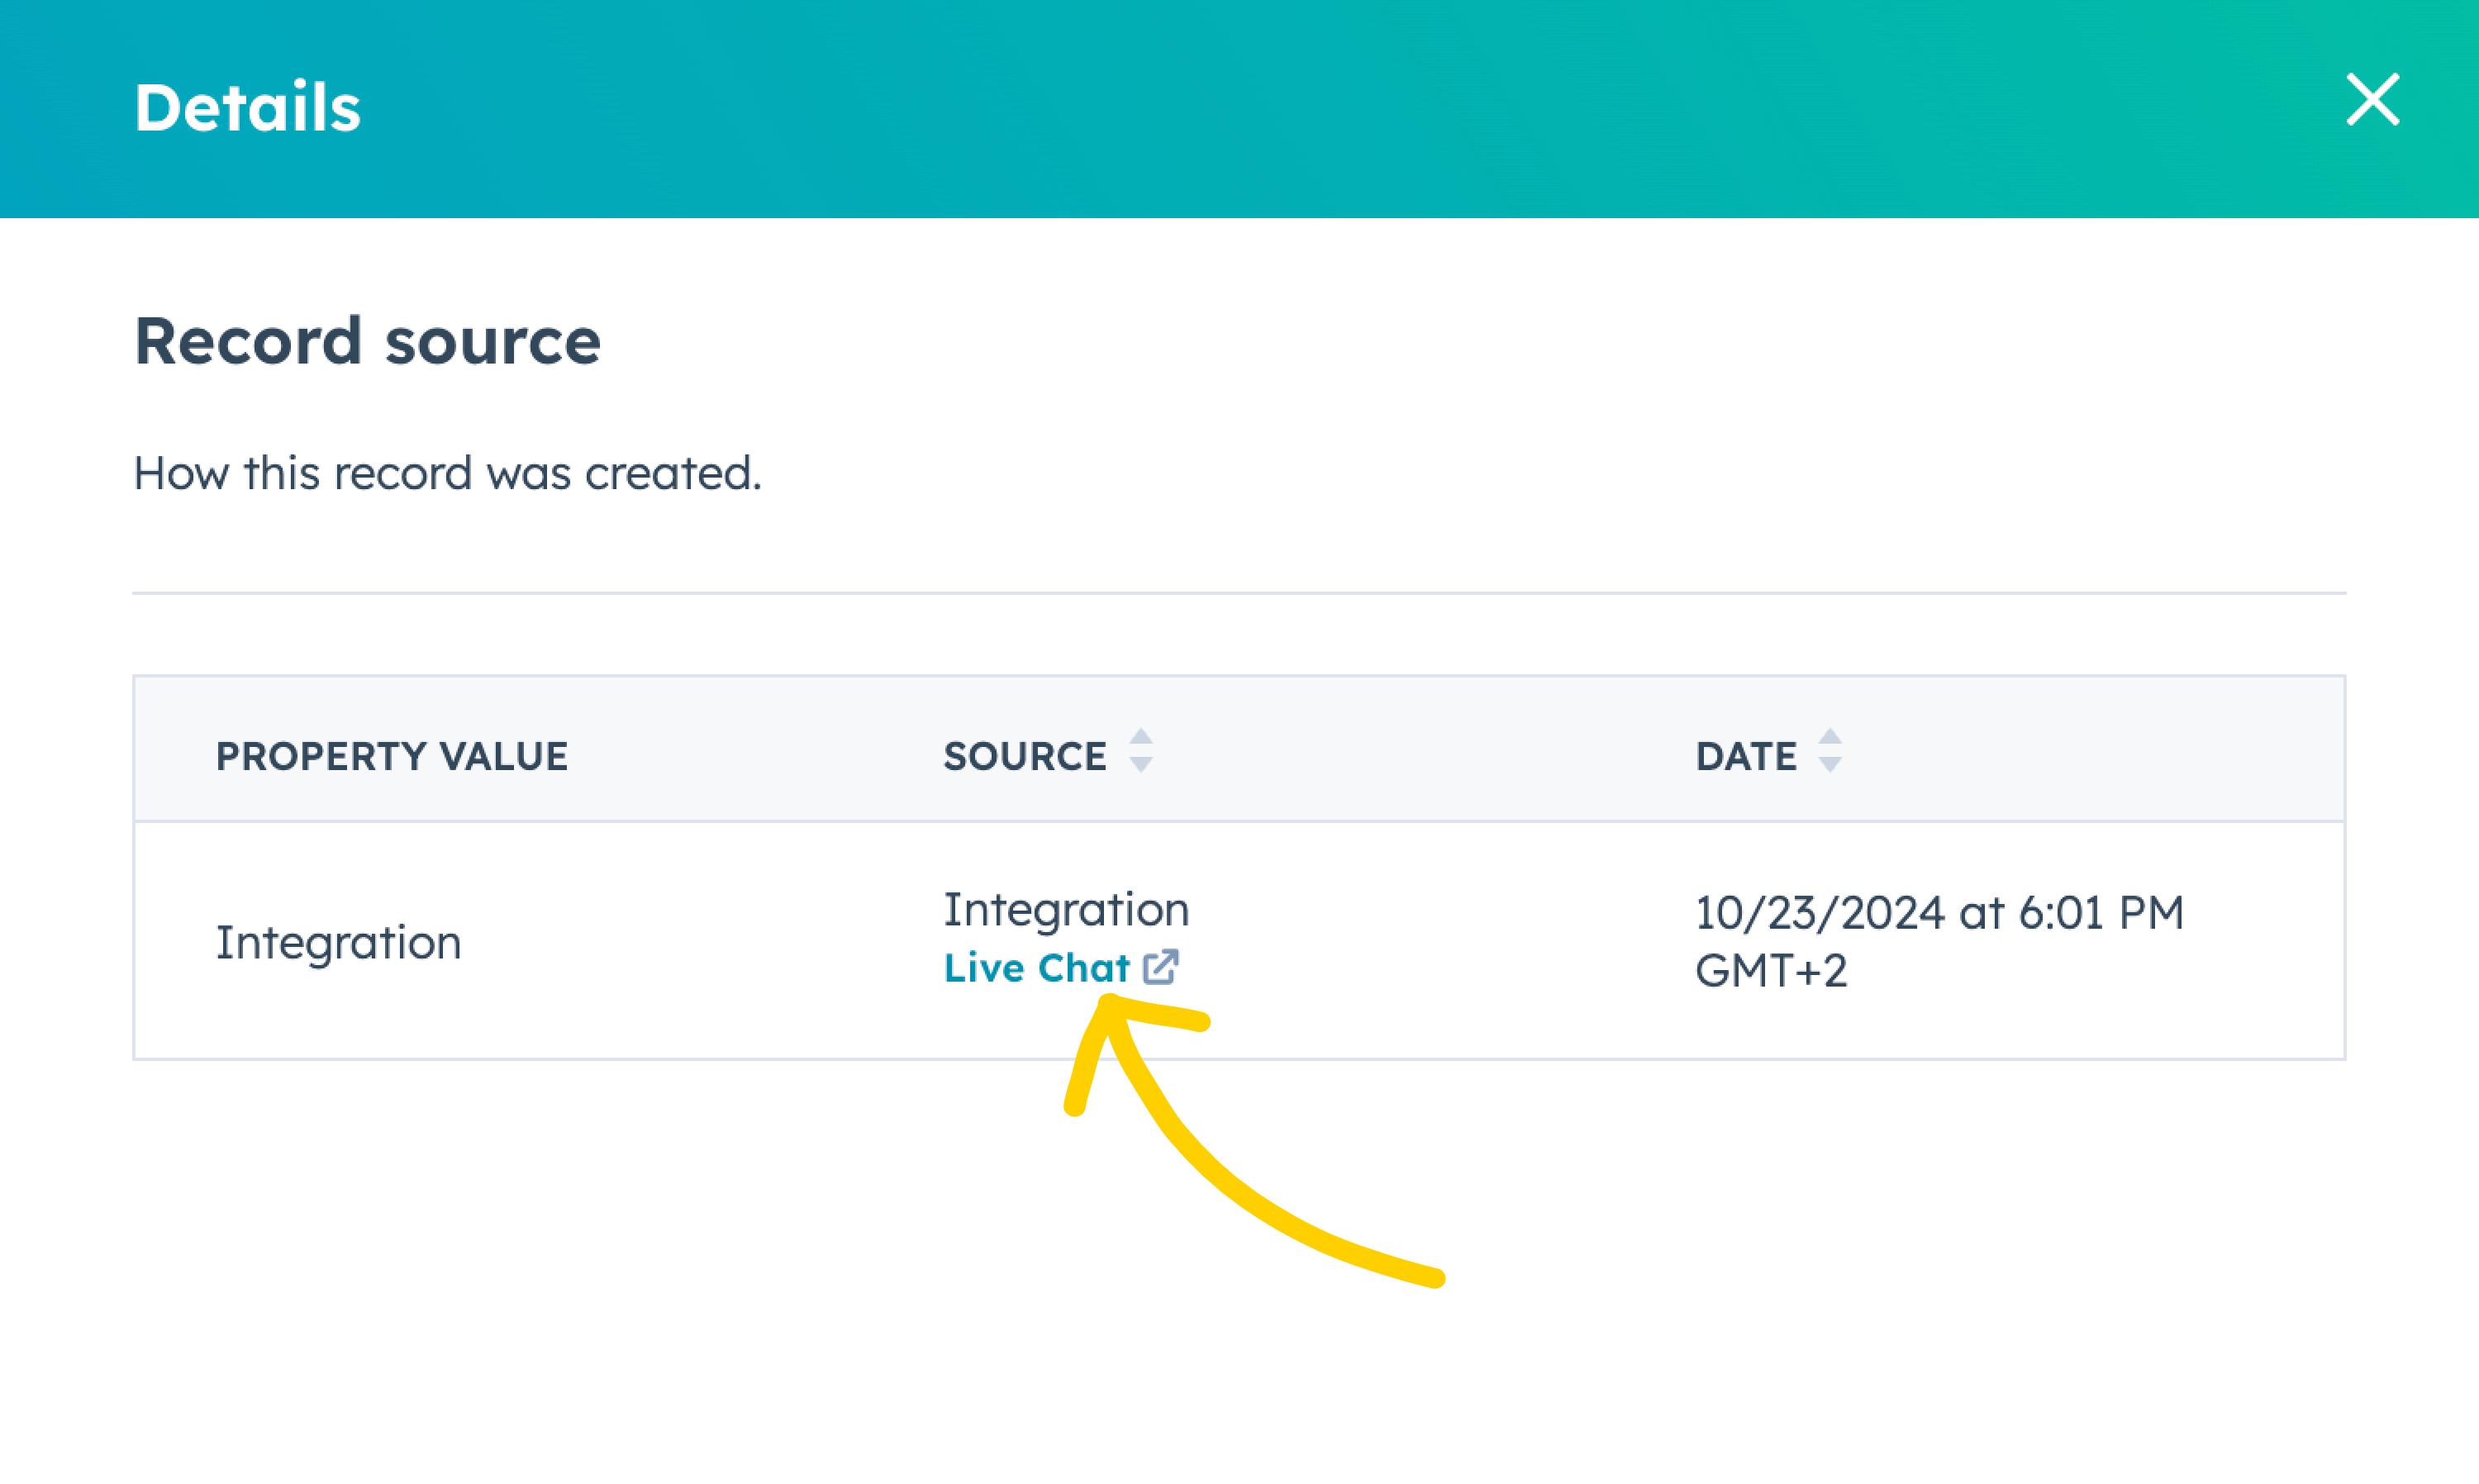
Moreover, your contacts will have a LiveChat assigned as a source in your HubSpot dashboard, so you can clearly see which ones you acquired on chats.
You can create a new contact from archived chats as well. Visit the Archives section in your LiveChat, select an archived chat and proceed in the same way as with an ongoing chat.

Read on to learn what data you can access in chats and the HubSpot dashboard ▶️

Review contacts informationLink icon

  • See your contacts’ information in LiveChat. Provide personalized and effective follow-ups.
  • Maintain context and provide a high-quality experience with your service.
If you want to add and see your HubSpot contacts data inside LiveChat, enable a pre-chat form with a mandatory email address field. LiveChat will be able to match your contacts with chatting customers based on the email addresses they provide in the form.

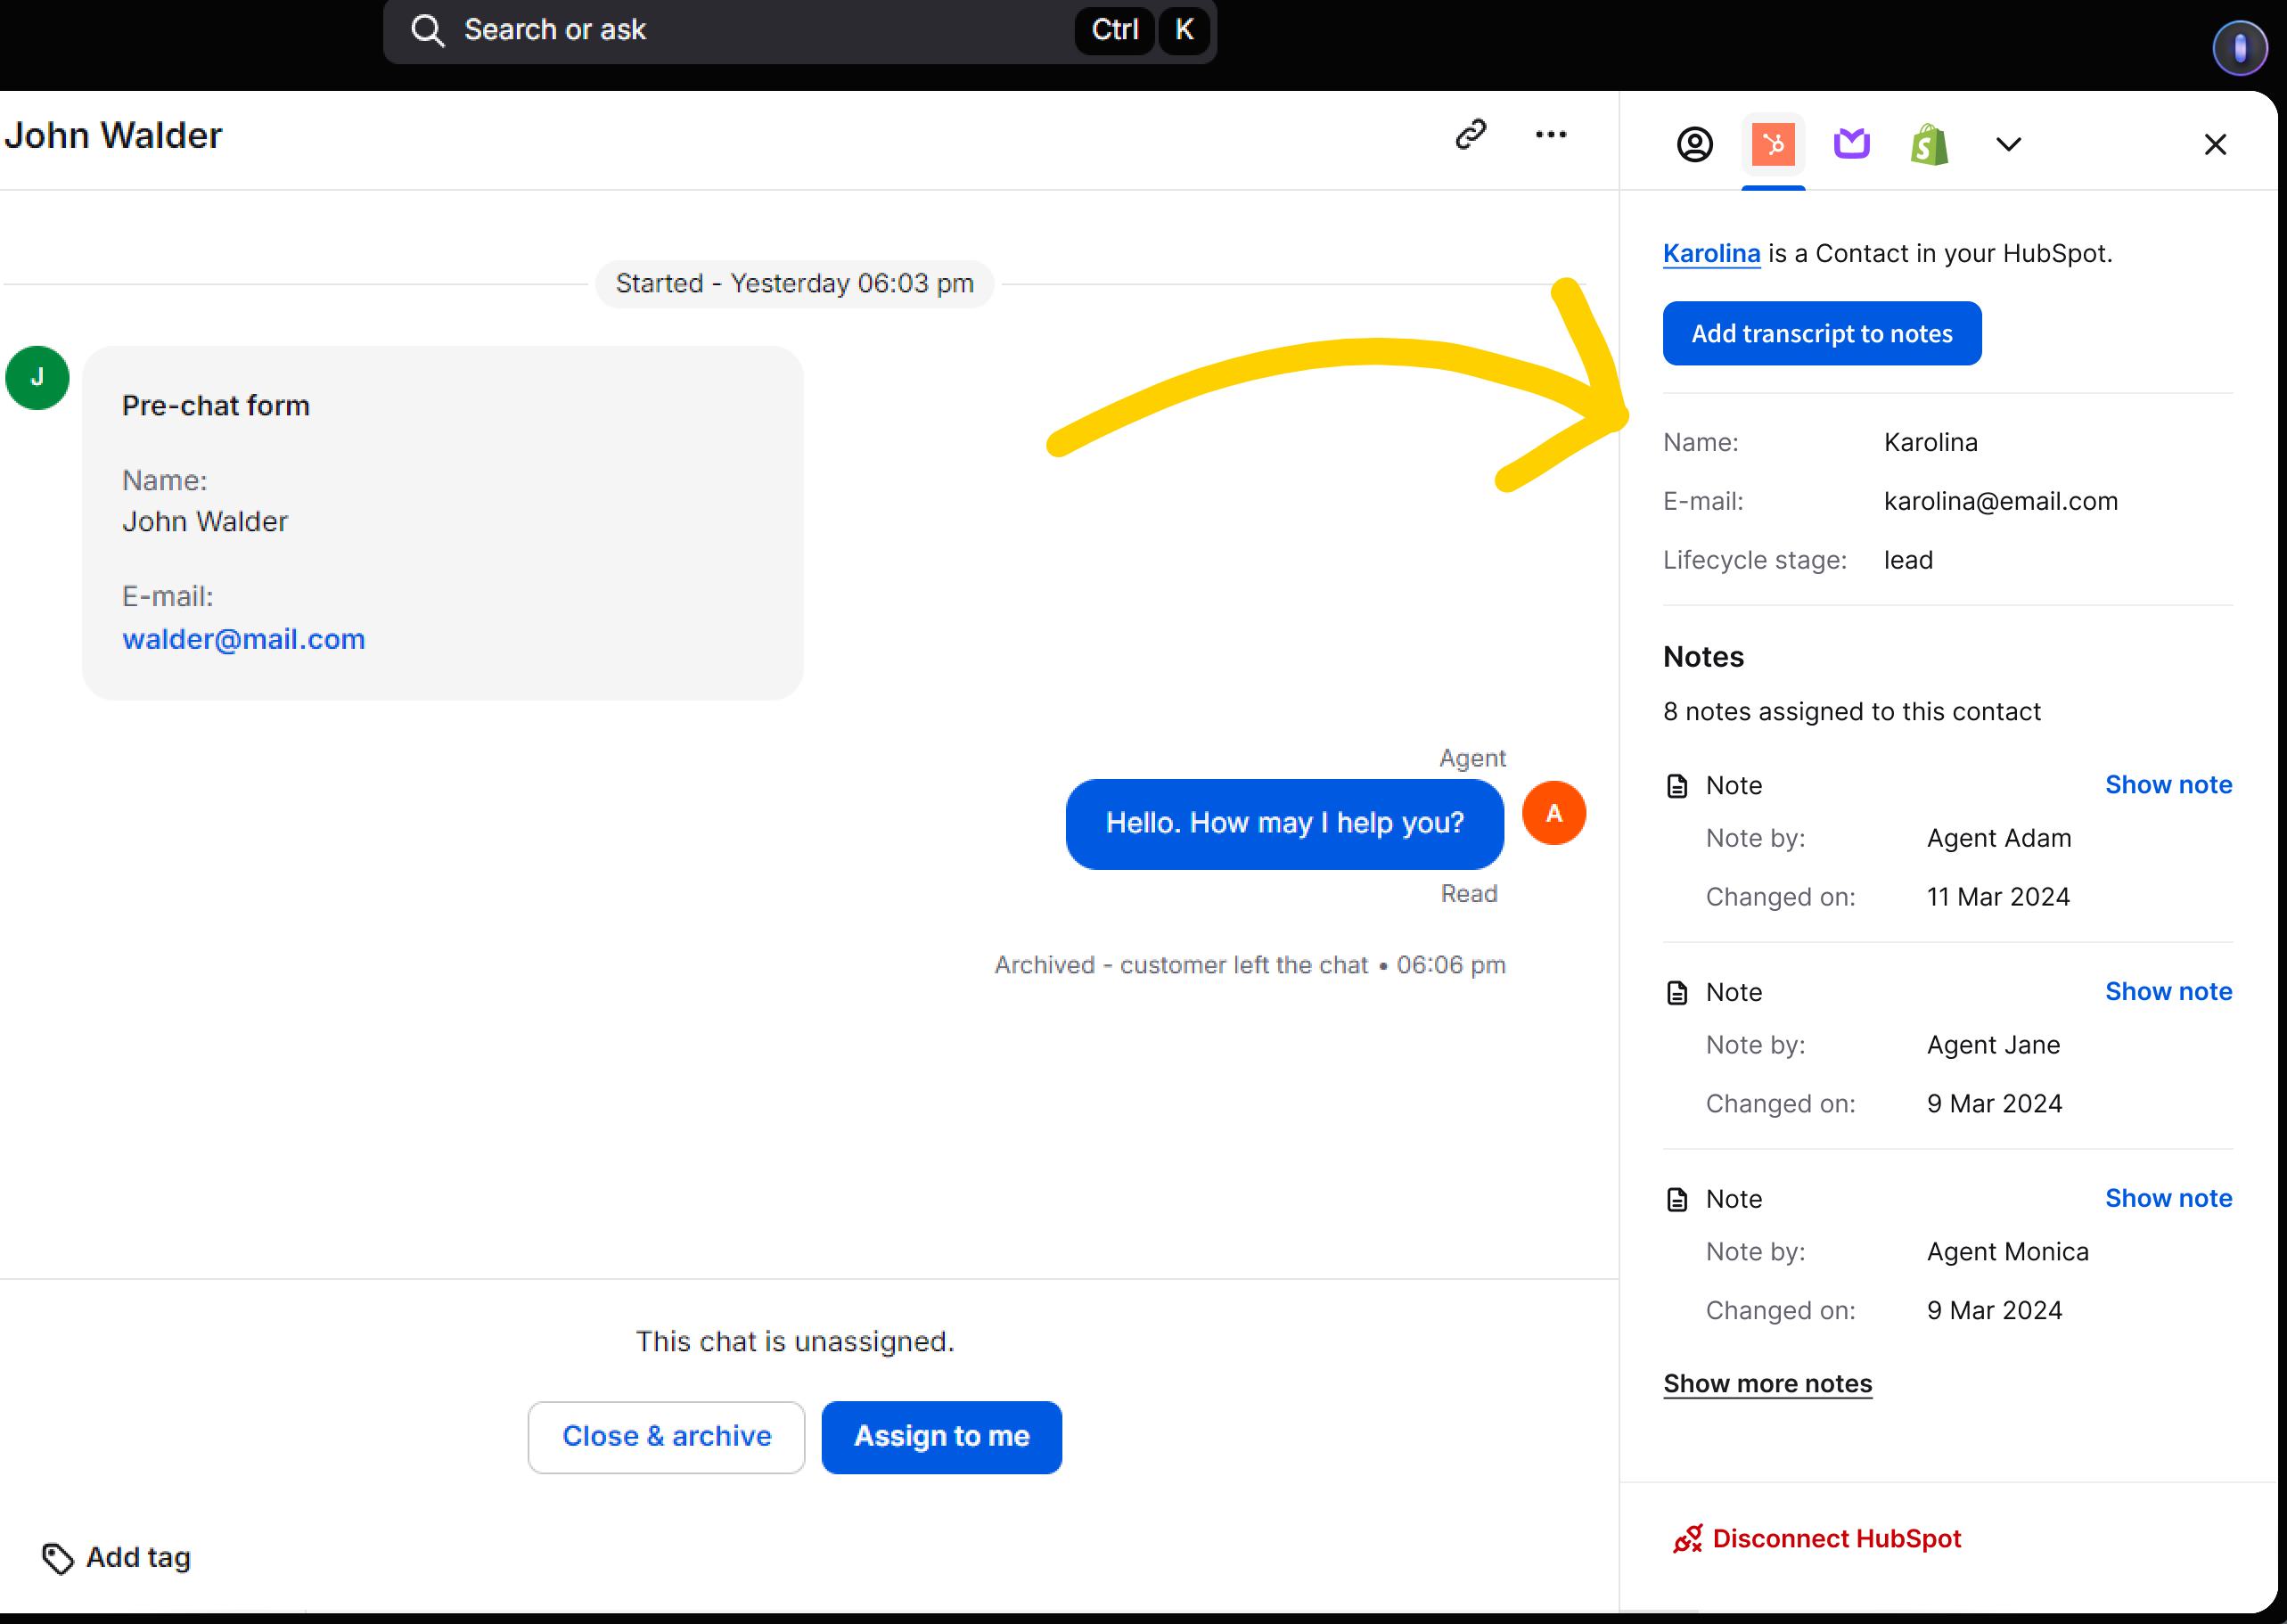
HubSpot integration lets you see your contacts’ details in LiveChat chats. You can see your contacts’ names, email addresses, and their lifecycle stages.

If you assigned any chat transcripts or notes to a contact (we’ll show you how to do that in the next chapter), you’ll be able to see and review those as well.

Enter any ongoing or archived chat. Select the HubSpot icon to expand a tab. It will contain all of the information, chat transcripts and notes assigned to the chosen customer.
Chat transcripts and notes added in LiveChat will pop up on your HubSpot dashboard too. Enter your contact profile to see a list of notes.
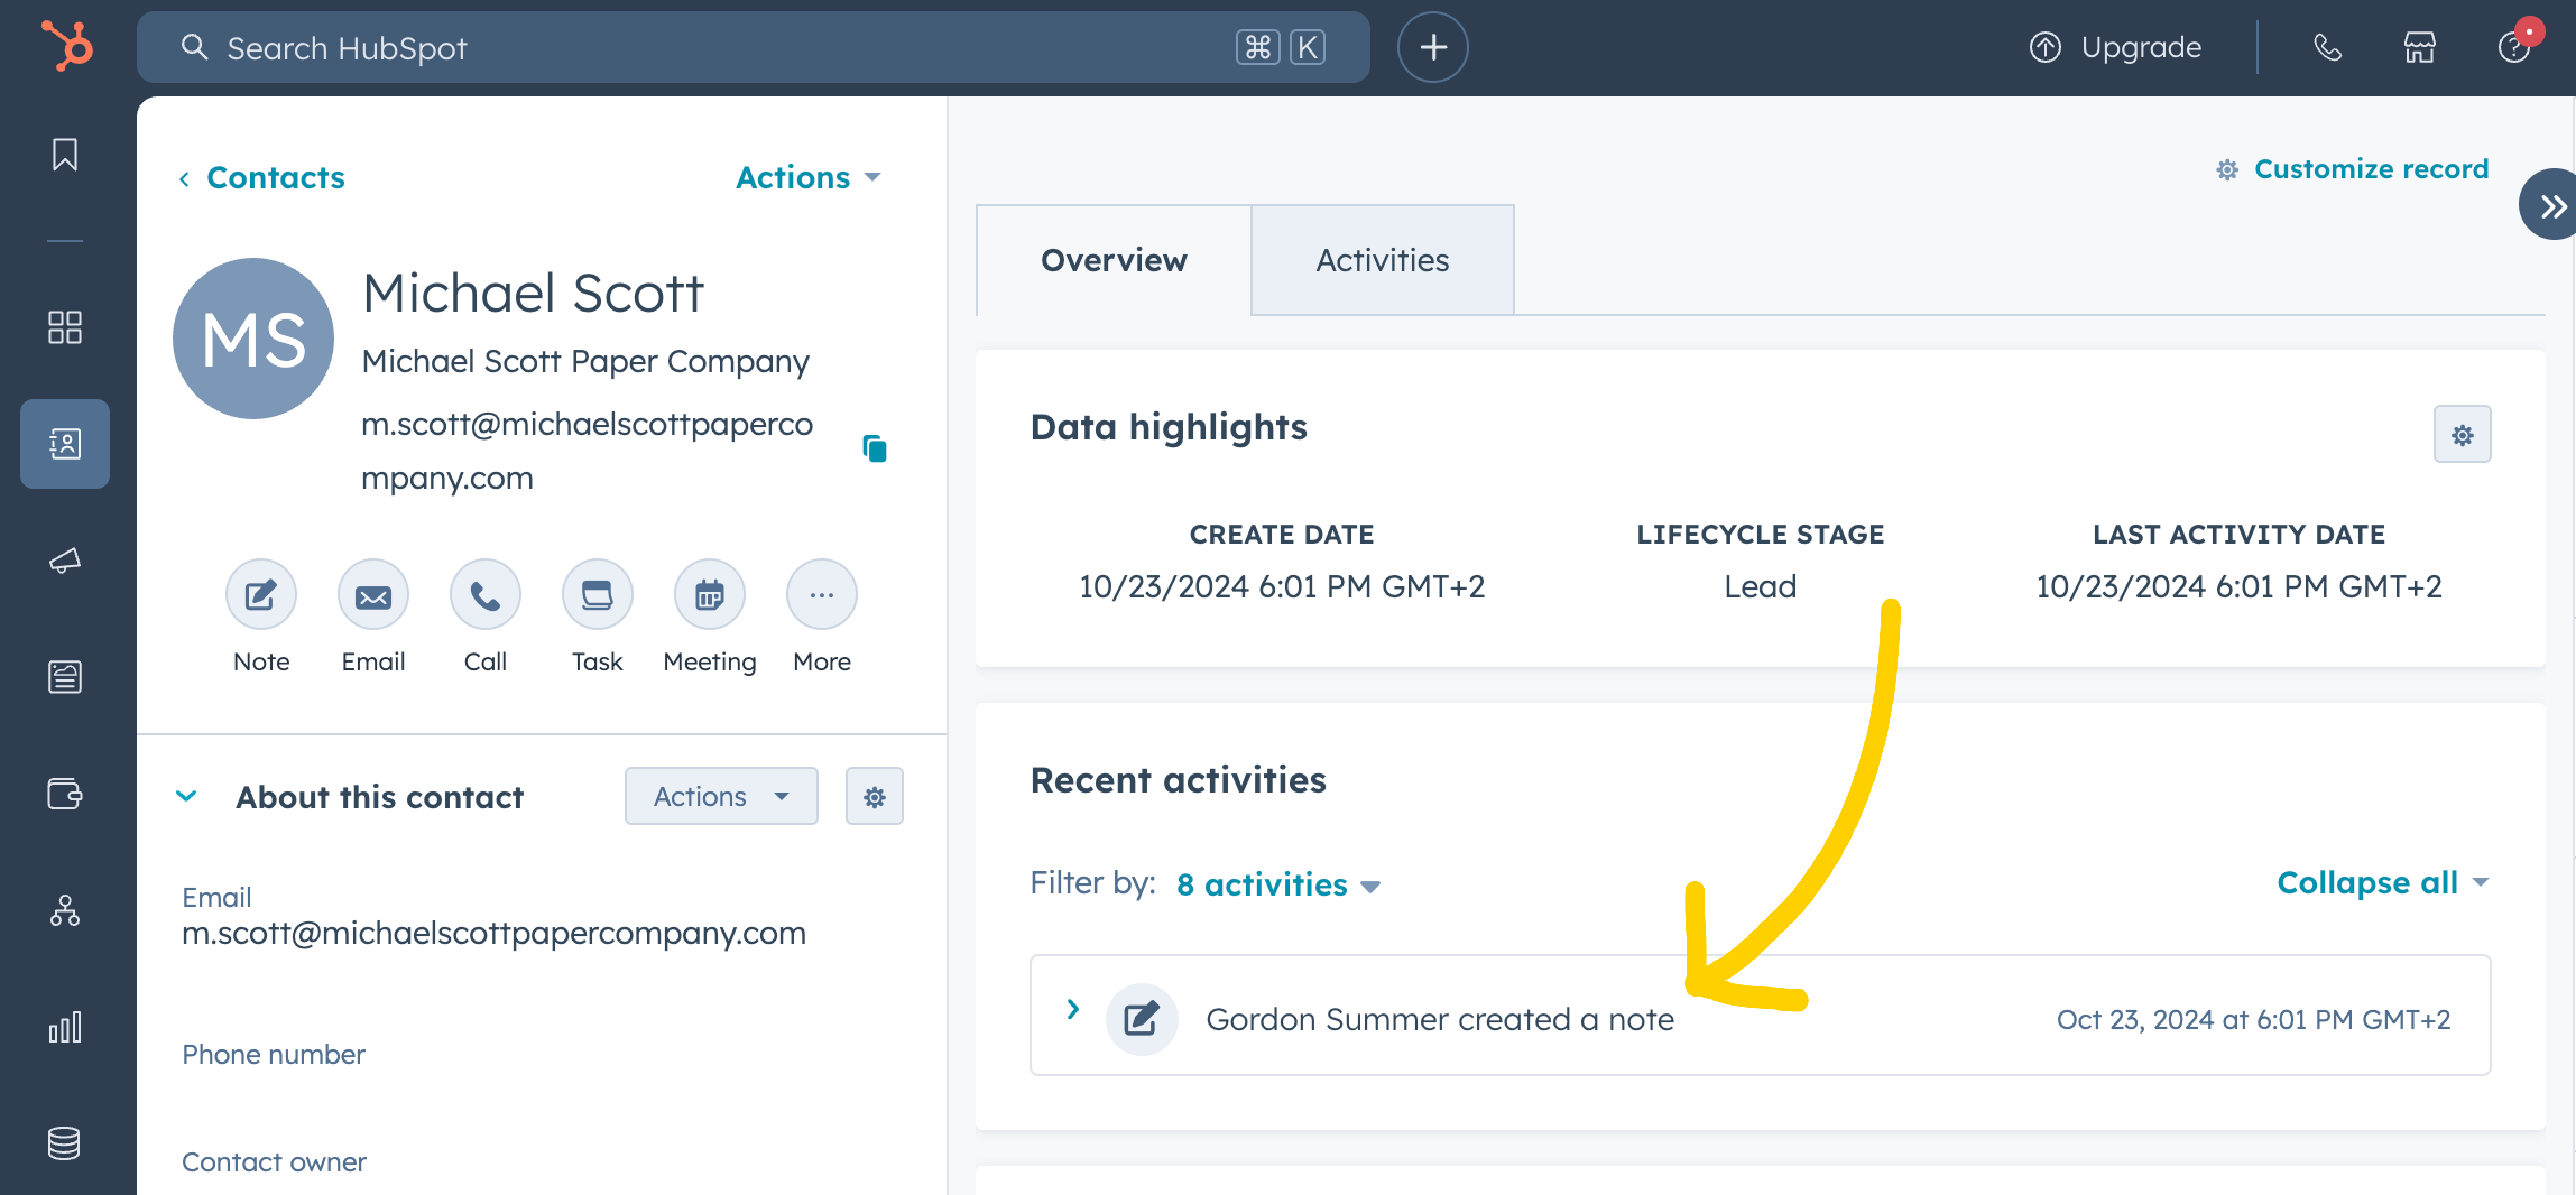
Expand a note to get to the data.
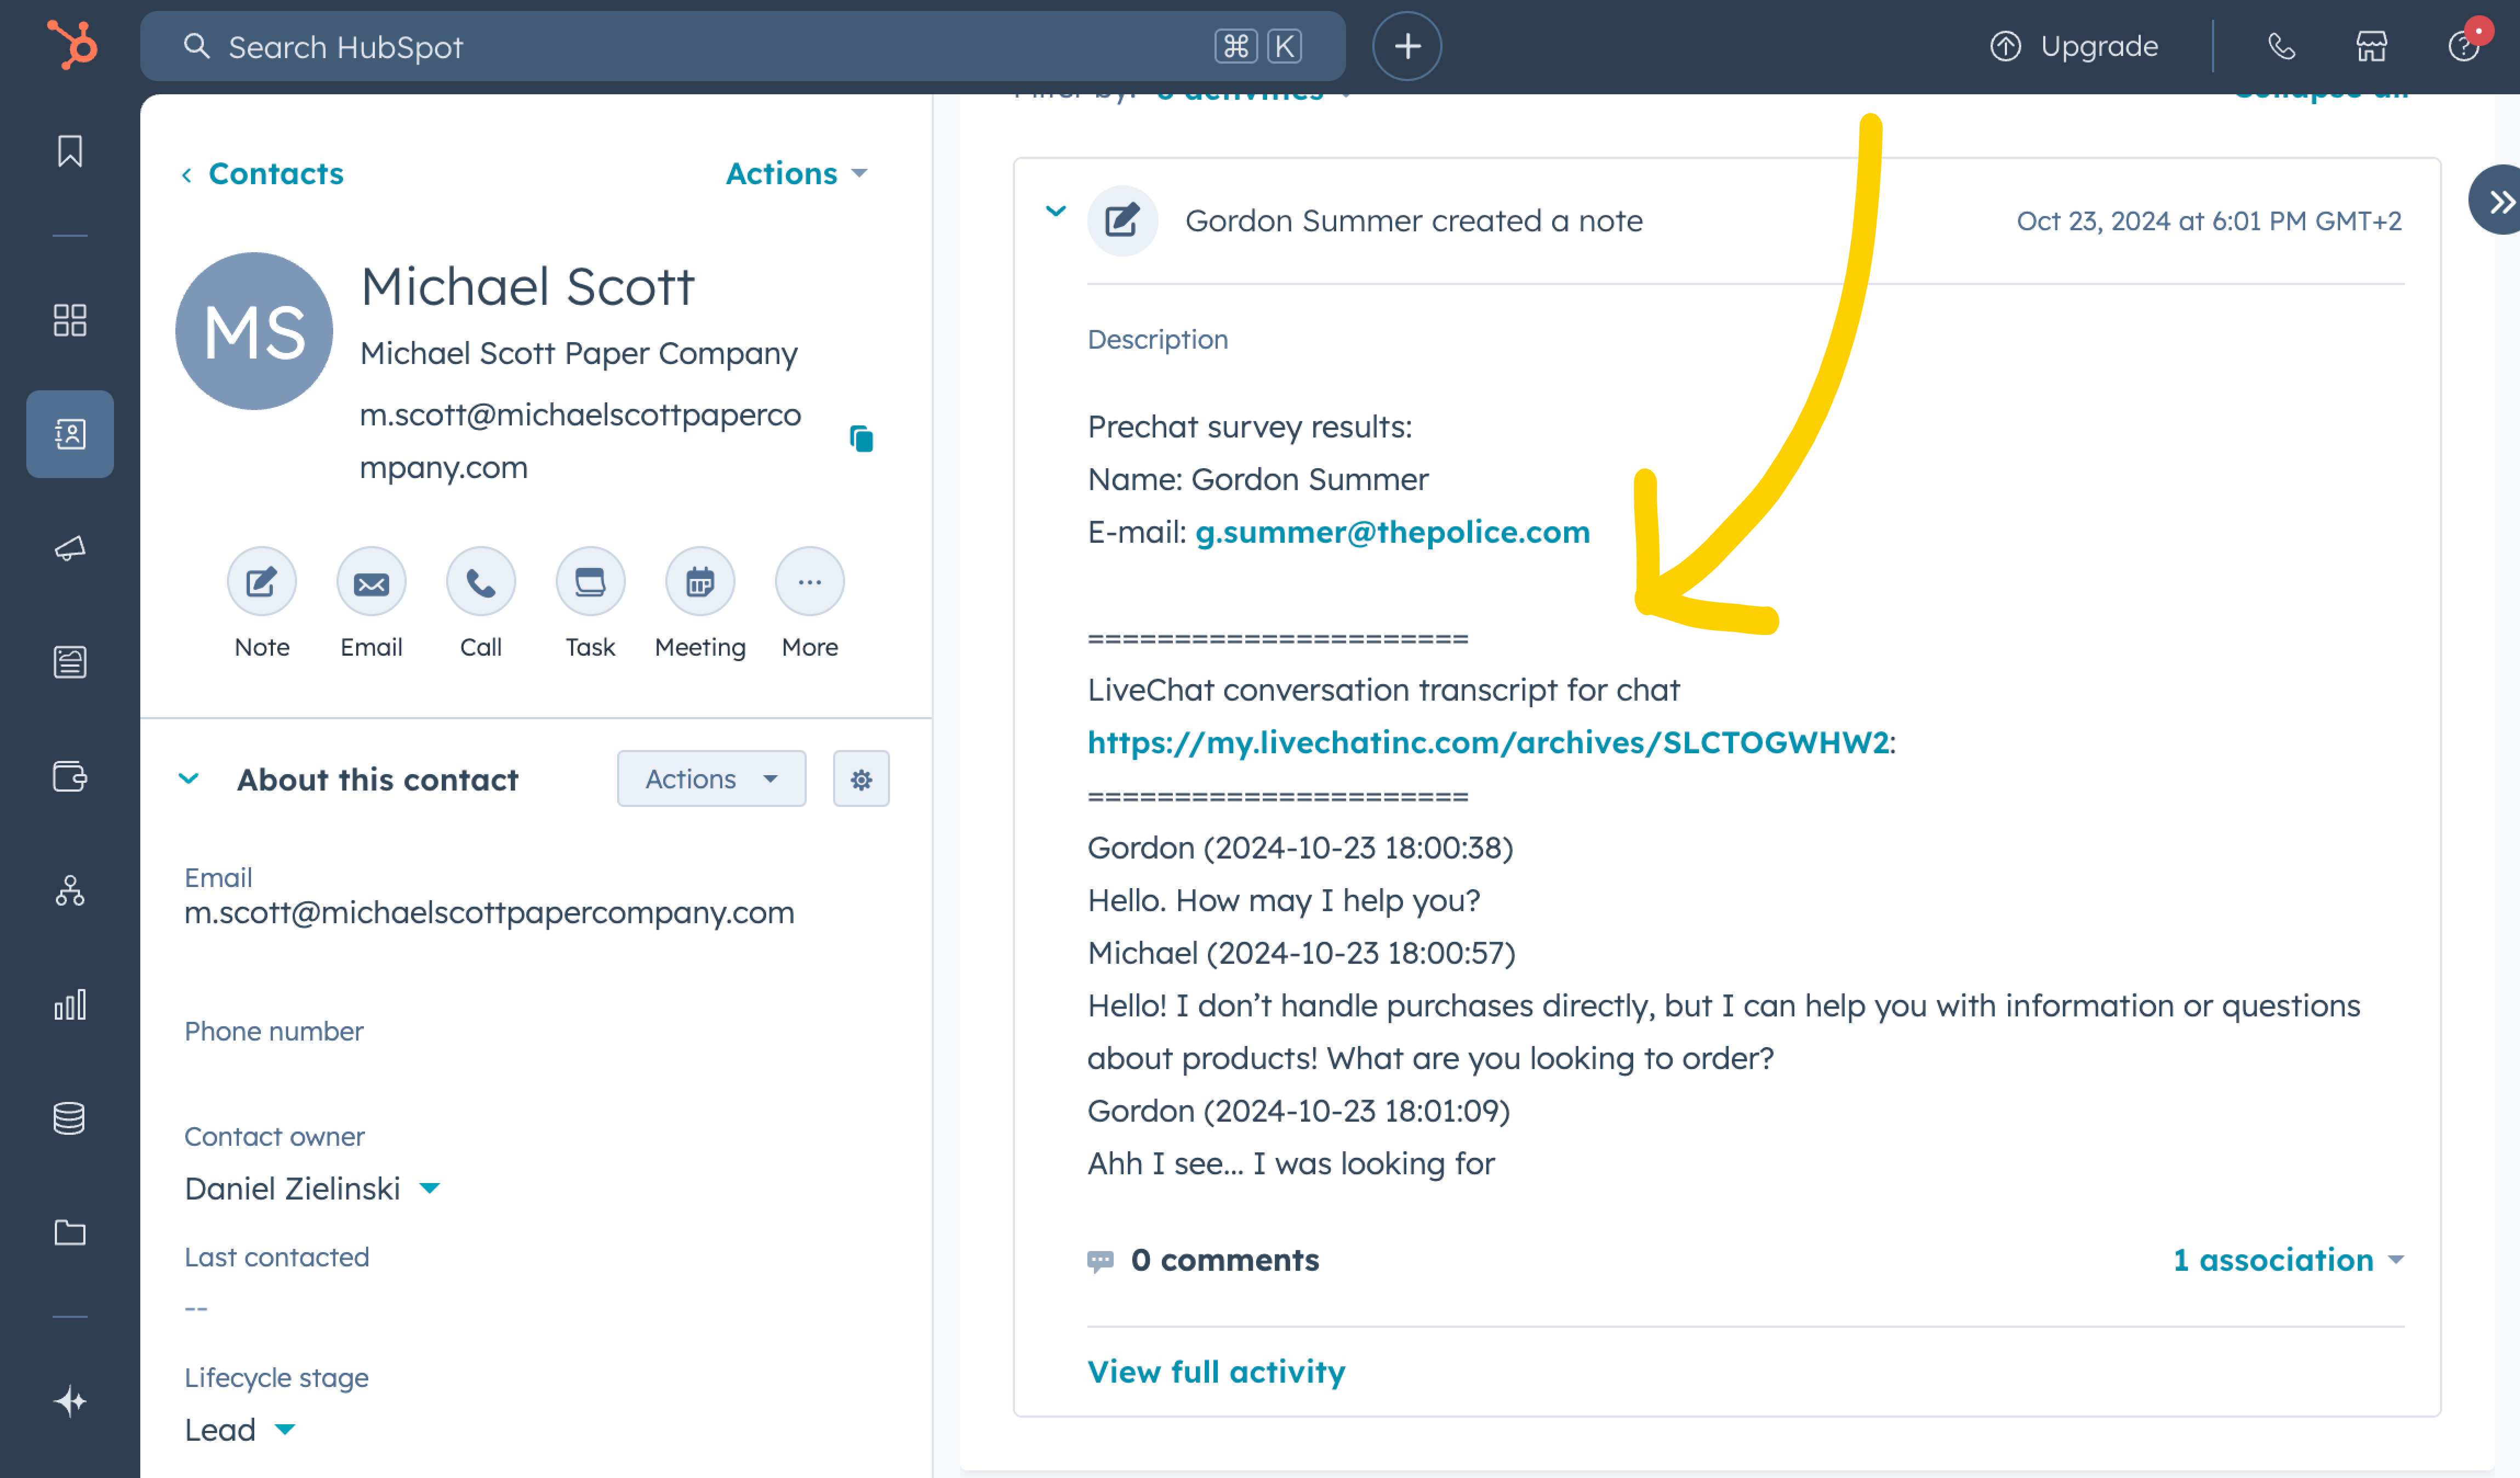
Read on to learn how to add, edit and delete chat transcripts/notes ▶️

Add chat transcripts and notes to contactsLink icon

  • Share key details with your team in your CRM and ongoing chats. 
  • Create a clear history of relevant interactions with your customers.

To assign a chat transcript to your contact:Link icon

1
Enter the HubSpot tab on the Details column.
2
Select the Add transcript to notes button.

This action will automatically assign a full chat transcript to your contact. It will be visible in the HubSpot CRM and LiveChat chats.

To assign a note to your contact:Link icon

In order to add custom notes, you need to have at least one chat transcript added to your contact. If you don’t have one yet, please assign it and then proceed with adding a note.
1
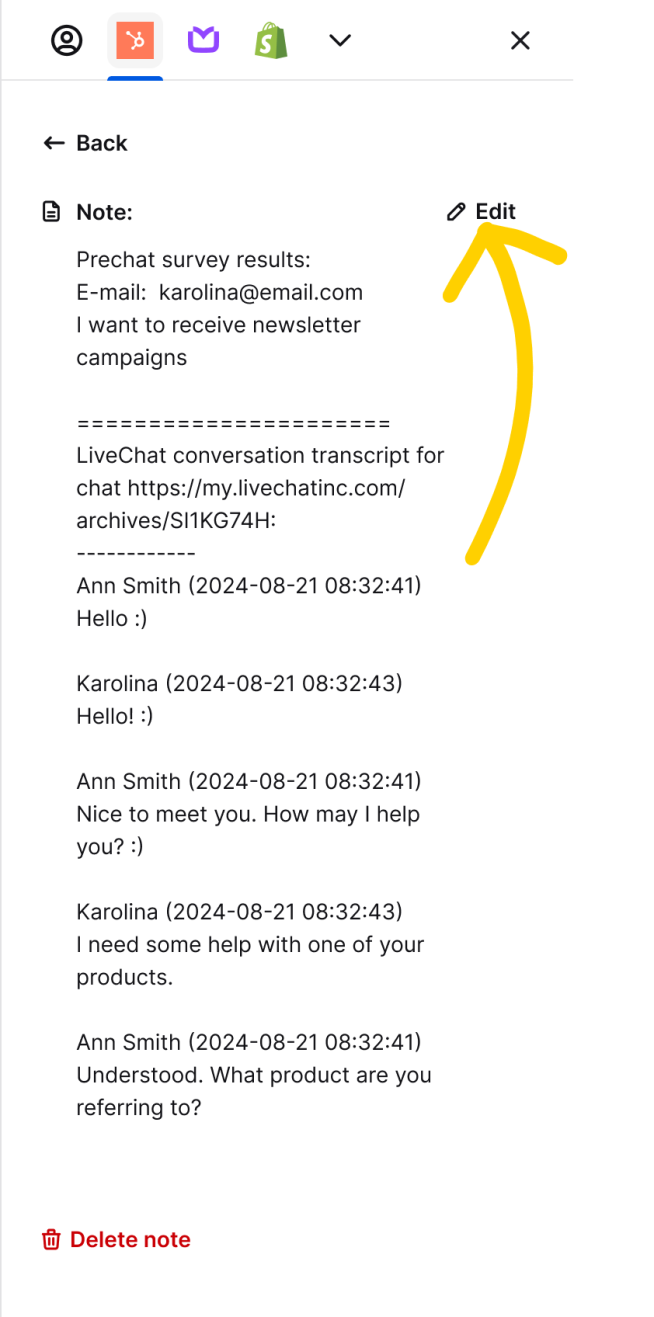
Select Show note.
2
Select Edit.
3
Modify the chat transcript text or add your own notes in any place you wish. Select Save to finish.

This action will automatically assign a note to your contact. It will be visible in the HubSpot CRM and LiveChat chats.

To delete a chat transcript/note:Link icon

1
Select Show note.
2
Select Delete note.
3
Select Delete note again to confirm.

This action will automatically remove a chat transcript/note from your contact. It will no longer be visible in the HubSpot CRM and LiveChat chats. 

In case of a chat transcript, you’ll still be able to find it in the LiveChat app Archives section.

You can manage chat transcripts and notes from archived chats as well. Visit the Archives section in your LiveChat, select an archived chat and proceed in the same way as with an ongoing chat.

How to uninstallLink icon

Any integration data, like contacts, chat transcripts, and notes, stay available in your HubSpot account even after the integration gets disconnected or uninstalled. You can continue managing the data directly from your HubSpot panel.

From the LiveChat appLink icon

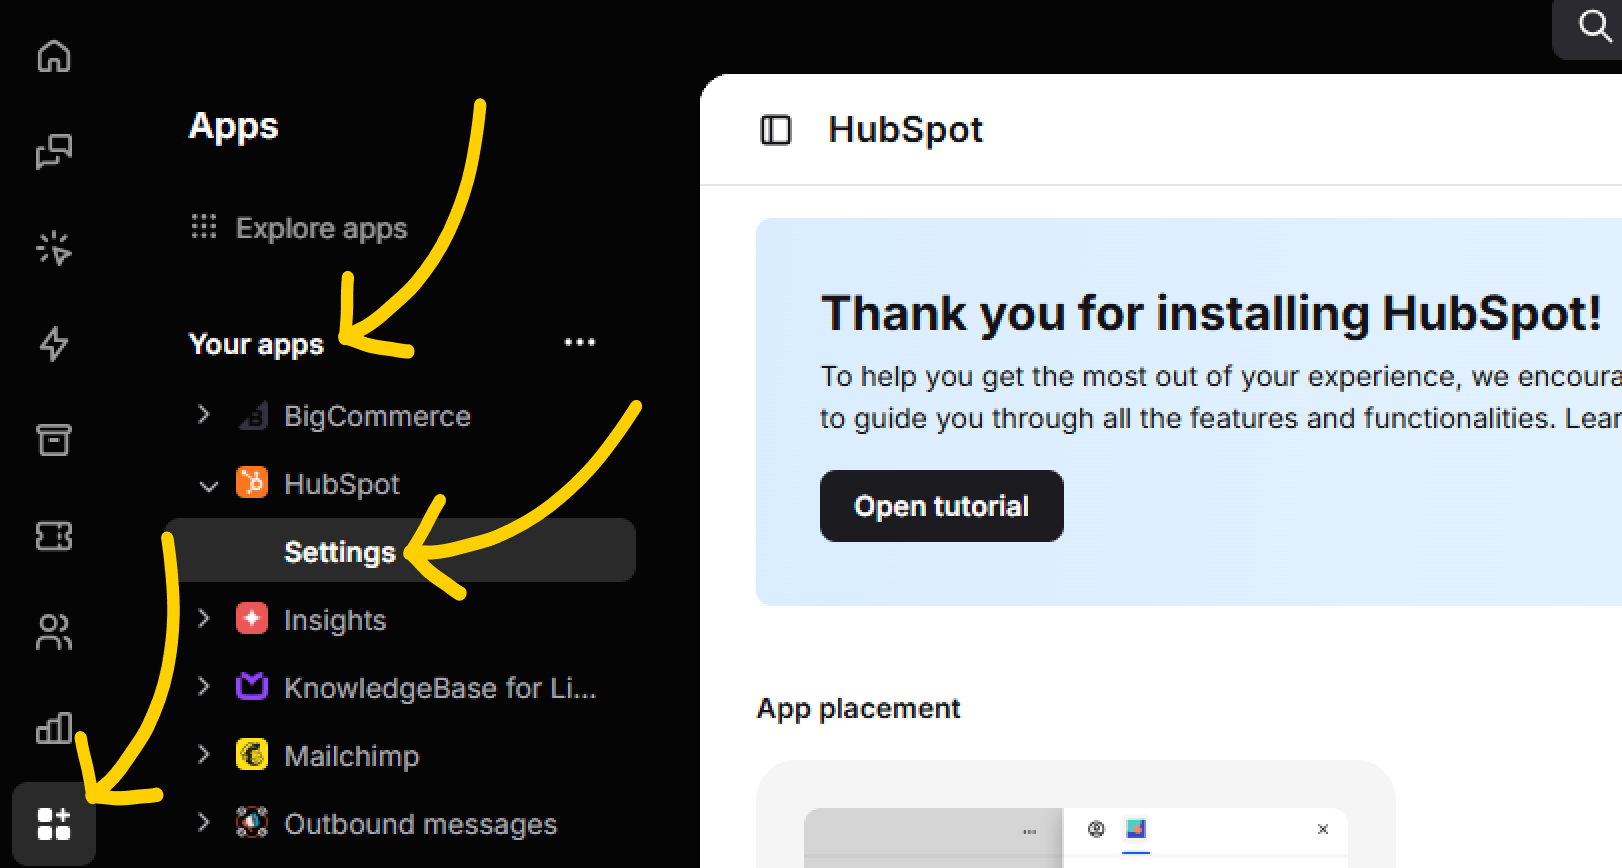
  1. Enter Apps -> Your apps -> HubSpot -> Settings.

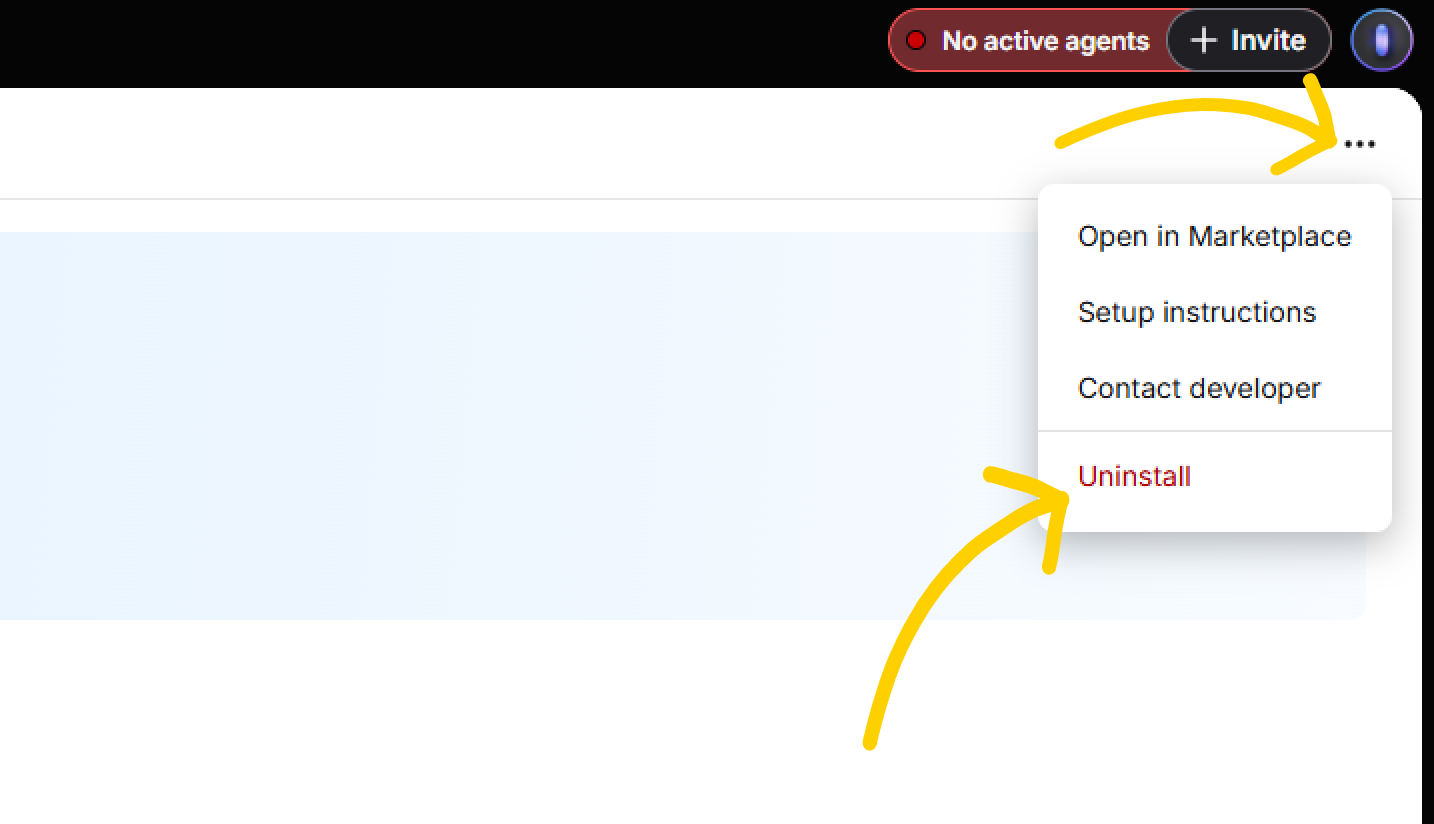
  1. Select the ellipsis button at the top-right corner of the screen. Select Uninstall.

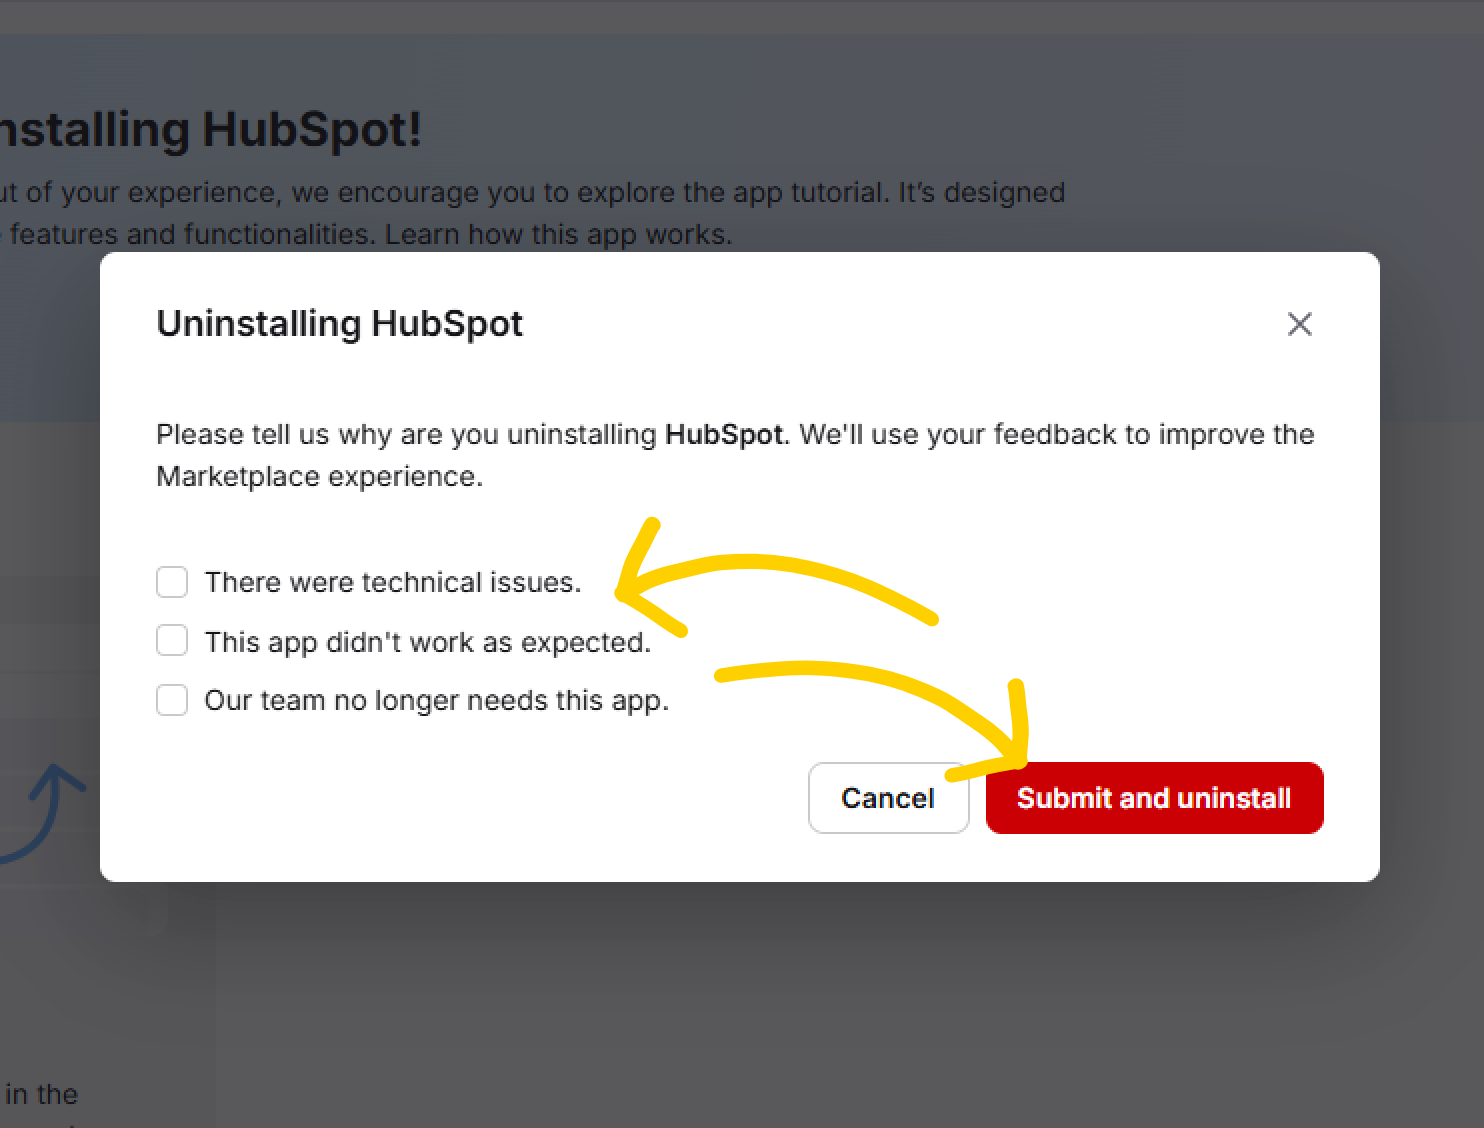
  1. Fill in the feedback form and select Submit and uninstall.

From the HubSpot accountLink icon

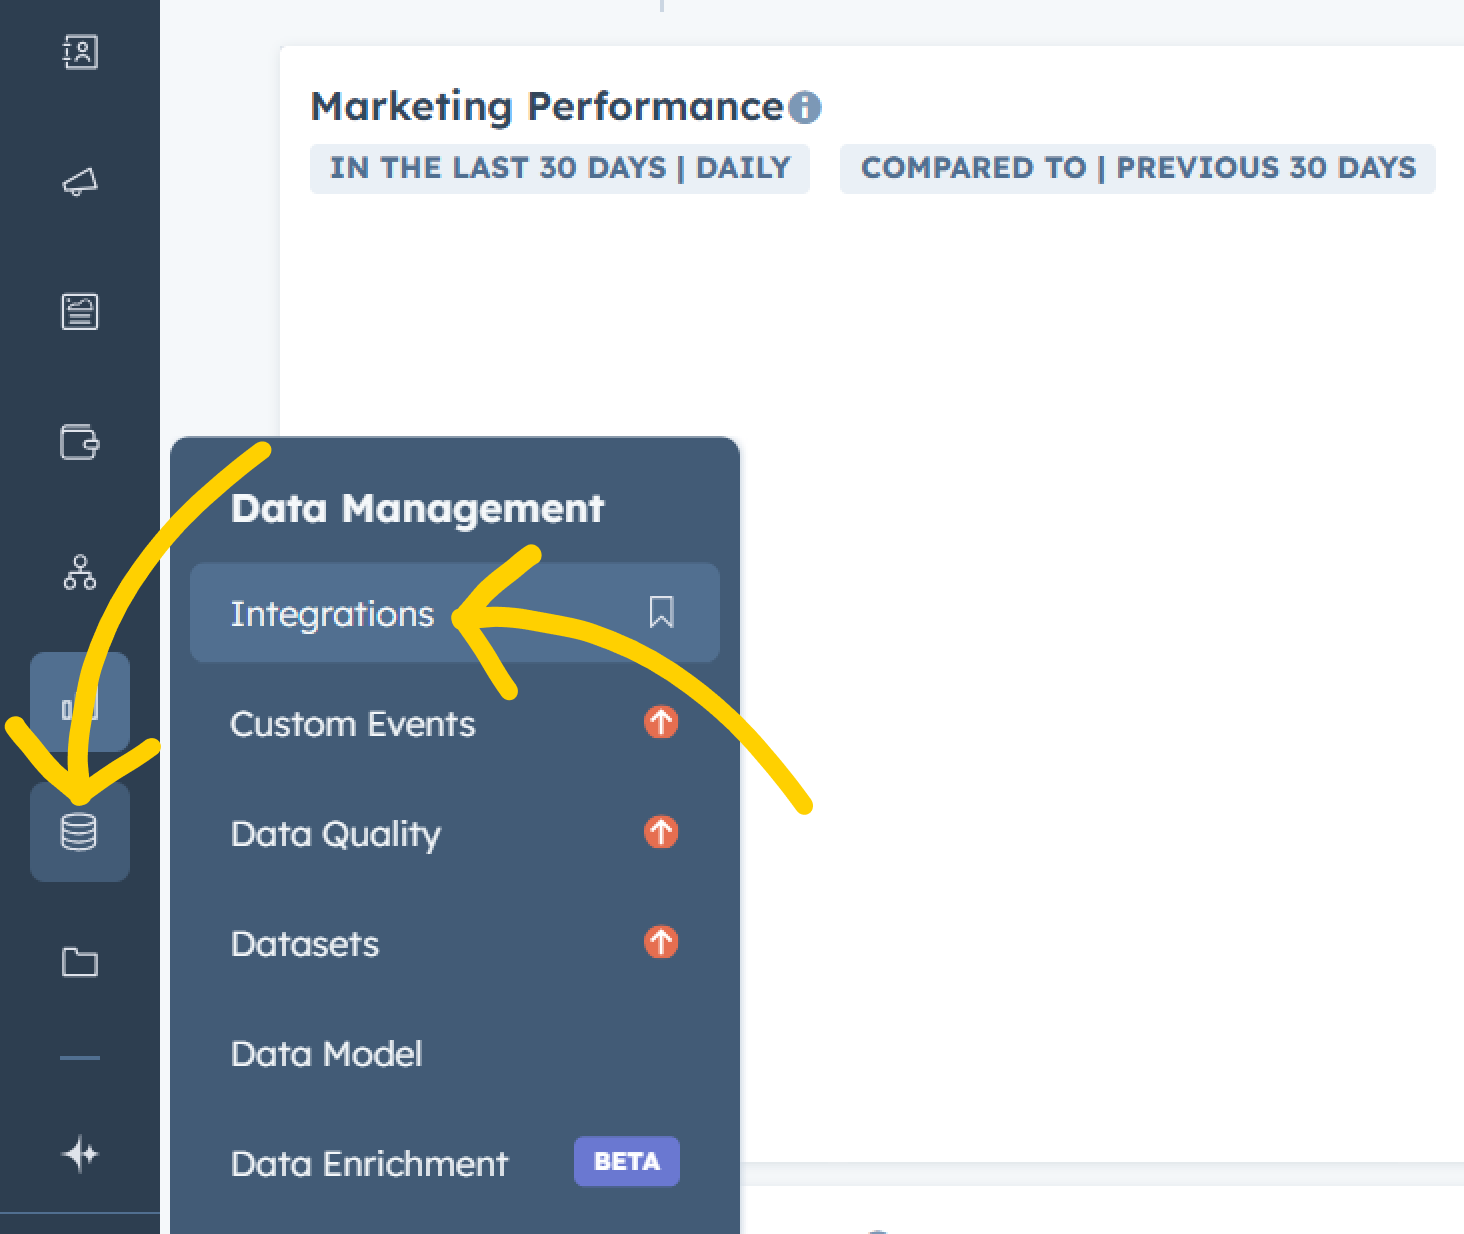
  1. Navigate to Data Management -> Integrations.

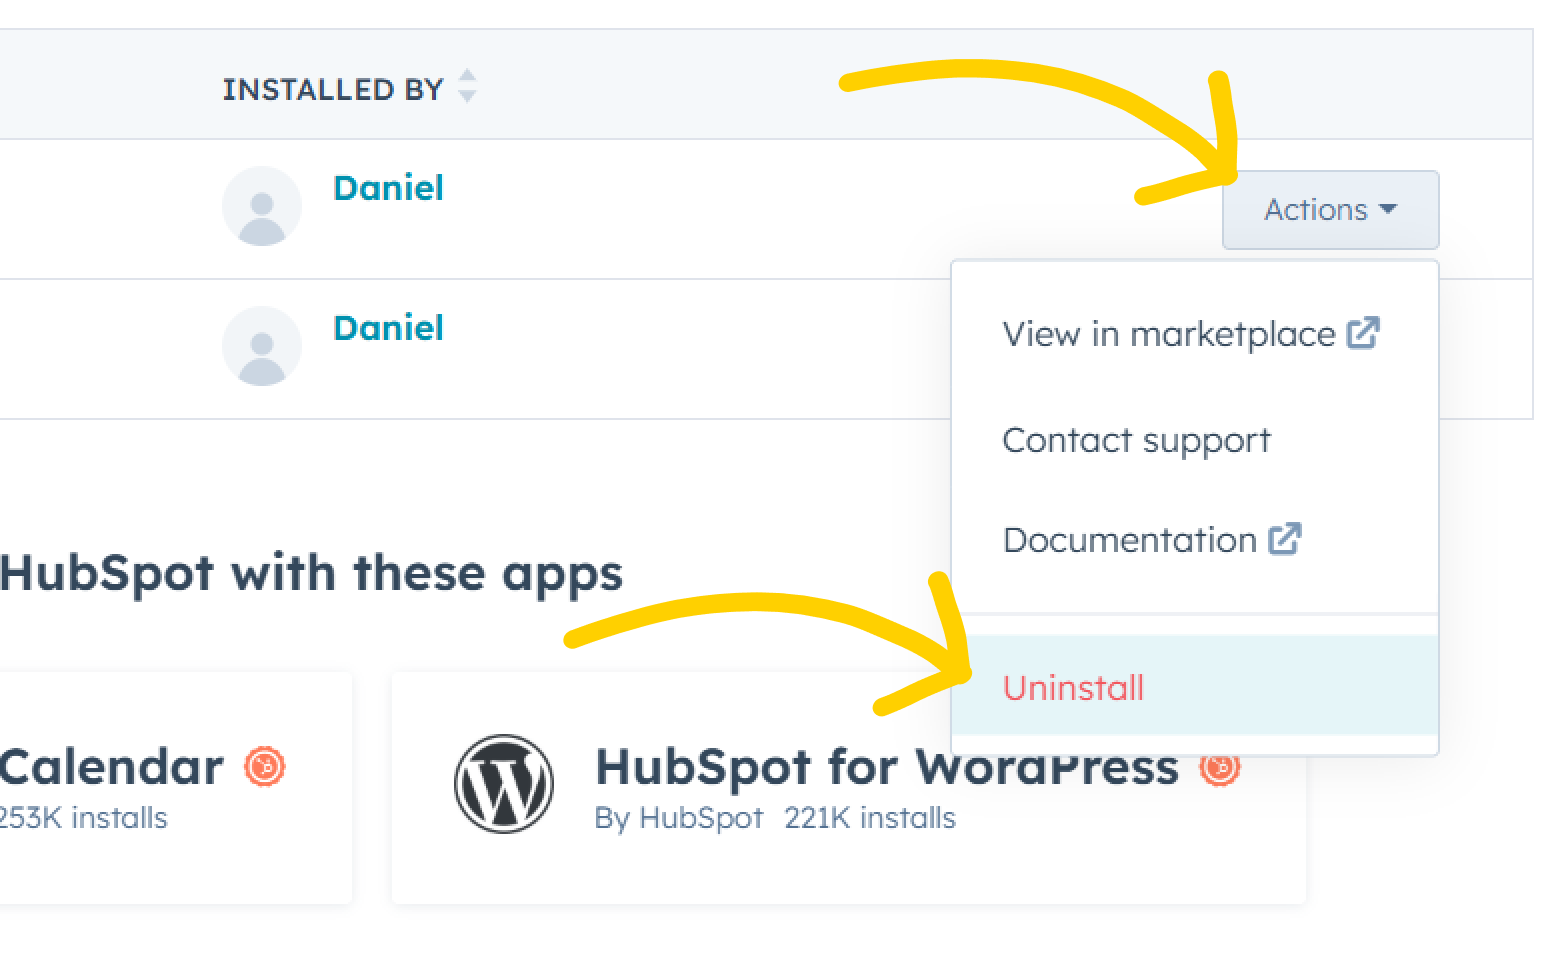
  1. Expand the Actions dropdown next to the LiveChat integration. Select Uninstall.

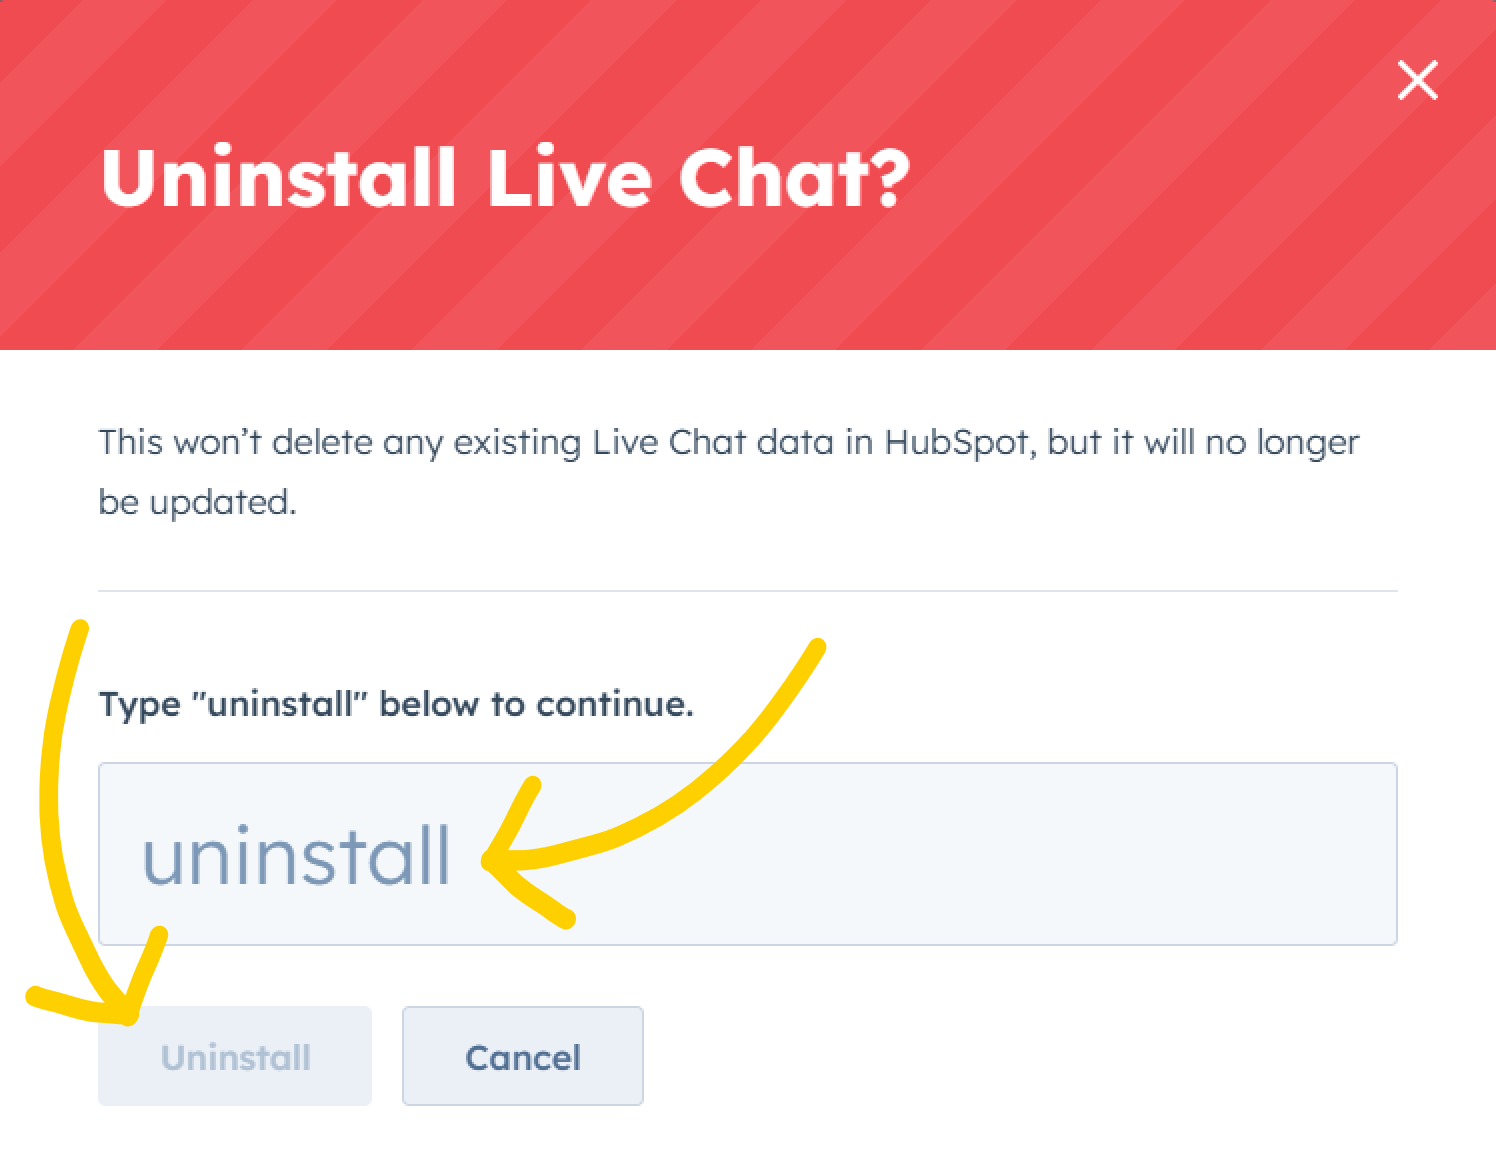
3.Type in uninstall and confirm by selecting the Uninstall button.

Integrate and automateLink icon

  • Cover all your brand channels with one platform. Make your agents’ jobs easier.
  • Join the AI revolution. Plug your business knowledge into LiveChat. Get professional reply suggestions delivered right to your message box.
  • Engage customers automatically and effortlessly with plug-and-play automated campaigns.

If you followed all of the previous topics, your seamless CRM integration should now be complete. It’s time to optimize.

Start by integrating your brand’s social media channels:

Complete your tasks faster thanks to AI helpers:

Finish your setup by creating an automated engagement machine with campaigns. Create pop-up invitations about your products, promo codes, or newsletters. Surprise your audience with seamless communication that drives new leads.

Encountered any troubles on the way? Start a chat with our support team and get immediate help. We’re available 24/7!

Was this article helpful?

Got it!

Thanks for your feedback.

Thank you!

We’re happy to help.

RELATED ARTICLES

Gold-Vision: create new CRM records from LiveChat

Gold-Vision: create new CRM records from LiveChat and gain a full picture of your customers and leads. Close more sales with just a few easy steps!

Read the article

Salesforce integration

Learn how to integrate LiveChat with Salesforce software. Check how to set up integration to gain new leads - it is really simple!

Read the article

Start using LiveChat now!

Free 14-day trial AI-driven features No credit card required

Still not convinced? Discover all LiveChat features

Discover Text products: