Add LiveChat to your WordPress website and gain an additional channel of communication with your website visitors. The installation consists of a few easy steps and only takes a few minutes.
You can also download LiveChat for WordPress plugin here.
You can also download LiveChat for WordPress plugin here.
If you have any questions, check out the FAQ section below, or start a chat with us!
Install LiveChat on your WordPress site
To begin, log in to your WordPress admin panel, then follow these steps:
1
Go to the Plugins section in your WordPress Dashboard.
2
Click on the Add New button.
3
Type LiveChat in the search bar. You’ll find it in the top right.
4
In the search results, you will find LiveChat - WP live chat plugin for WordPress plugin. Click on Install Now to proceed.
5
Wait a few seconds until the plugin is installed, then click on the Activate button.
6
You will be taken to the Plugins section of your WordPress admin panel. There, click on the Settings button available under the LiveChat plugin.
7
You’ll see the Thank you for choosing LiveChat! screen. Select Connect LiveChat to proceed.
8
Fill in your credentials and select Sign up to start a free 14 days LiveChat trial. If you already have a LiveChat account, select Log in instead, log in with your credentials and skip to step 11.
9
You’ll receive an email address verification code the email box that you used to sign up. Copy the code and paste it onto the confirmation screen.
10
Select Log in to finish the installation.
11
That’s it! A chat widget should now be visible on your website. Select View Traffic to see who is currently browsing it, Invite to add your teammates to your LiveChat account, or Customize to match your chat widget with your websites style!
If you run into any problems or get stuck at any point, check out the Troubleshooting section and start a chat with us.
If you run into any problems or get stuck at any point, check out the Troubleshooting section and start a chat with us.
Download LiveChat desktop app for Windows or Mac, and enjoy your browsing with one less tab!
Download LiveChat desktop app for Windows or Mac, and enjoy your browsing with one less tab!
Plugin settings
LiveChat plugin for WordPress comes with a useful option: To hide the chat widget from visitors who are not logged into your website.
To find this option, go to your LiveChat app -> Select Apps -> LiveChat for WordPress -> Settings.
There you can switch on/off the option to display a chat widget to logged-in users only.
Customer’s cart details
WordPress plugin automatically provides you with your customers’ carts contents. They are displayed in the Details column - on the right side of the chat, under the Custom Variables tab.
There you can find data like:
- Total cart value
- Product names
- Total number of items in the cart
- Links to product pages
WooCommerce support
If your WordPress has the WooCommerce plugin installed, you can get access to additional data under the WordPress icon located at the top of the Details column.
Select this icon to expand a cart view displaying key details, including:
- Total cart value
- Product names
- Product illustrations
- Unit prices
Use this information to immediately get a hang of your customers’ situations’ and close more deals faster!
Connect to a different LiveChat license
If for whatever reason you need to connect your LiveChat plugin with a different LiveChat license, e.g., you joined forces with another website, also using the LiveChat plugin, and you want to merge your support/sales team in one license, or you signed up for a new license rather than logged in your existing one by mistake, here are the steps to do it:
1
In the WordPress dashboard go to LiveChat. Click on Disconnect your account
2
Select Connect LiveChat. And proceed with the standard installation steps, starting from step 7.
All done! Log in and start chatting with your customers.
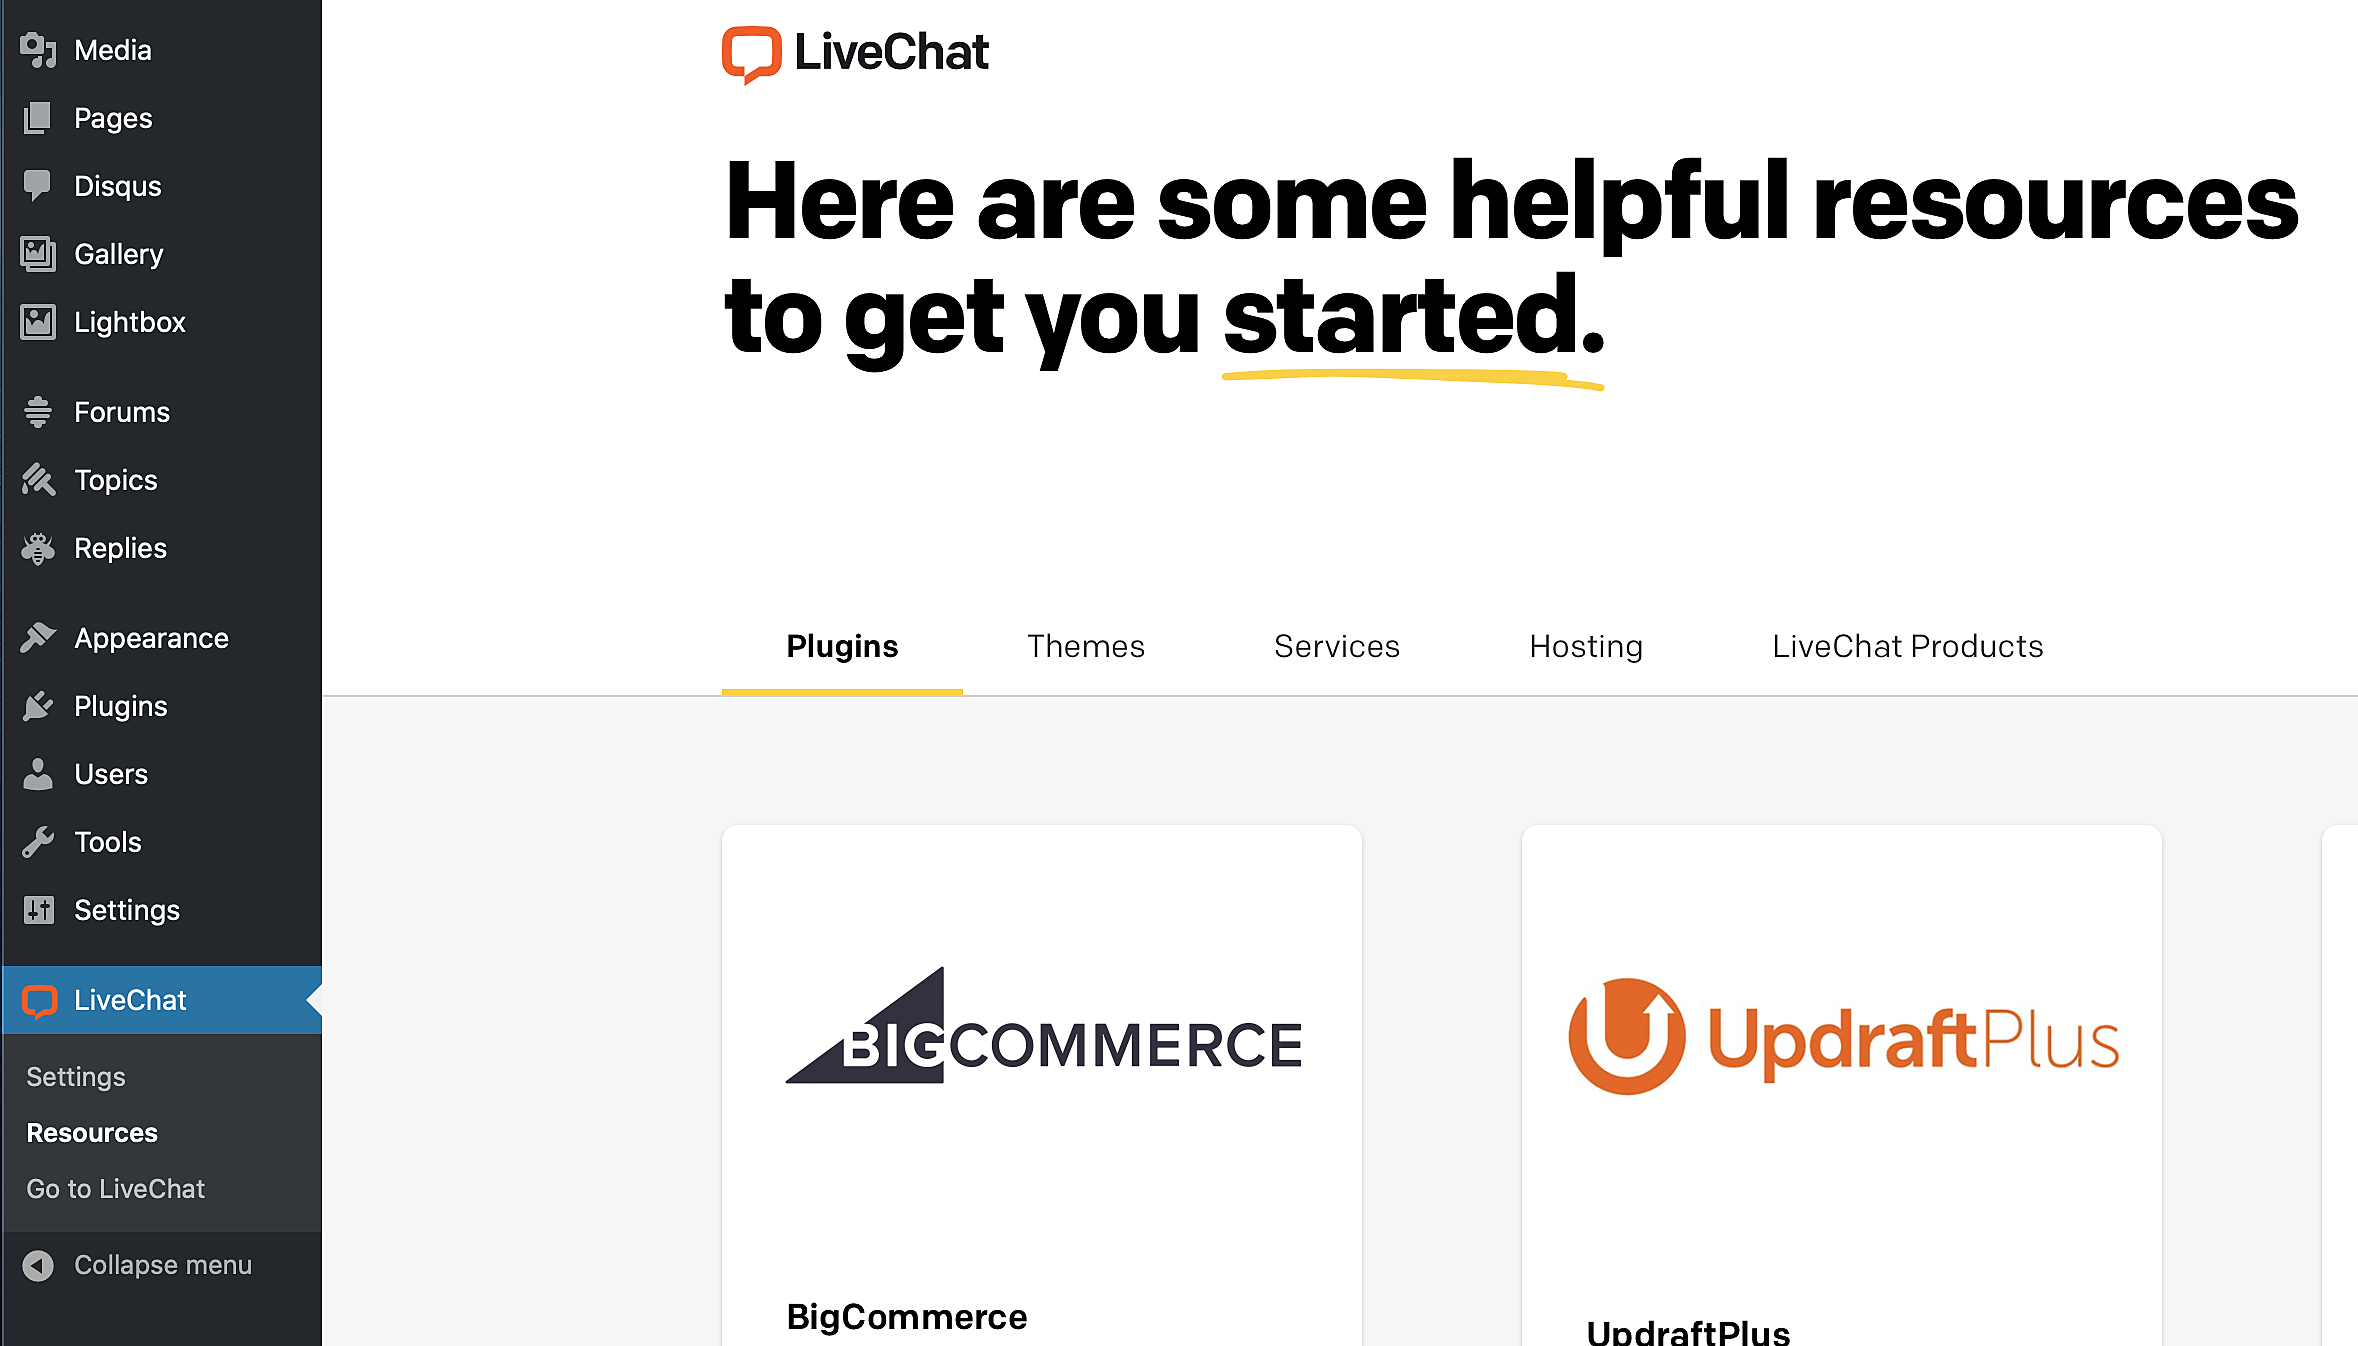
Get more out of the LiveChat integration
We prepared additional resources that help you make your website or online store even better.
You’ll find them in the WordPress admin panel under LiveChat > Resources.
Troubleshooting
This section contains answers to the most frequently asked questions and solutions to the most commonly reported issues and errors. Most of these issues are easily fixed or can even be avoided altogether.
The FAQ section addresses the questions and issues that our customers report to our Support Team on chat. The second part is devoted to error messages that appear in the LiveChat WordPress plugin along with explanations and solutions.
Is it possible to run both LiveChat plugins for WordPress and for WooCommerce at the same time?
Installing two LiveChat plugins, one for WordPress and one for WooCommecre will result in an error, and no plugin will work. Please uninstall one of the plugins, and the remaining one will work correctly. Make sure to uninstall the plugin completely rather than deactivating it because that will not help in this case.
Can I use LiveChat in a local environment?
Is it possible to make the LiveChat plugin work in a development environment? Yes, since September 2020 it’s possible to install our WordPress plugin in a local environment.
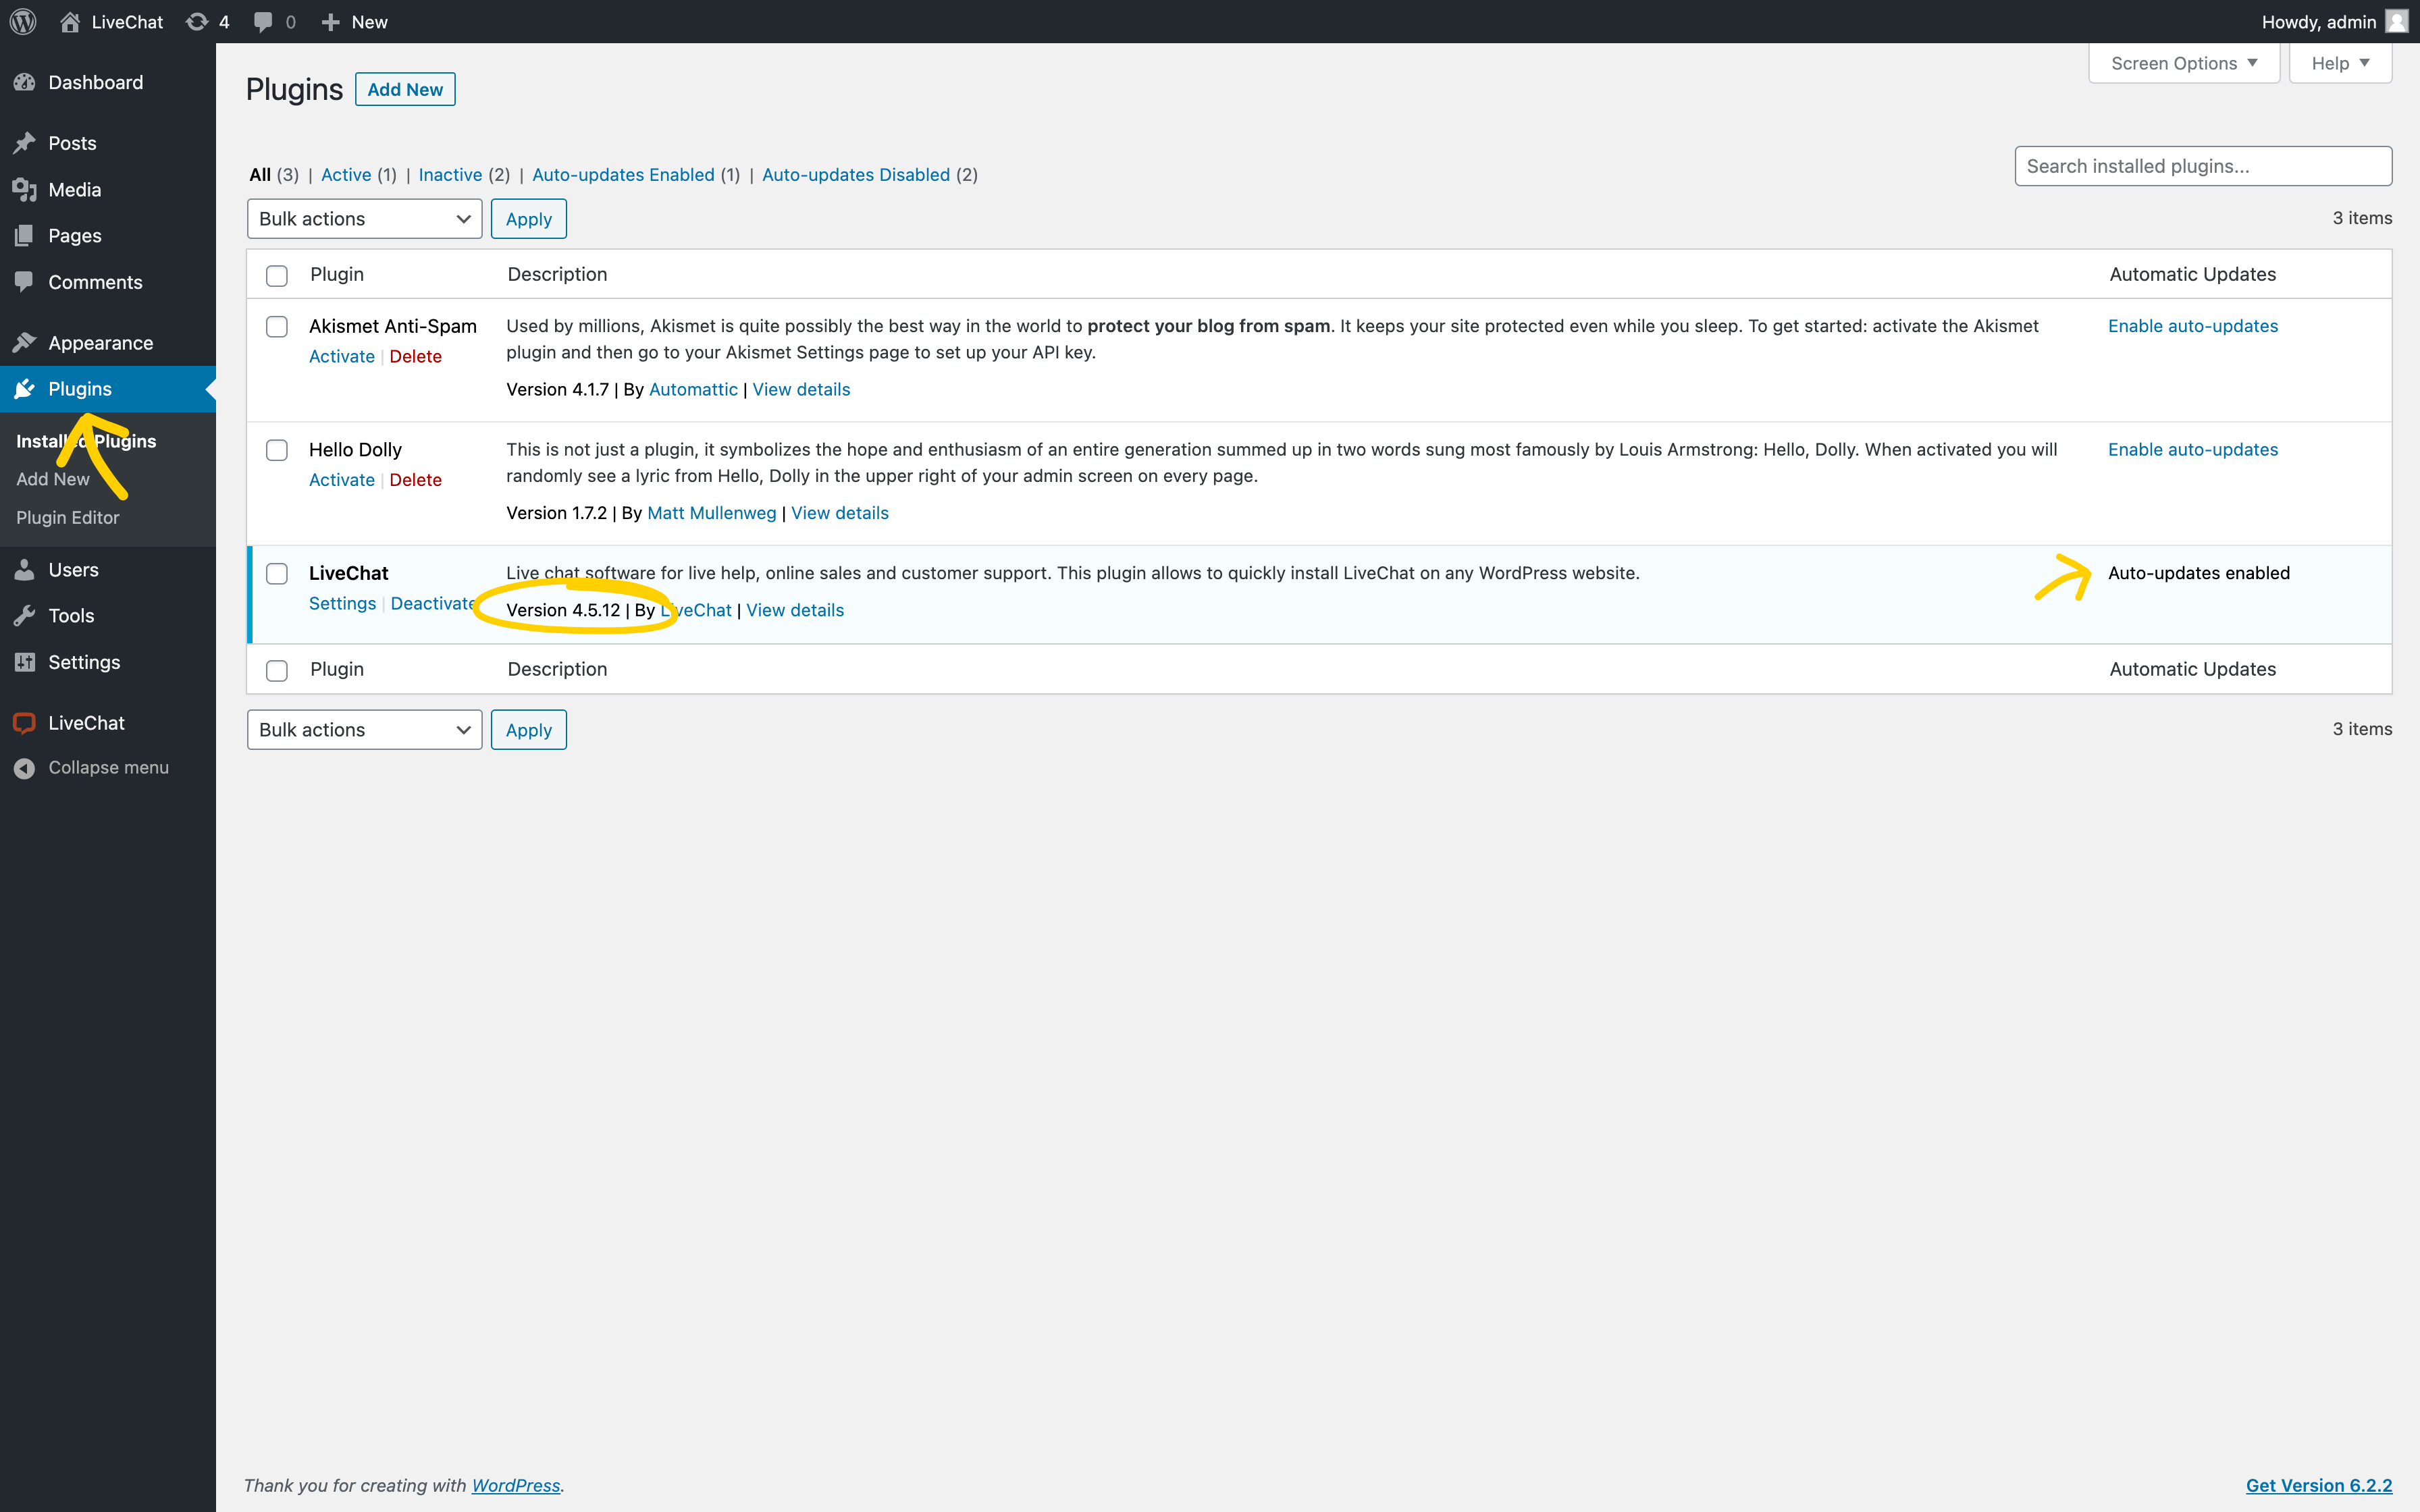
How can I ensure that my LiveChat plugin is always up to date?
It’s important to keep your WordPress plugins up to date, to ensure that all of the latest security changes and/or functional updates are applied to your LiveChat immediately. An auto-update feature has been introduced along with the release of WordPress 4.4.0 plugin version. So if the current version of the plugin you’re using is older than that, make sure to update to the latest version, and never worry about new updates again!
You can check your plugin version in the WordPress admin panel in the Plugins tab.
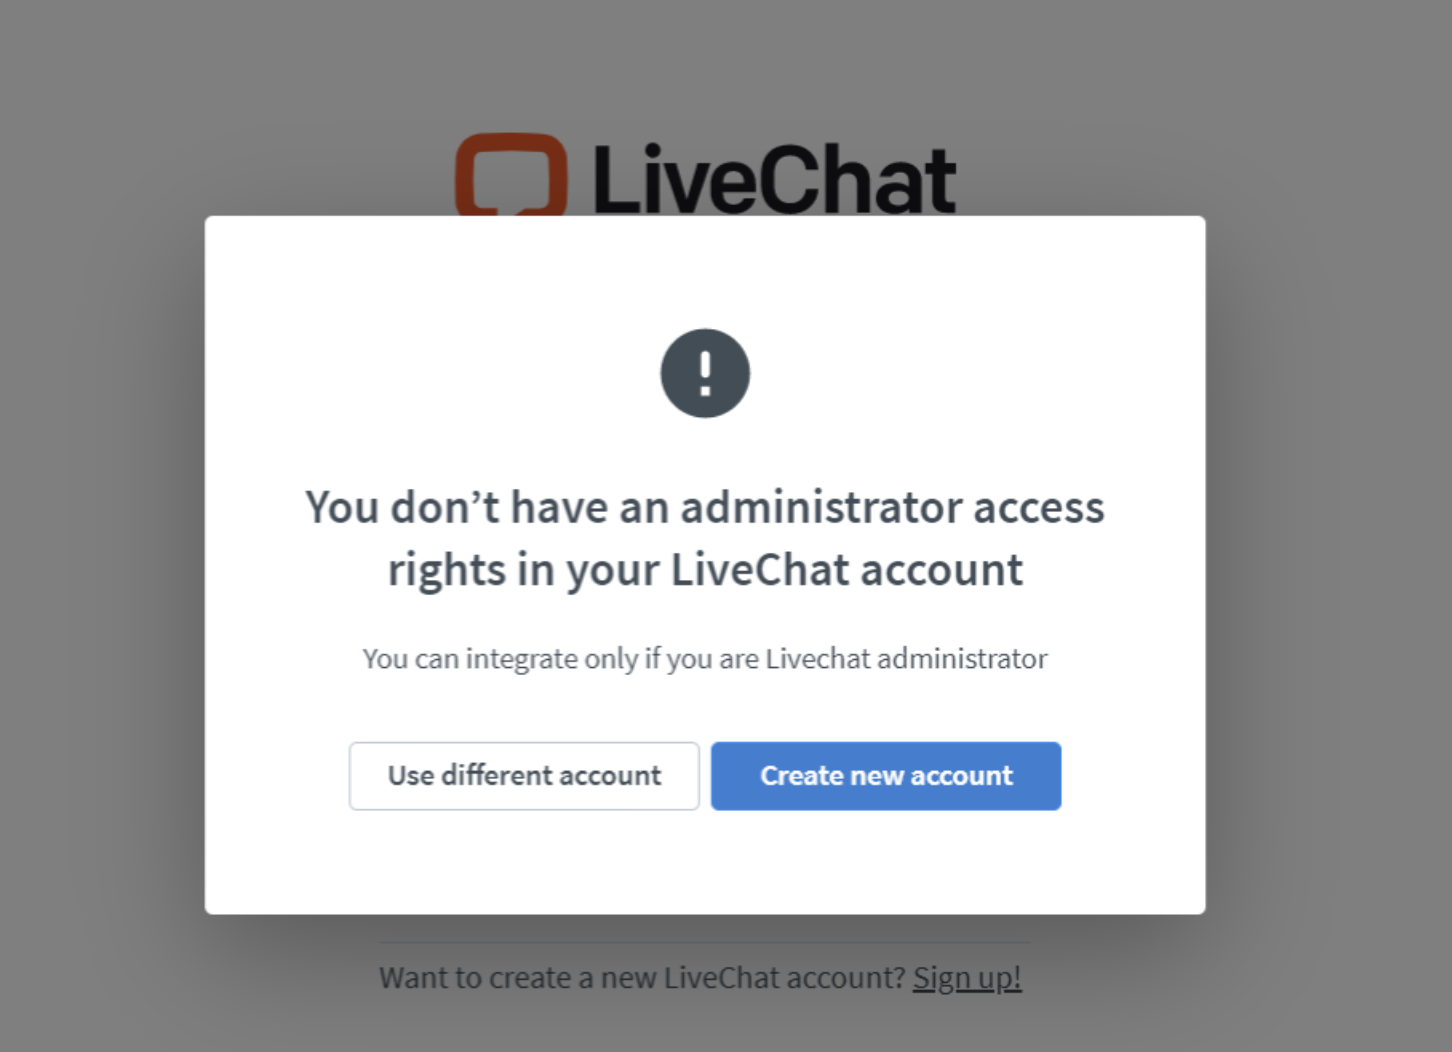
Why can’t I access LiveChat settings?
In order to install the LiveChat plugin on your WordPress site, you need admin permissions in WordPress and Owner or Admin permissions in LiveChat. If you have Agent permissions in LiveChat and you try to install the plugin or access its settings, you’ll encounter this error message:
Make sure to use an Owner or Admin account in LiveChat to perform these actions.
Is it possible to integrate Sales Tracker with the WordPress plugin?
At the moment, installing Sales Tracker on a WordPress site requires custom coding. Please see this article for instructions on how to add Sales Tracker code to a checkout page.
Error Messages
If you encounter an error in your LiveChat plugin dashboard in WordPress, it’s always a good idea to take the steps below before you contact our Support Team. Our Support Heroes will ask you to perform these actions in order to diagnose the issue when you start a chat with them, and you’ll most likely be able to resolve the issue yourself in the process.
Make sure you have only one plugin installed.
If that is the case, open your WordPress admin panel in a new incognito/private window in your browser. If there is no error in the incognito window, the error was most likely caused by cache. Clear your browser cache to get rid of the error.
To open a private/incognito window, press Ctrl+Shift+P or N, depending on the browser, for computers running on Windows OS and Cmd_Shift+P or N, depending on the browser, for computers running on Mac OS.
To open a private/incognito window, press Ctrl+Shift+P or N, depending on the browser, for computers running on Windows OS and Cmd_Shift+P or N, depending on the browser, for computers running on Mac OS.
If this does not solve the issue, please try a different browser just to be sure.
If none of the above solve the problem, check the list of common errors below.
When you contact our support, make sure to provide a screenshot of the view of the plugin in the WordPress admin panel, even when it’s just a blank page. It provides valuable information to our team.
Blank screen when accessing the WordPress plugin settings
If, after you install the LiveChat plugin, you see a blank page where plugin settings should be, please make sure that you have enabled third-party cookies.
Some sites simply don’t load unless you let them set cookies, and that applies to the LiveChat plugin settings page as well. Enable cookies to access the plugin settings. You can find instructions on how to enable cookies in most browsers here.
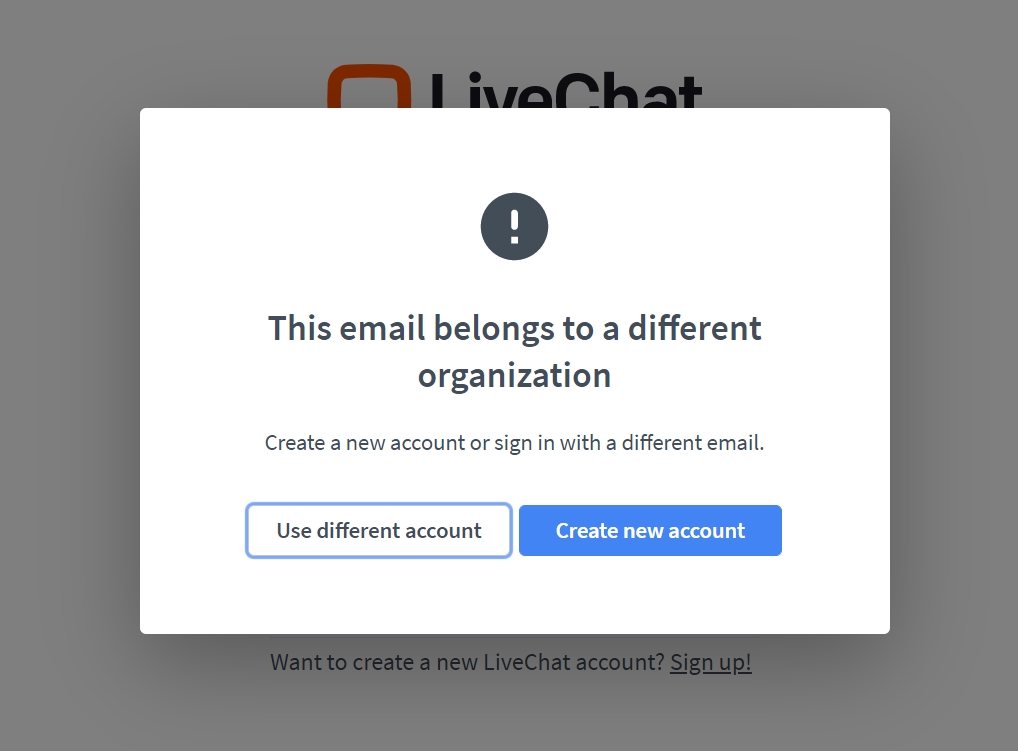
“This email belongs to a different organization”
If you encounter this error, it means that you’re trying to connect to LiveChat with a different license than the one already connected to your WordPress page.
Make sure that you’re using the login credentials connected with your company’s LiveChat account already connected with your WordPress account.
Missing chat widget
If you have installed the plugin and you can see the plugin settings in your WordPress admin panel, and the LiveChat chat widget still doesn’t appear on your website, please check the following:
At least one agent needs to be logged into the LiveChat agent app and be accepting chats for the chat widget to be available on your website. Make sure this is the case.
Please check your website in a new incognito/private window. Sometimes the page is cached and the changes are not immediately visible.
If the chat widget is not visible only on a specific page, please check if it’s not disabled with a URL rule. You can check it in the LiveChat agent app. Go to Settings>Chat settings>URL rules.
If none of the above helps, most likely, the issue is caused by cache. It could be the plugin cache, e.g., WP Rocket, server cache, e.g., OPcache, or ISP cache, e.g., Cloudflare. Please clear the cache, and check your page again.
Finally, make sure that the WordPress theme you’re using on your website supports wp_headers.
If none of the above solves the issue, start a chat with us.
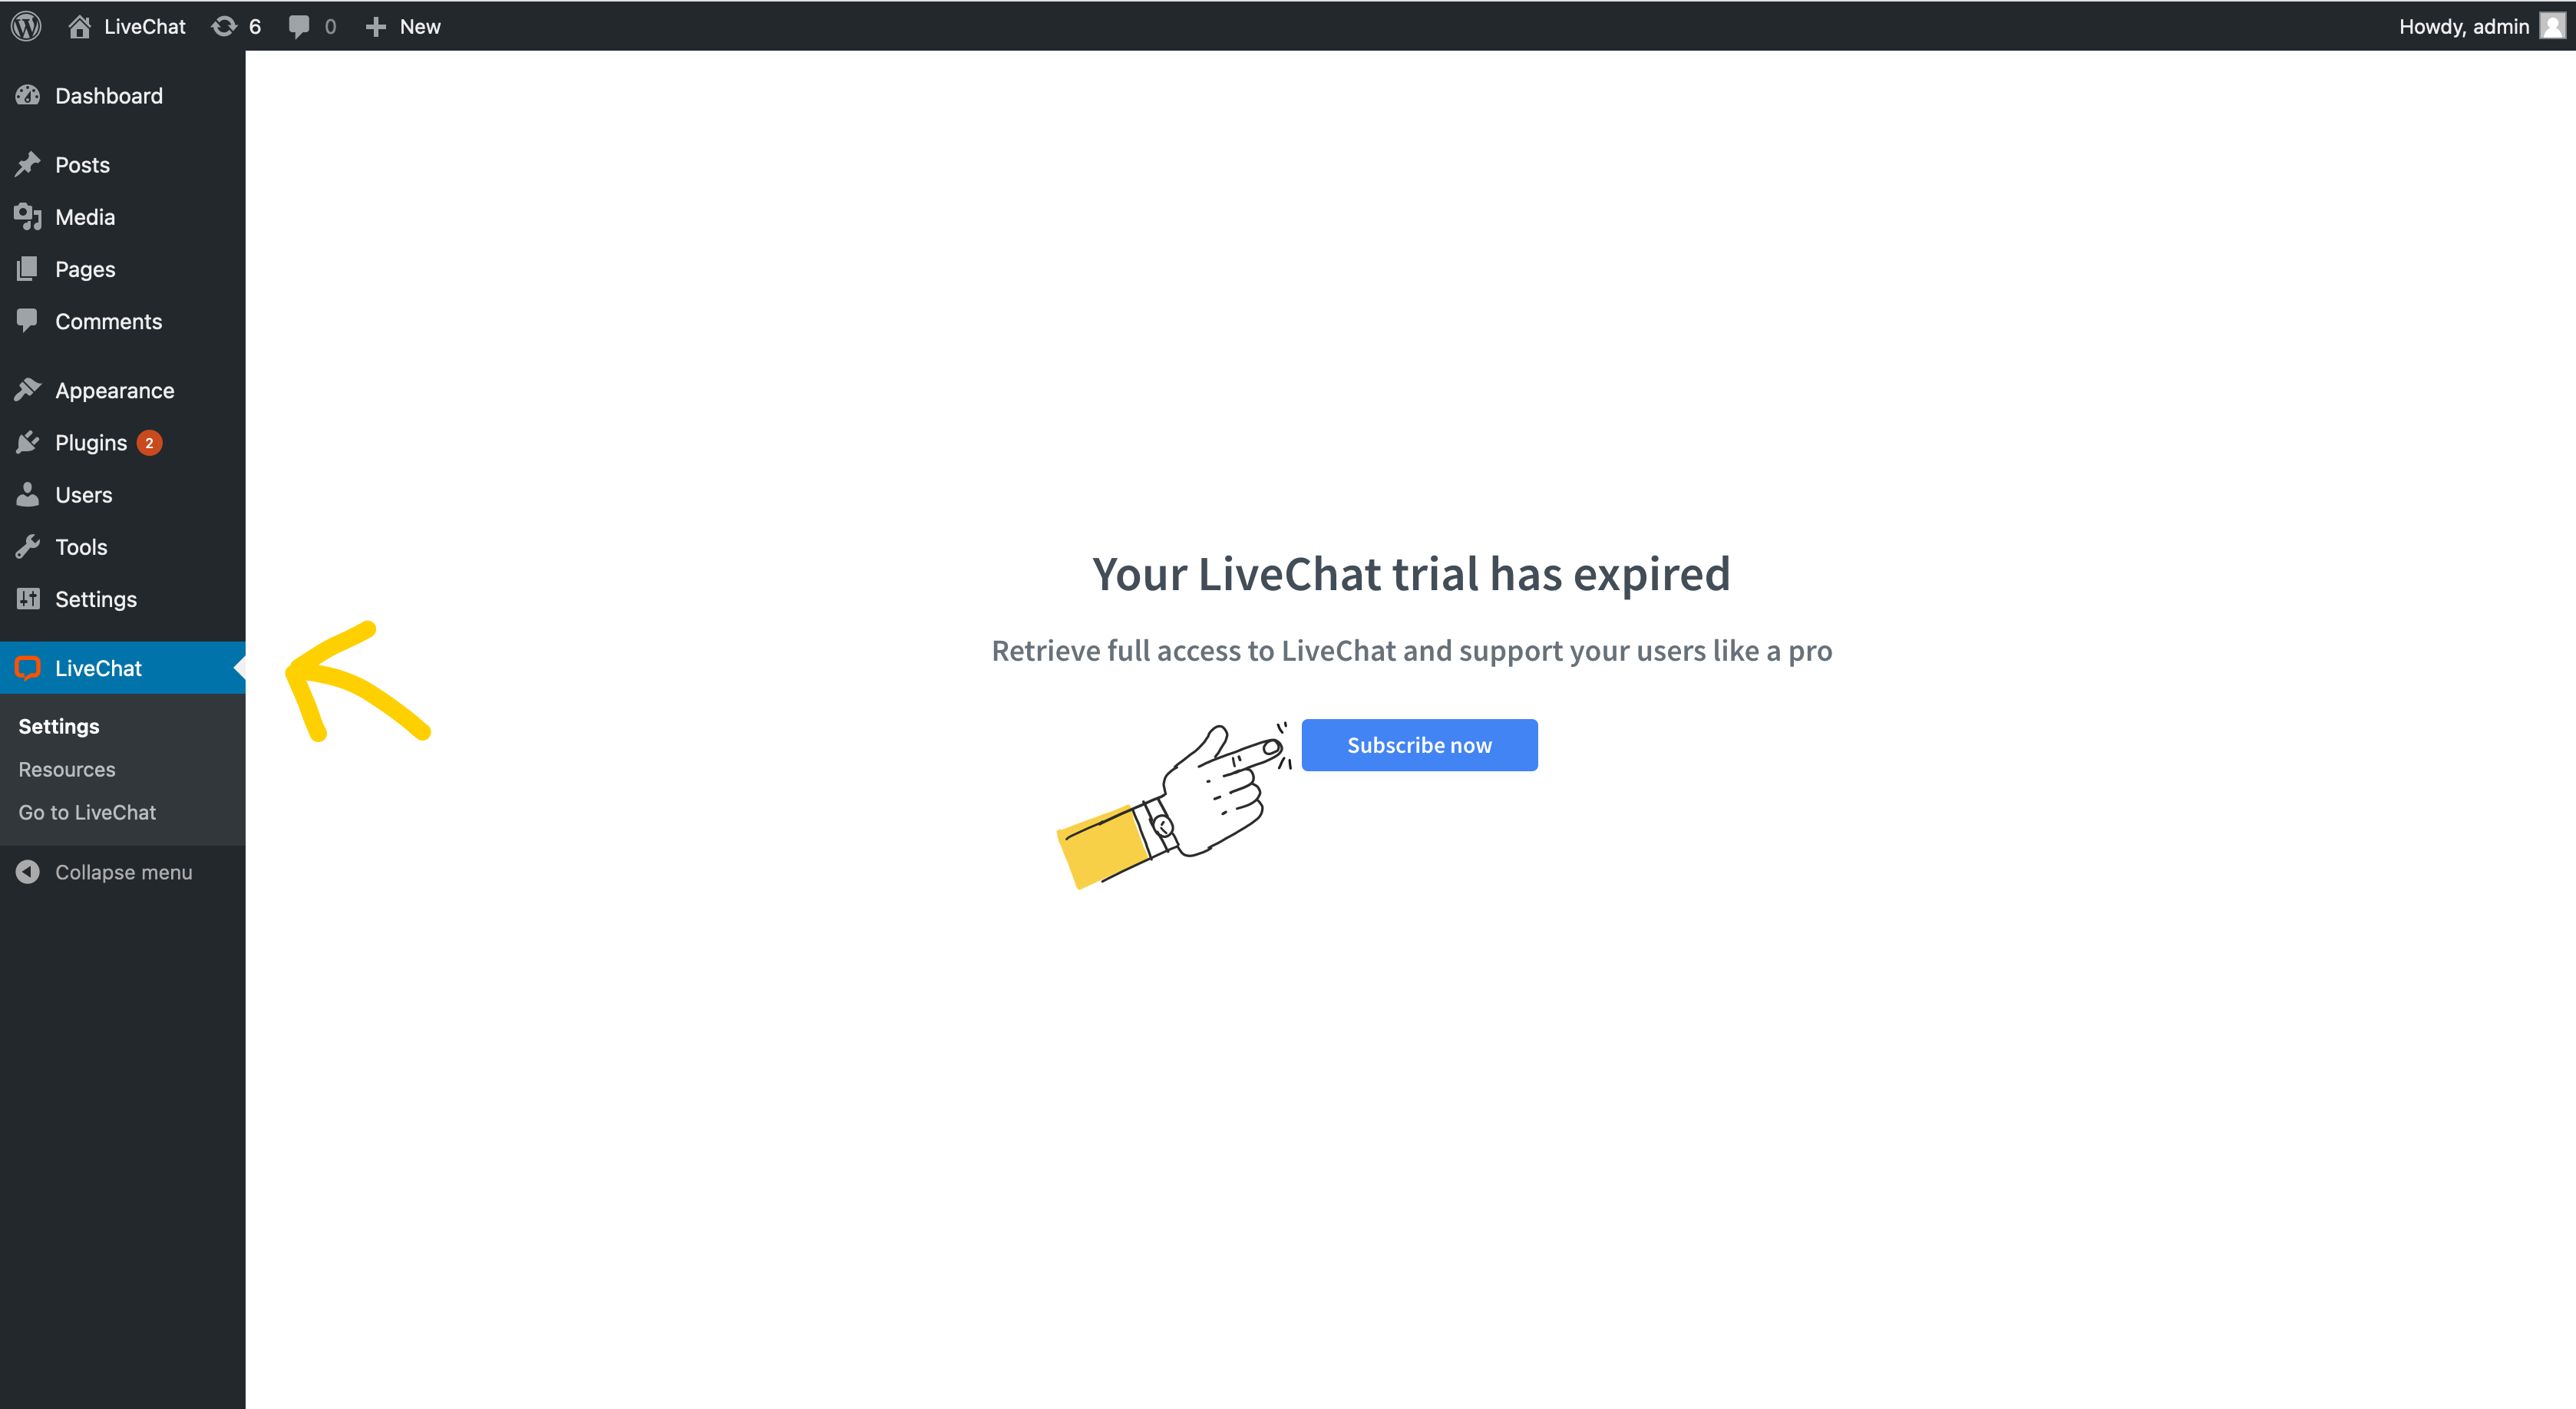
“Your LiveChat trial has expired”
It may happen that you’ll see this notice despite the fact that you’ve paid for your LiveChat subscription.
If you click on “Subscribe now”, you’ll be redirected to the login screen. After you log in, you’ll encounter the above screen again. This is due to cache on our side. The settings will be available in up to 60 minutes. Your LiveChat chat widget is still available on your website, and you can log in to the LiveChat agent app to handle chats.
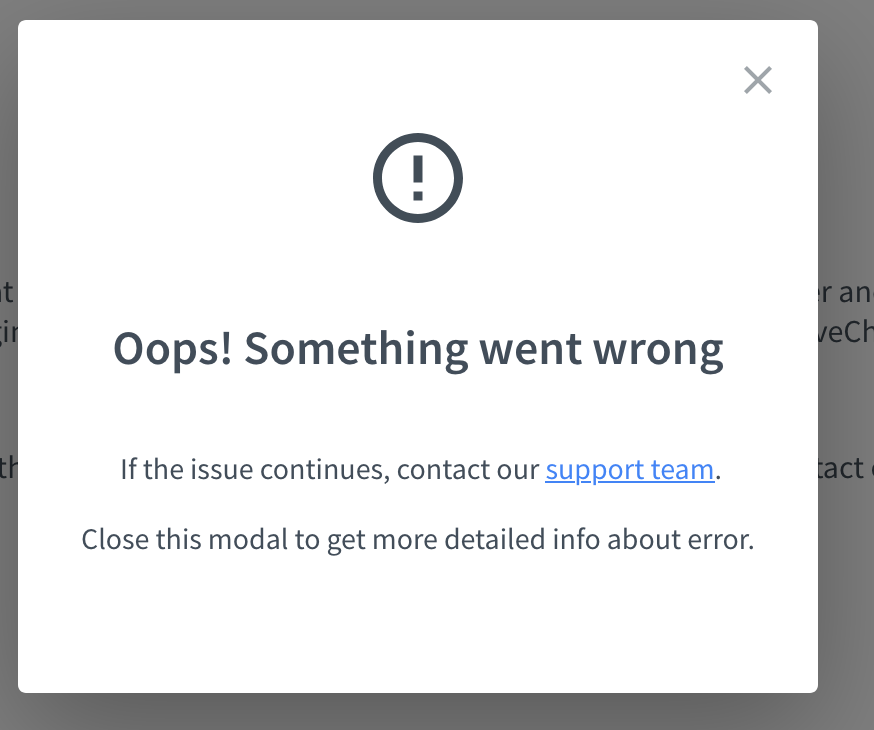
“Oops, something went wrong”
If you’re getting an “Oops, something went wrong” error in the LiveChat plugin settings, please take the following steps:
Make sure that you have only one plugin installed.
If that’s the case, please open your WordPress admin panel in a new incognito/private window.
To open a private/incognito window, press Ctrl+Shift+P or N, depending on the browser, for computers running on Windows OS and Cmd_Shift+P or N, depending on the browser, for computers running on Mac OS.
To open a private/incognito window, press Ctrl+Shift+P or N, depending on the browser, for computers running on Windows OS and Cmd_Shift+P or N, depending on the browser, for computers running on Mac OS.
If the same issue occurs in a new incognito/private window, uninstall the plugin, open a fresh incognito/private window, and install the plugin again.
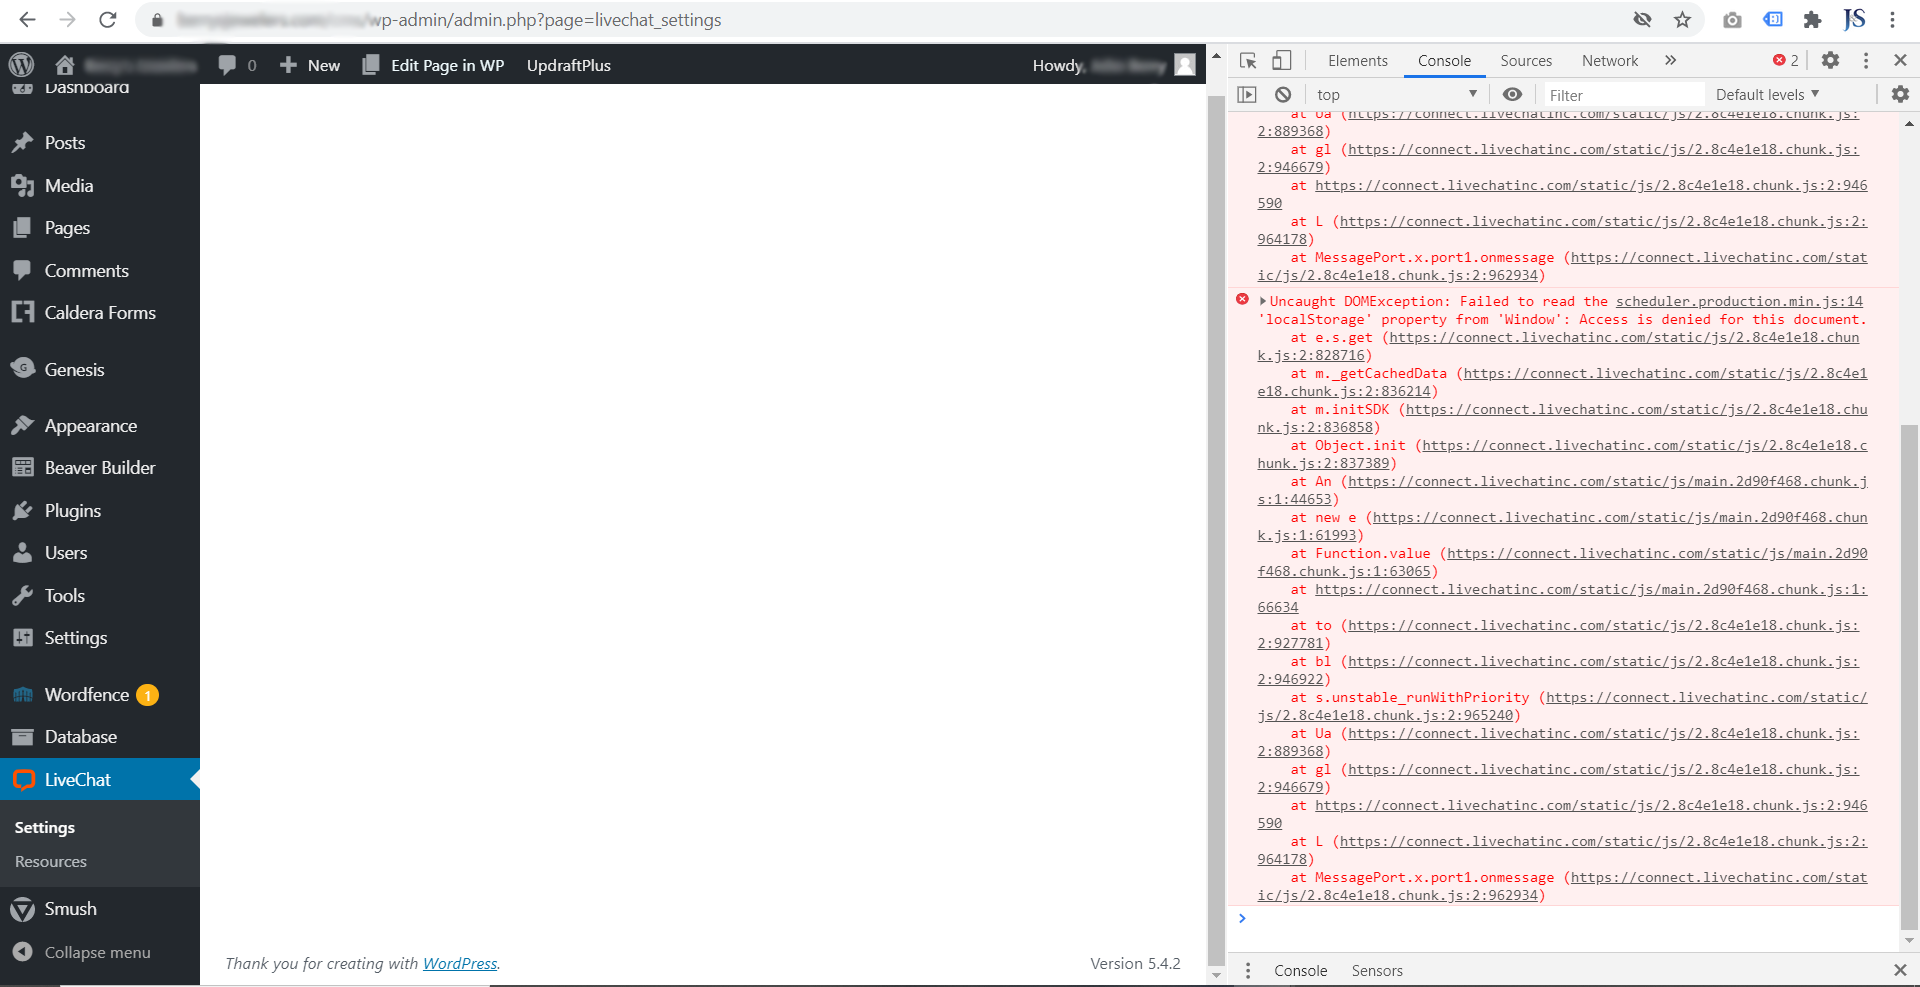
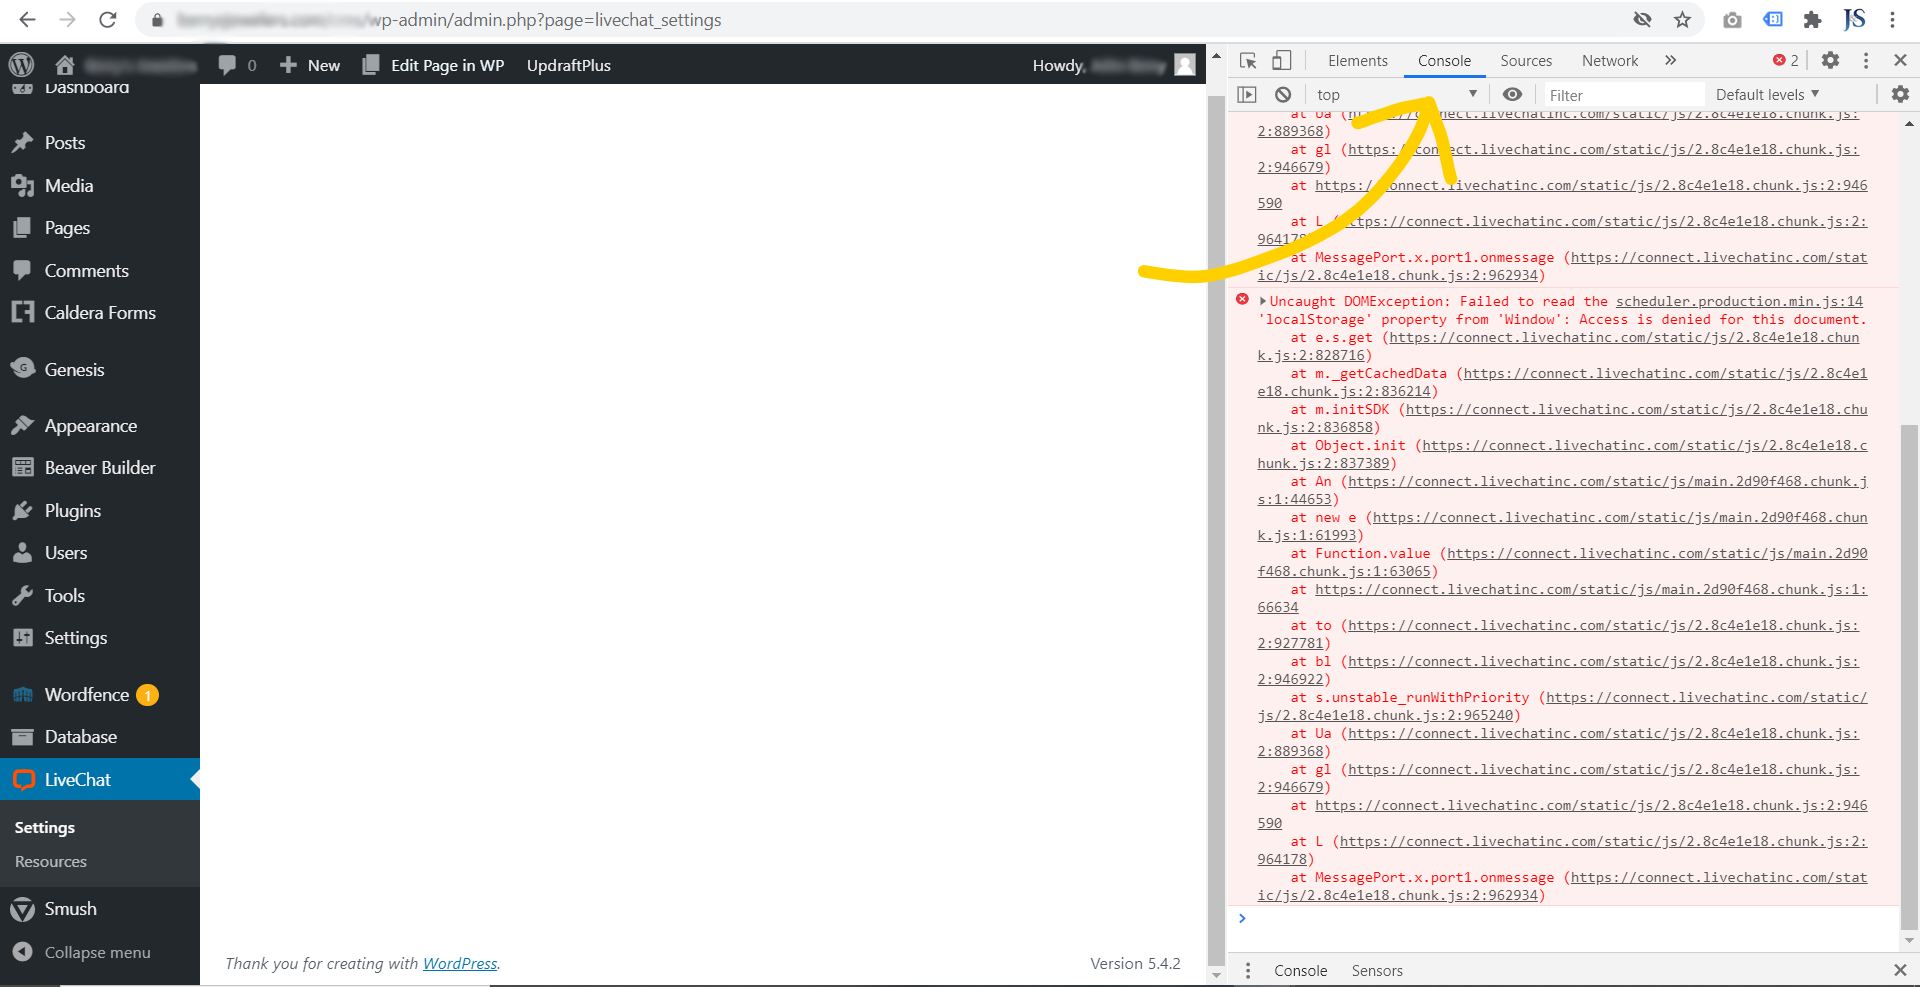
If the issue persists, contact our Support Team. They’ll need a screenshot of the JavaScript console to investigate the issue further.
You can find information on how to access the console on most browsers here.
If at any point you get stuck or you encounter any other error, don’t hesitate to start a chat with us.
RELATED ARTICLES
1&1: adding LiveChat to your page
Add to your 1&1 page LiveChat integration and get immediate access to your visitors and their needs. Use it to turn them into customers more effectively.